Functions settings
Function settings targets provide configuration interfaces for Shopify Functions within the Shopify admin. These extensions allow merchants to configure function behavior through forms and input fields, storing configuration data as metafields that your function can read at runtime.
Functions settings extensions use the function settings component, which integrates with the native save bar to handle form submission and reset actions. Configuration values are stored as metafields on the function's parent resource (discount, order routing rule, or validation).
Anchor to Use casesUse cases
- Discount configuration: Create custom interfaces for merchants to configure discount functions, such as setting percentage thresholds, quantity requirements, or product selection rules for complex discount logic.
- Order routing rules: Build configuration forms for order routing functions that help merchants define location priority, capacity constraints, fulfillment preferences, or custom routing criteria.
- Checkout validation: Design validation rule configuration interfaces for checkout validation functions that let merchants set validation thresholds, define blocking versus warning rules, customize error messages, or configure validation logic for cart and checkout operations.
- Dynamic function behavior: Store configuration values as metafields that your function reads at runtime, enabling merchants to adjust function behavior without code changes or redeployment.
- Multi-field configuration: Build forms with multiple input types (text, numbers, toggles, selections) to capture complex configuration requirements for sophisticated function logic.
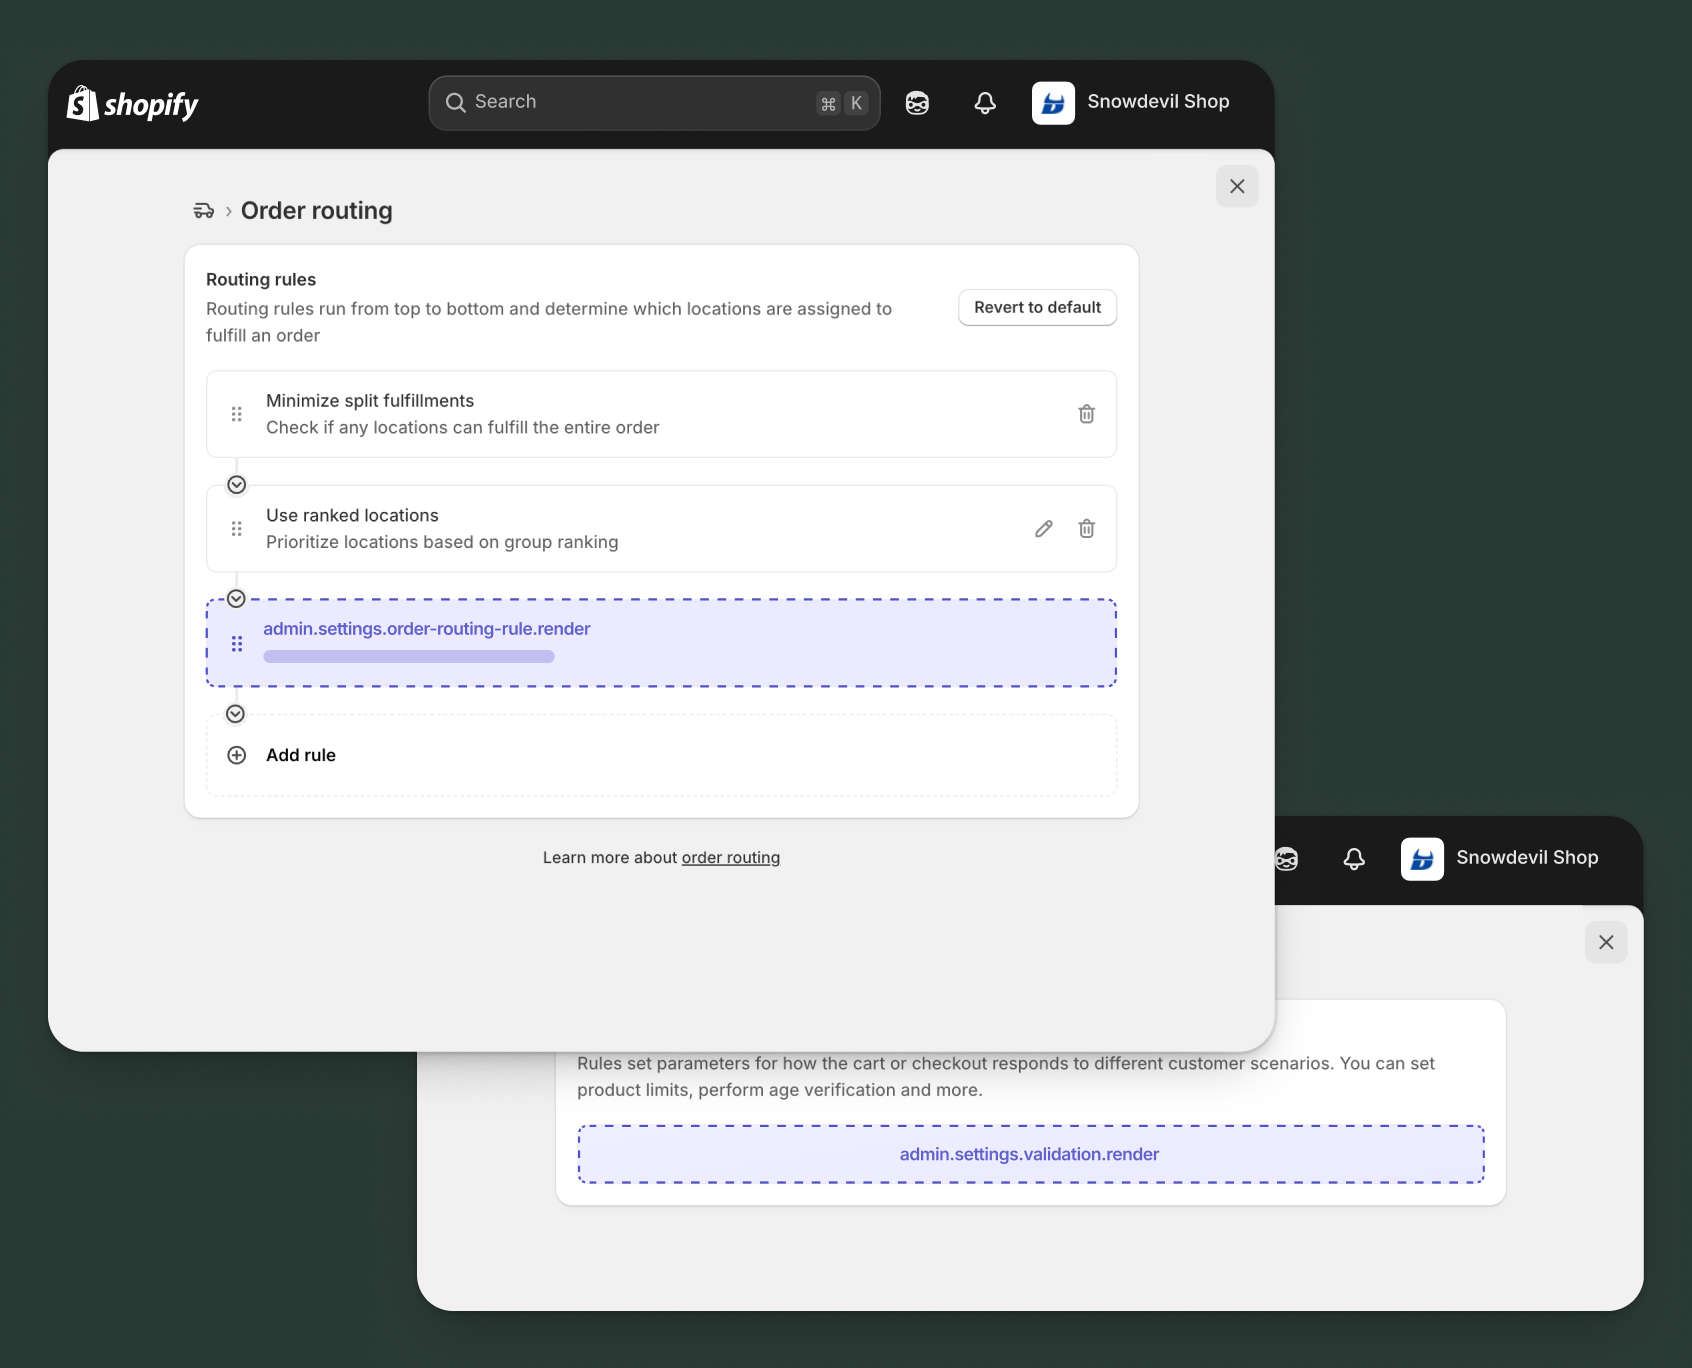
Anchor to Discount details function settings ,[object Object]Discount details function settings target
admin.discount-details.function-settings.render
Renders a function settings extension for discount functions within the discount details page. Use this target to create configuration interfaces that let merchants customize discount behavior, such as setting percentage limits, quantity requirements, customer eligibility rules, or product selection criteria.
Extensions at this target can access the discount ID and existing metafields through the Discount Function Settings API. The extension must use the function settings component as its root element. Configuration values are saved as metafields on the discount, which your function can read when processing discount calculations.
Supported components
- Avatar
- Badge
- Banner
- Box
- Button
- Button group
- Checkbox
- Chip
- Choice list
- Clickable
- Clickable chip
- Color field
- Color picker
- Date field
- Date picker
- Divider
- Drop zone
- Email field
- Form
- Function settings
- Grid
- Heading
- Icon
- Image
- Link
- Menu
- Money field
- Number field
- Ordered list
- Paragraph
- Password field
- Query container
- Search field
- Section
- Select
- Spinner
- Stack
- Switch
- Table
- Text
- Text area
- Text field
- Thumbnail
- Tooltip
- Url field
- Unordered list
Available APIs
Supported components
- Avatar
- Badge
- Banner
- Box
- Button
- Button group
- Checkbox
- Chip
- Choice list
- Clickable
- Clickable chip
- Color field
- Color picker
- Date field
- Date picker
- Divider
- Drop zone
- Email field
- Form
- Function settings
- Grid
- Heading
- Icon
- Image
- Link
- Menu
- Money field
- Number field
- Ordered list
- Paragraph
- Password field
- Query container
- Search field
- Section
- Select
- Spinner
- Stack
- Switch
- Table
- Text
- Text area
- Text field
- Thumbnail
- Tooltip
- Url field
- Unordered list
Available APIs
jsx
Examples
Description
Create a configuration interface for a discount function that applies percentage-based discounts with configurable limits. This example demonstrates how to store configuration as metafields and handle form submission.
jsx
import {render} from 'preact';
import {useState} from 'preact/hooks';

export default async () => {
  render(<Extension />, document.body);
};

function Extension() {
  const [percentage, setPercentage] = useState(
    shopify.data.metafields[0]?.value || '10'
  );
  const [maxAmount, setMaxAmount] = useState(
    shopify.data.metafields[1]?.value || '100'
  );

  async function handleSubmit() {
    // Save percentage configuration
    await shopify.applyMetafieldChange({
      type: 'updateMetafield',
      namespace: '$app:discount-config',
      key: 'percentage',
      value: percentage,
      valueType: 'number_decimal',
    });

    // Save max amount configuration
    await shopify.applyMetafieldChange({
      type: 'updateMetafield',
      namespace: '$app:discount-config',
      key: 'max-amount',
      value: maxAmount,
      valueType: 'money',
    });
  }

  function handleReset() {
    setPercentage(shopify.data.metafields[0]?.value || '10');
    setMaxAmount(shopify.data.metafields[1]?.value || '100');
  }

  return (
    <s-function-settings
      onSubmit={(e) => e.waitUntil(handleSubmit())}
      onReset={handleReset}
    >
      <s-stack gap="base">
        <s-banner tone="info">
          Configure the discount percentage and maximum discount amount. These
          settings will be applied when your function runs.
        </s-banner>

        <s-number-field
          step={1}
          min={1}
          max={100}
          suffix="%"
          label="Discount percentage"
          details="The percentage discount to apply to eligible items"
          name="percentage"
          value={percentage}
          onChange={(event) => setPercentage(event.currentTarget.value)}
        />

        <s-number-field
          step={0.01}
          min={0}
          prefix="$"
          label="Maximum discount amount"
          details="The maximum total discount amount per order"
          name="maxAmount"
          value={maxAmount}
          onChange={(event) => setMaxAmount(event.currentTarget.value)}
        />

        <s-text color="subdued">
          Your function will read these configuration values when calculating
          discounts.
        </s-text>
      </s-stack>
    </s-function-settings>
  );
}
Description
Build a configuration interface for a discount function that applies tiered discounts based on quantity. This example shows how to create a more complex configuration with multiple tiers.
jsx
import {render} from 'preact';
import {useState} from 'preact/hooks';

export default async () => {
  render(<Extension />, document.body);
};

function Extension() {
  // Parse existing tier configuration from metafields
  const existingConfig = shopify.data.metafields[0]?.value
    ? JSON.parse(shopify.data.metafields[0].value)
    : {tier1: 5, tier2: 10, tier3: 15, minQty1: 3, minQty2: 6, minQty3: 10};

  const [tier1Discount, setTier1Discount] = useState(existingConfig.tier1);
  const [tier2Discount, setTier2Discount] = useState(existingConfig.tier2);
  const [tier3Discount, setTier3Discount] = useState(existingConfig.tier3);
  const [tier1MinQty, setTier1MinQty] = useState(existingConfig.minQty1);
  const [tier2MinQty, setTier2MinQty] = useState(existingConfig.minQty2);
  const [tier3MinQty, setTier3MinQty] = useState(existingConfig.minQty3);
  const [applyToWholeOrder, setApplyToWholeOrder] = useState(
    existingConfig.applyToWholeOrder || false
  );

  async function handleSubmit() {
    const configuration = {
      tier1: parseFloat(tier1Discount),
      tier2: parseFloat(tier2Discount),
      tier3: parseFloat(tier3Discount),
      minQty1: parseInt(tier1MinQty),
      minQty2: parseInt(tier2MinQty),
      minQty3: parseInt(tier3MinQty),
      applyToWholeOrder,
    };

    await shopify.applyMetafieldChange({
      type: 'updateMetafield',
      namespace: '$app:tiered-discount',
      key: 'configuration',
      value: JSON.stringify(configuration),
      valueType: 'json',
    });
  }

  function handleReset() {
    setTier1Discount(existingConfig.tier1);
    setTier2Discount(existingConfig.tier2);
    setTier3Discount(existingConfig.tier3);
    setTier1MinQty(existingConfig.minQty1);
    setTier2MinQty(existingConfig.minQty2);
    setTier3MinQty(existingConfig.minQty3);
    setApplyToWholeOrder(existingConfig.applyToWholeOrder || false);
  }

  return (
    <s-function-settings
      onSubmit={(e) => e.waitUntil(handleSubmit())}
      onReset={handleReset}
    >
      <s-stack gap="large">
        <s-banner tone="info">
          Set up quantity-based discount tiers. Higher quantities unlock larger
          discounts.
        </s-banner>

        <s-section heading="Tier 1 - Starter discount">
          <s-stack gap="base">
            <s-number-field
              label="Minimum quantity"
              value={tier1MinQty}
              onChange={(e) => setTier1MinQty(e.currentTarget.value)}
              min={1}
              step={1}
            />
            <s-number-field
              label="Discount percentage"
              value={tier1Discount}
              onChange={(e) => setTier1Discount(e.currentTarget.value)}
              min={0}
              max={100}
              step={1}
              suffix="%"
            />
          </s-stack>
        </s-section>

        <s-section heading="Tier 2 - Better discount">
          <s-stack gap="base">
            <s-number-field
              label="Minimum quantity"
              value={tier2MinQty}
              onChange={(e) => setTier2MinQty(e.currentTarget.value)}
              min={1}
              step={1}
            />
            <s-number-field
              label="Discount percentage"
              value={tier2Discount}
              onChange={(e) => setTier2Discount(e.currentTarget.value)}
              min={0}
              max={100}
              step={1}
              suffix="%"
            />
          </s-stack>
        </s-section>

        <s-section heading="Tier 3 - Best discount">
          <s-stack gap="base">
            <s-number-field
              label="Minimum quantity"
              value={tier3MinQty}
              onChange={(e) => setTier3MinQty(e.currentTarget.value)}
              min={1}
              step={1}
            />
            <s-number-field
              label="Discount percentage"
              value={tier3Discount}
              onChange={(e) => setTier3Discount(e.currentTarget.value)}
              min={0}
              max={100}
              step={1}
              suffix="%"
            />
          </s-stack>
        </s-section>

        <s-divider />

        <s-checkbox
          label="Apply discount to entire order when threshold is met"
          checked={applyToWholeOrder}
          onChange={(e) => setApplyToWholeOrder(e.currentTarget.checked)}
        />

        <s-text color="subdued">
          Customers will see the highest tier they qualify for based on their
          cart quantity.
        </s-text>
      </s-stack>
    </s-function-settings>
  );
}
Anchor to Order routing rule function settings ,[object Object]Order routing rule function settings target
admin.settings.order-routing-rule.render
Renders a function settings extension for order routing functions within the order routing settings page. Use this target to create configuration interfaces that let merchants customize order routing behavior, such as setting location priorities, capacity constraints, distance thresholds, or custom routing criteria.
Extensions at this target can access the routing rule details through the Order Routing Rule API. The extension must use the function settings component as its root element. Configuration values are saved as metafields on the order routing rule, which your function can read when determining order routing.
Supported components
- Avatar
- Badge
- Banner
- Box
- Button
- Button group
- Checkbox
- Chip
- Choice list
- Clickable
- Clickable chip
- Color field
- Color picker
- Date field
- Date picker
- Divider
- Drop zone
- Email field
- Form
- Function settings
- Grid
- Heading
- Icon
- Image
- Link
- Menu
- Money field
- Number field
- Ordered list
- Paragraph
- Password field
- Query container
- Search field
- Section
- Select
- Spinner
- Stack
- Switch
- Table
- Text
- Text area
- Text field
- Thumbnail
- Tooltip
- Url field
- Unordered list
Available APIs
Supported components
- Avatar
- Badge
- Banner
- Box
- Button
- Button group
- Checkbox
- Chip
- Choice list
- Clickable
- Clickable chip
- Color field
- Color picker
- Date field
- Date picker
- Divider
- Drop zone
- Email field
- Form
- Function settings
- Grid
- Heading
- Icon
- Image
- Link
- Menu
- Money field
- Number field
- Ordered list
- Paragraph
- Password field
- Query container
- Search field
- Section
- Select
- Spinner
- Stack
- Switch
- Table
- Text
- Text area
- Text field
- Thumbnail
- Tooltip
- Url field
- Unordered list
Available APIs
jsx
Examples
Description
Create a configuration interface for an order routing function that routes orders based on location priorities. This example demonstrates how to configure location-based routing rules.
jsx
import {render} from 'preact';
import {useState} from 'preact/hooks';

export default async () => {
  render(<Extension />, document.body);
};

function Extension() {
  const existingConfig = shopify.data.rule.metafields[0]?.value
    ? JSON.parse(shopify.data.rule.metafields[0].value)
    : {prioritizeNearestLocation: true, maxDistanceKm: 50};

  const [prioritizeNearest, setPrioritizeNearest] = useState(
    existingConfig.prioritizeNearestLocation
  );
  const [maxDistance, setMaxDistance] = useState(
    existingConfig.maxDistanceKm
  );
  const [considerInventory, setConsiderInventory] = useState(
    existingConfig.considerInventory || true
  );

  async function handleSubmit() {
    const configuration = {
      prioritizeNearestLocation: prioritizeNearest,
      maxDistanceKm: parseFloat(maxDistance),
      considerInventory,
    };

    await shopify.applyMetafieldsChange([{
      type: 'updateMetafield',
      namespace: '$app:routing-config',
      key: 'location-priority',
      value: JSON.stringify(configuration),
      valueType: 'json',
    }]);
  }

  function handleReset() {
    setPrioritizeNearest(existingConfig.prioritizeNearestLocation);
    setMaxDistance(existingConfig.maxDistanceKm);
    setConsiderInventory(existingConfig.considerInventory || true);
  }

  return (
    <s-function-settings
      onSubmit={(e) => e.waitUntil(handleSubmit())}
      onReset={handleReset}
    >
      <s-stack gap="large">
        <s-banner tone="info">
          Configure how orders are routed to fulfillment locations based on
          distance and inventory.
        </s-banner>

        <s-section heading="Routing rules">
          <s-text>Rule: {shopify.data.rule.label}</s-text>
          <s-text color="subdued">{shopify.data.rule.description}</s-text>
        </s-section>

        <s-section heading="Location selection">
          <s-stack gap="base">
            <s-checkbox
              label="Prioritize nearest fulfillment location"
              checked={prioritizeNearest}
              onChange={(e) => setPrioritizeNearest(e.currentTarget.checked)}
            />

            <s-number-field
              label="Maximum distance (km)"
              details="Orders beyond this distance won't be routed to the location"
              value={maxDistance}
              onChange={(e) => setMaxDistance(e.currentTarget.value)}
              min={1}
              step={1}
              suffix="km"
            />

            <s-checkbox
              label="Only route to locations with available inventory"
              checked={considerInventory}
              onChange={(e) => setConsiderInventory(e.currentTarget.checked)}
            />
          </s-stack>
        </s-section>

        <s-text color="subdued">
          Your routing function will use these rules to determine the optimal
          fulfillment location for each order.
        </s-text>
      </s-stack>
    </s-function-settings>
  );
}
Description
Build a configuration interface for an order routing function that considers location capacity and workload. This example shows how to configure capacity constraints for routing decisions.
jsx
import {render} from 'preact';
import {useState} from 'preact/hooks';

export default async () => {
  render(<Extension />, document.body);
};

function Extension() {
  const existingConfig = shopify.data.rule.metafields[0]?.value
    ? JSON.parse(shopify.data.rule.metafields[0].value)
    : {
        maxDailyOrders: 100,
        loadBalancing: 'round-robin',
        respectBusinessHours: true,
      };

  const [maxDailyOrders, setMaxDailyOrders] = useState(
    existingConfig.maxDailyOrders
  );
  const [loadBalancing, setLoadBalancing] = useState(
    existingConfig.loadBalancing
  );
  const [respectBusinessHours, setRespectBusinessHours] = useState(
    existingConfig.respectBusinessHours
  );
  const [priorityThreshold, setPriorityThreshold] = useState(
    existingConfig.priorityThreshold || 80
  );

  async function handleSubmit() {
    const configuration = {
      maxDailyOrders: parseInt(maxDailyOrders),
      loadBalancing,
      respectBusinessHours,
      priorityThreshold: parseInt(priorityThreshold),
    };

    await shopify.applyMetafieldsChange([{
      type: 'updateMetafield',
      namespace: '$app:routing-capacity',
      key: 'configuration',
      value: JSON.stringify(configuration),
      valueType: 'json',
    }]);
  }

  function handleReset() {
    setMaxDailyOrders(existingConfig.maxDailyOrders);
    setLoadBalancing(existingConfig.loadBalancing);
    setRespectBusinessHours(existingConfig.respectBusinessHours);
    setPriorityThreshold(existingConfig.priorityThreshold || 80);
  }

  return (
    <s-function-settings
      onSubmit={(e) => e.waitUntil(handleSubmit())}
      onReset={handleReset}
    >
      <s-stack gap="large">
        <s-banner tone="info">
          Configure capacity constraints and load balancing for order routing.
        </s-banner>

        <s-section heading="Capacity limits">
          <s-stack gap="base">
            <s-number-field
              label="Maximum daily orders per location"
              details="Prevent locations from being overwhelmed with too many orders"
              value={maxDailyOrders}
              onChange={(e) => setMaxDailyOrders(e.currentTarget.value)}
              min={1}
              step={1}
            />

            <s-number-field
              label="Capacity threshold (%)"
              details="Start routing to other locations when capacity exceeds this threshold"
              value={priorityThreshold}
              onChange={(e) => setPriorityThreshold(e.currentTarget.value)}
              min={0}
              max={100}
              step={5}
              suffix="%"
            />
          </s-stack>
        </s-section>

        <s-section heading="Load balancing strategy">
          <s-stack gap="base">
            <s-select
              label="Load balancing method"
              value={loadBalancing}
              onChange={(e) => setLoadBalancing(e.currentTarget.value)}
            >
              <option value="round-robin">Round robin</option>
              <option value="least-loaded">Least loaded first</option>
              <option value="weighted">Weighted by capacity</option>
            </s-select>

            <s-checkbox
              label="Only route to locations during their business hours"
              checked={respectBusinessHours}
              onChange={(e) => setRespectBusinessHours(e.currentTarget.checked)}
            />
          </s-stack>
        </s-section>

        <s-text color="subdued">
          Orders will be distributed across locations based on these capacity
          and load balancing rules.
        </s-text>
      </s-stack>
    </s-function-settings>
  );
}
Anchor to Validation function settings ,[object Object]Validation function settings target
admin.settings.validation.render
Renders a function settings extension for checkout validation functions within the checkout rules settings page. Use this target to create configuration interfaces that let merchants customize checkout validation rules, such as setting minimum order values, quantity limits, product restrictions, or custom validation criteria.
Extensions at this target can access the validation details through the Validation Settings API. The extension must use the function settings component as its root element. Configuration values are saved as metafields on the validation, which your function can read when validating cart and checkout operations.
Supported components
- Avatar
- Badge
- Banner
- Box
- Button
- Button group
- Checkbox
- Chip
- Choice list
- Clickable
- Clickable chip
- Color field
- Color picker
- Date field
- Date picker
- Divider
- Drop zone
- Email field
- Form
- Function settings
- Grid
- Heading
- Icon
- Image
- Link
- Menu
- Money field
- Number field
- Ordered list
- Paragraph
- Password field
- Query container
- Search field
- Section
- Select
- Spinner
- Stack
- Switch
- Table
- Text
- Text area
- Text field
- Thumbnail
- Tooltip
- Url field
- Unordered list
Available APIs
Supported components
- Avatar
- Badge
- Banner
- Box
- Button
- Button group
- Checkbox
- Chip
- Choice list
- Clickable
- Clickable chip
- Color field
- Color picker
- Date field
- Date picker
- Divider
- Drop zone
- Email field
- Form
- Function settings
- Grid
- Heading
- Icon
- Image
- Link
- Menu
- Money field
- Number field
- Ordered list
- Paragraph
- Password field
- Query container
- Search field
- Section
- Select
- Spinner
- Stack
- Switch
- Table
- Text
- Text area
- Text field
- Thumbnail
- Tooltip
- Url field
- Unordered list
Available APIs
jsx
Examples
Description
Create a configuration interface for a validation function that enforces minimum order values. This example demonstrates how to configure validation rules with customizable error messages.
jsx
import {render} from 'preact';
import {useState} from 'preact/hooks';

export default async () => {
  render(<Extension />, document.body);
};

function Extension() {
  const existingConfig = shopify.data.validation?.metafields[0]?.value
    ? JSON.parse(shopify.data.validation.metafields[0].value)
    : {minOrderValue: 50, errorMessage: 'Minimum order value not met'};

  const [minOrderValue, setMinOrderValue] = useState(
    existingConfig.minOrderValue
  );
  const [errorMessage, setErrorMessage] = useState(
    existingConfig.errorMessage
  );
  const [blockCheckout, setBlockCheckout] = useState(
    existingConfig.blockCheckout !== false
  );

  async function handleSubmit() {
    const configuration = {
      minOrderValue: parseFloat(minOrderValue),
      errorMessage,
      blockCheckout,
    };

    await shopify.applyMetafieldChange({
      type: 'updateMetafield',
      namespace: '$app:validation-config',
      key: 'min-order-value',
      value: JSON.stringify(configuration),
      valueType: 'json',
    });
  }

  function handleReset() {
    setMinOrderValue(existingConfig.minOrderValue);
    setErrorMessage(existingConfig.errorMessage);
    setBlockCheckout(existingConfig.blockCheckout !== false);
  }

  return (
    <s-function-settings
      onSubmit={(e) => e.waitUntil(handleSubmit())}
      onReset={handleReset}
    >
      <s-stack gap="large">
        <s-banner tone="info">
          Configure minimum order value requirements for checkout. Customers
          must meet this threshold to complete their purchase.
        </s-banner>

        <s-section heading="Validation rules">
          <s-stack gap="base">
            <s-number-field
              label="Minimum order value"
              details="The minimum subtotal required to proceed to checkout"
              value={minOrderValue}
              onChange={(e) => setMinOrderValue(e.currentTarget.value)}
              min={0}
              step={0.01}
              prefix="$"
            />

            <s-text-field
              label="Error message"
              details="The message shown to customers when they don't meet the minimum"
              value={errorMessage}
              onChange={(e) => setErrorMessage(e.currentTarget.value)}
              placeholder="Your order must be at least $50"
            />

            <s-checkbox
              label="Block checkout when validation fails"
              checked={blockCheckout}
              onChange={(e) => setBlockCheckout(e.currentTarget.checked)}
            />

            {!blockCheckout && (
              <s-banner tone="warning">
                When unchecked, customers will see a warning but can still
                proceed to checkout.
              </s-banner>
            )}
          </s-stack>
        </s-section>

        <s-text color="subdued">
          Your validation function will use these settings to validate orders
          during checkout.
        </s-text>
      </s-stack>
    </s-function-settings>
  );
}
Description
Build a configuration interface for a validation function that enforces product quantity limits. This example shows how to create validation rules with per-product and per-order limits.
jsx
import {render} from 'preact';
import {useState} from 'preact/hooks';

export default async () => {
  render(<Extension />, document.body);
};

function Extension() {
  const existingConfig = shopify.data.validation?.metafields[0]?.value
    ? JSON.parse(shopify.data.validation.metafields[0].value)
    : {
        maxQuantityPerProduct: 10,
        maxTotalQuantity: 50,
        applyToAllProducts: true,
        warningThreshold: 80,
      };

  const [maxPerProduct, setMaxPerProduct] = useState(
    existingConfig.maxQuantityPerProduct
  );
  const [maxTotal, setMaxTotal] = useState(existingConfig.maxTotalQuantity);
  const [applyToAll, setApplyToAll] = useState(
    existingConfig.applyToAllProducts
  );
  const [warningThreshold, setWarningThreshold] = useState(
    existingConfig.warningThreshold
  );
  const [customMessage, setCustomMessage] = useState(
    existingConfig.customMessage ||
      'Quantity limit exceeded. Please reduce your order quantity.'
  );

  async function handleSubmit() {
    const configuration = {
      maxQuantityPerProduct: parseInt(maxPerProduct),
      maxTotalQuantity: parseInt(maxTotal),
      applyToAllProducts: applyToAll,
      warningThreshold: parseInt(warningThreshold),
      customMessage,
    };

    await shopify.applyMetafieldChange({
      type: 'updateMetafield',
      namespace: '$app:quantity-validation',
      key: 'configuration',
      value: JSON.stringify(configuration),
      valueType: 'json',
    });
  }

  function handleReset() {
    setMaxPerProduct(existingConfig.maxQuantityPerProduct);
    setMaxTotal(existingConfig.maxTotalQuantity);
    setApplyToAll(existingConfig.applyToAllProducts);
    setWarningThreshold(existingConfig.warningThreshold);
    setCustomMessage(
      existingConfig.customMessage ||
        'Quantity limit exceeded. Please reduce your order quantity.'
    );
  }

  return (
    <s-function-settings
      onSubmit={(e) => e.waitUntil(handleSubmit())}
      onReset={handleReset}
    >
      <s-stack gap="large">
        <s-banner tone="info">
          Set quantity limits to prevent customers from ordering excessive
          amounts of products.
        </s-banner>

        <s-section heading="Quantity limits">
          <s-stack gap="base">
            <s-number-field
              label="Maximum quantity per product"
              details="The maximum quantity allowed for any single product"
              value={maxPerProduct}
              onChange={(e) => setMaxPerProduct(e.currentTarget.value)}
              min={1}
              step={1}
            />

            <s-number-field
              label="Maximum total quantity per order"
              details="The maximum combined quantity across all products"
              value={maxTotal}
              onChange={(e) => setMaxTotal(e.currentTarget.value)}
              min={1}
              step={1}
            />

            <s-checkbox
              label="Apply limits to all products"
              checked={applyToAll}
              onChange={(e) => setApplyToAll(e.currentTarget.checked)}
            />

            {!applyToAll && (
              <s-text color="subdued">
                Limits will only apply to products with specific tags or
                metafields configured in your function.
              </s-text>
            )}
          </s-stack>
        </s-section>

        <s-section heading="Warning settings">
          <s-stack gap="base">
            <s-number-field
              label="Warning threshold (%)"
              details="Show a warning when quantity reaches this percentage of the limit"
              value={warningThreshold}
              onChange={(e) => setWarningThreshold(e.currentTarget.value)}
              min={0}
              max={100}
              step={5}
              suffix="%"
            />

            <s-text-area
              label="Custom validation message"
              details="The message shown when quantity limits are exceeded"
              value={customMessage}
              onChange={(e) => setCustomMessage(e.currentTarget.value)}
              rows={3}
            />
          </s-stack>
        </s-section>

        <s-divider />

        <s-text color="subdued">
          Validation will run during cart updates and checkout to enforce these
          quantity limits.
        </s-text>
      </s-stack>
    </s-function-settings>
  );
}
Anchor to Best practicesBest practices
- Use consistent metafield namespaces: Prefix your app's metafield namespaces with
$app:to ensure they're owned by your app. Use descriptive namespace and key names that clearly indicate their purpose. - Implement the reset handler: The function settings component requires an
onResethandler. Implement it to restore fields to their saved values, allowing merchants to undo changes before saving. - Set sensible default values: Initialize form fields with reasonable defaults from existing metafields or fallback values. This prevents errors when merchants haven't configured the function yet.
Anchor to LimitationsLimitations
- Single target per module: Each
[[extensions.targeting]]entry in your TOML configuration maps one target to one module file. - Root component requirement: All function settings extensions must use the function settings component as their root element. This component handles integration with the native save bar.
- Limited component set: Function settings extensions can only use form components (for example, text field, number field, select, or checkbox). They can't use resource pickers, modals, or action extensions available to other extension types.
- Metafield storage only: Configuration values must be stored as metafields. You can't use other storage mechanisms. Metafields have size limits, so large configurations may need to be split across multiple metafields.
- Configuration is separate from execution: Function settings extensions only store configuration as metafields. Your Shopify Function reads this configuration at runtime through metafields for input queries. The extension can't directly modify function code, enforce validation rules, or preview function behavior.
- Metafield type constraints: When using
applyMetafieldsChange, you must specify a valid metafield type. Complex configurations often require usingjsontype and serializing/deserializing configuration objects.