Shop Pay UX
Anchor to OverviewOverview
Shop Pay Wallet introduces an accelerated checkout experience powered by Shop Pay to a merchant's existing ecommerce site. This guide describes the supported customer journeys, information on what can be customized, and usage guidelines for the Shop button.
To learn more about the API, and to start implementing it in your store, refer to the Shop Pay Wallet API overview.
Anchor to Customer touch-pointsCustomer touch-points
There are three customer touch-points:
- Shop button.
- Shop email recognition.
- Shop popup checkout.
The payment request button is the Shop button that a user can press to initiate the Shop popup checkout. Place this button on your cart, guest checkout, or product detail page to indicate to Shop users that they can use Shop Pay to check out the item or the cart.
This button comes in two varieties:
- A base version, with only the Shop logo
buy-with, where the logo is prefixed with "Buy with"


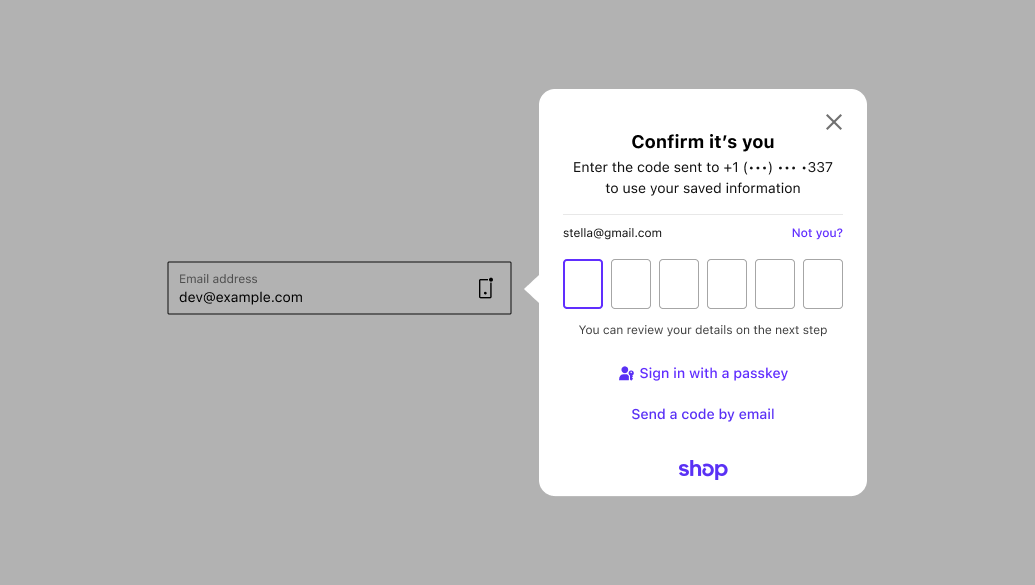
Anchor to Email recognitionEmail recognition
Some customers might not be aware that they have a Shop account. The email recognition component recognizes existing Shop account emails entered into your guest checkout, and invites the customer to authenticate for an accelerated checkout experience. Customers can opt out of this if they wish.
Anchor to Shop checkout popupShop checkout popup
The Shop checkout is served to your customers in a popup, providing a similar experience to other accelerated checkout options. If a Shop session cookie is present, then the customer can check out in one tap after reviewing their information. If a Shop session cookie isn't present, then customers can log in to their Shop account.
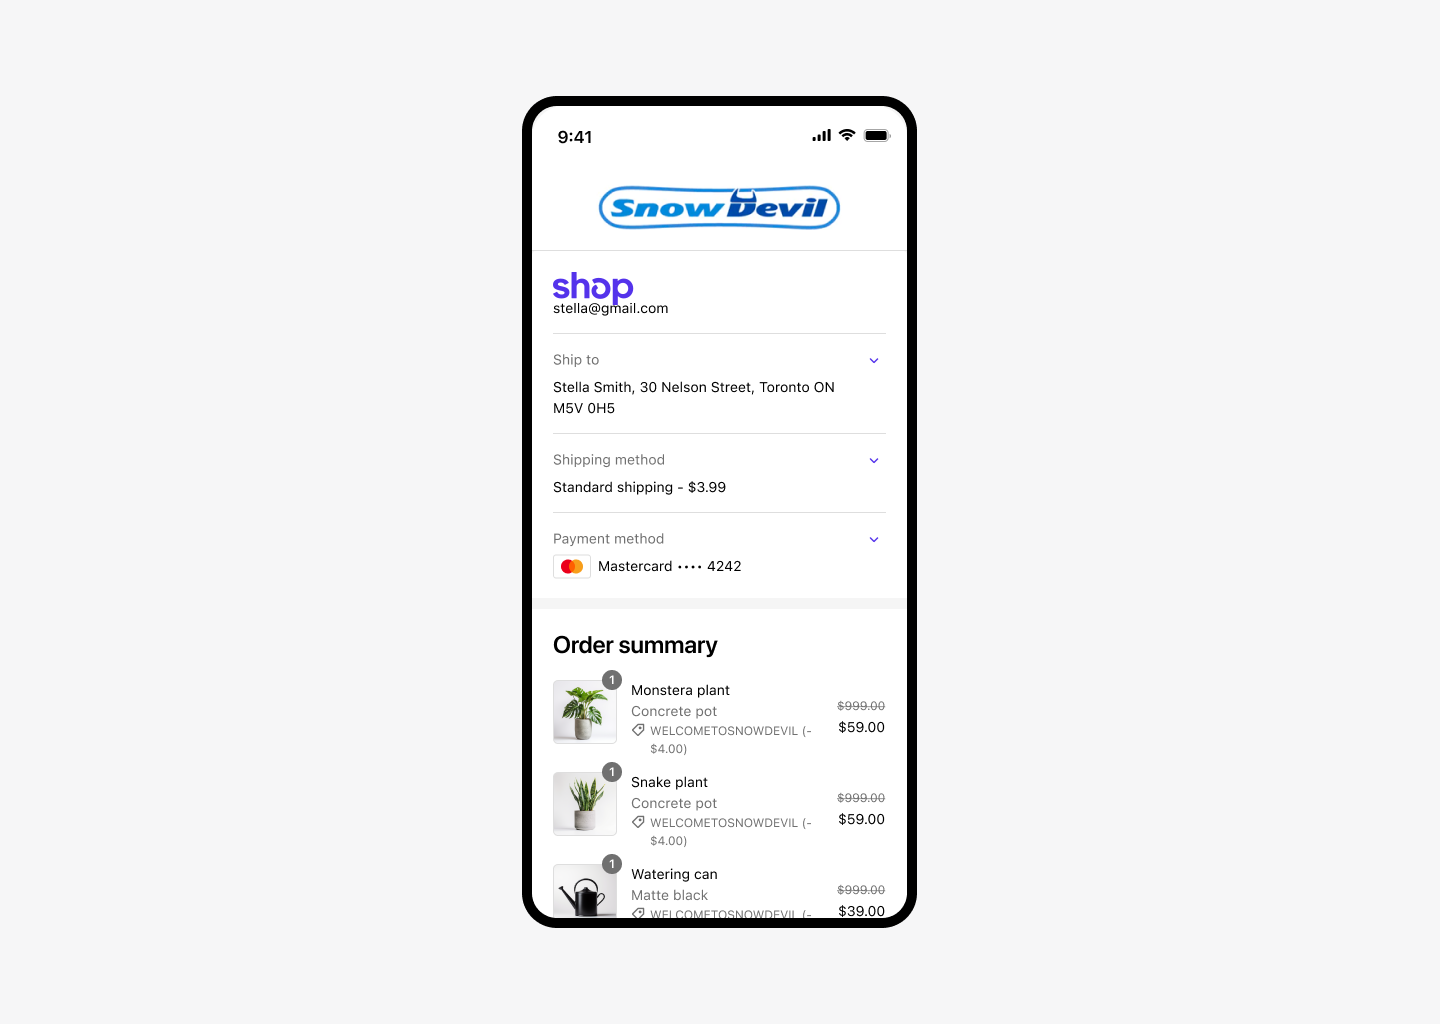
Anchor to Thank-you page and order confirmation e-mailThank-you page and order confirmation e-mail
Your thank-you page and order confirmation e-mail provide continuity to the customer's checkout experience. It's a good opportunity to confirm payment and address information, and to provide a link to the customer's Shop account where a customer can manage their installments payments.
Anchor to Customer experienceCustomer experience
The customer experience can be broken down into the following stages:
- Trigger: How does a customer choose Shop Pay?
- Checkout: What happens after a customer chooses Shop Pay? What do they see and do?
- Post-payment: What happens after payment?
Anchor to TriggerTrigger
The customer experience is triggered in the following ways:
- Using the Shop button.
- Through email recognition.
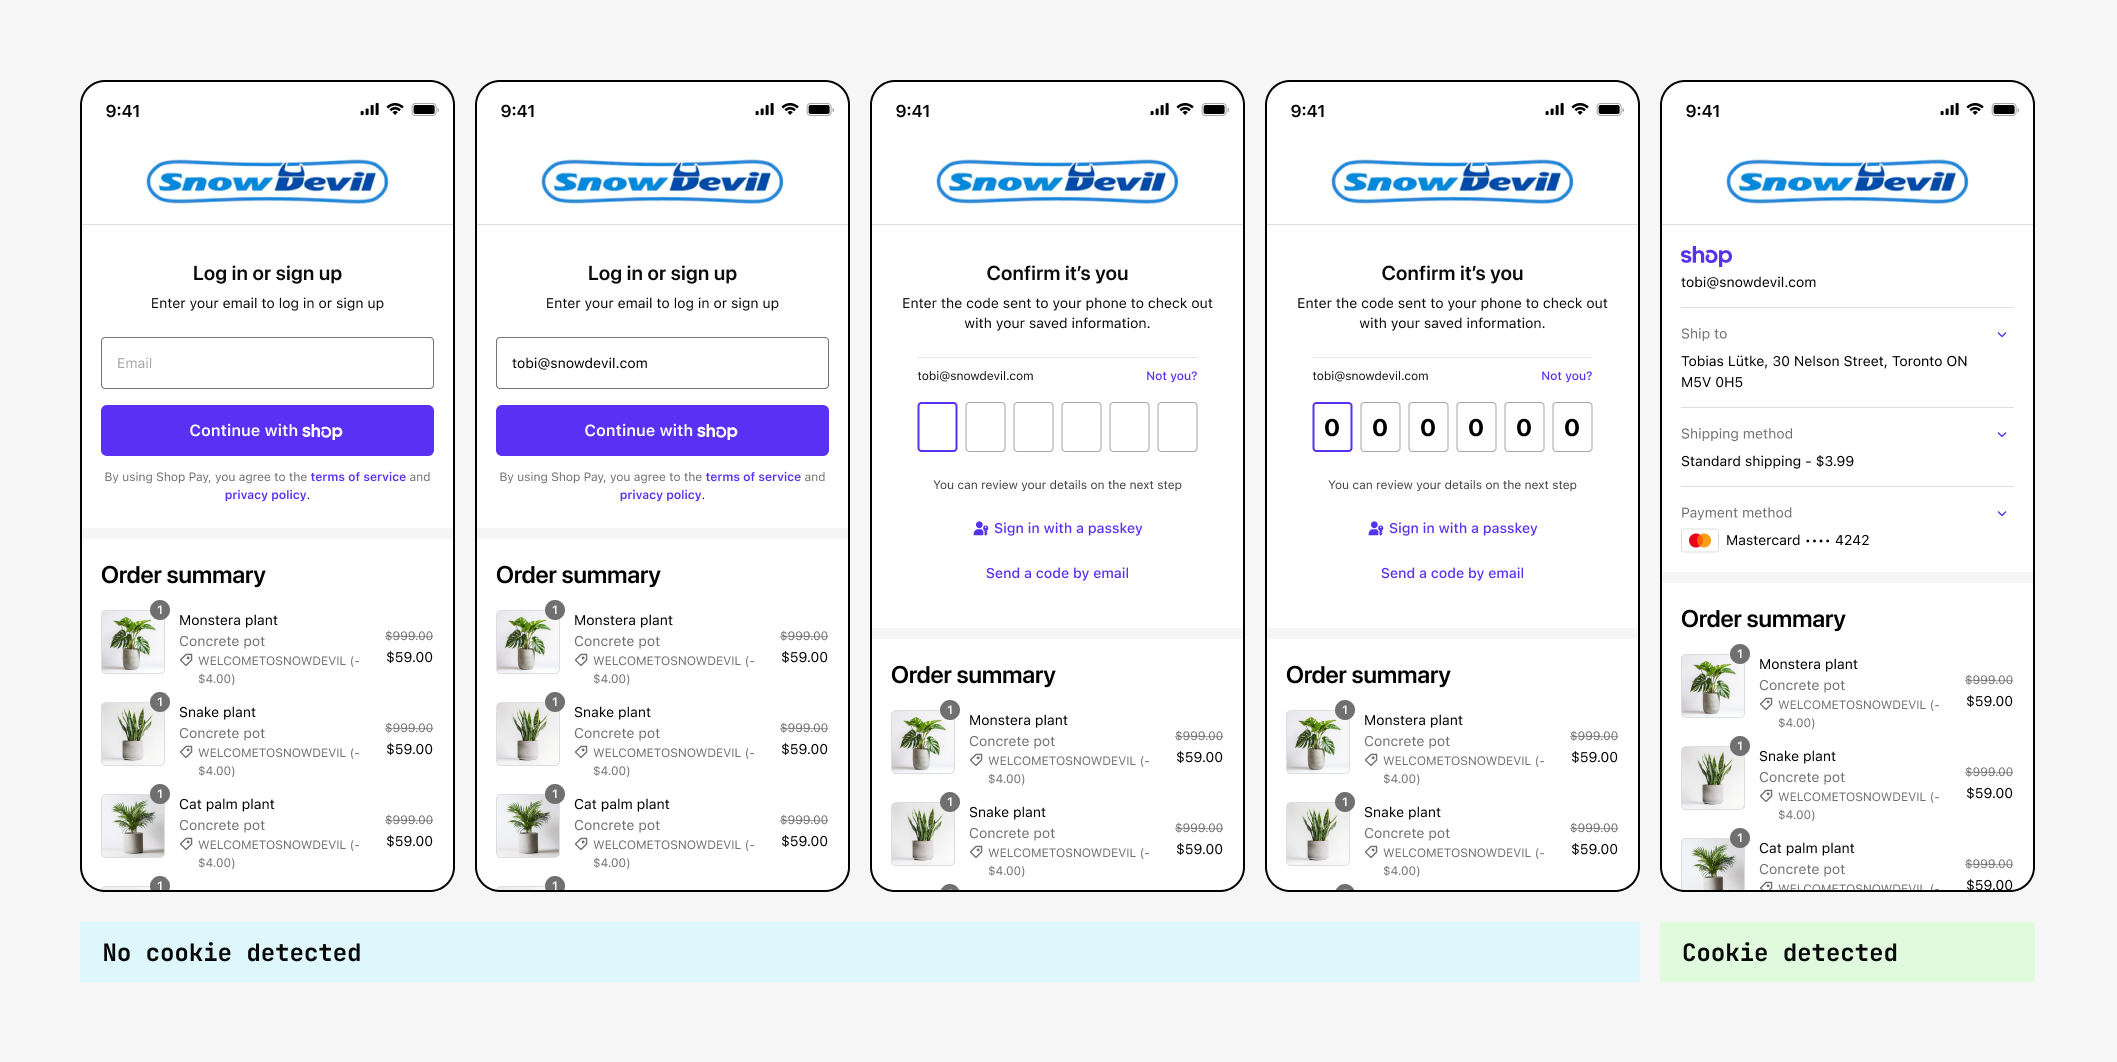
The flow the customer experiences after they click the Shop button depends on whether the browser has an active Shop session cookie.
With an active cookie:
The popup pops, and contains the customer's vaulted information. The customer can then review or edit their information before proceeding to Pay now.
Without an active cookie:
The popup pops with a login flow. The customer needs to log in to their Shop account or sign up, and authenticate using a password or passkey.
If the customer logs in and has vaulted information, then the information loads.
If the customer signs up, then the checkout fields load for the user to enter their checkout information.
Anchor to Email recognitionEmail recognition
When a customer enters an email address associated with a Shop account into your guest checkout, they experience the following:
A modal pops asking the customer to authenticate using email, SMS, or a passkey. The customer then has three options:
- Complete authentication challenge.
- Close the modal using the close icon.
- Press or click outside of the modal. If the user clicks outside of the modal, then they can re-load the modal using the icon that appears in the email field.
After the customer authenticates, the popup populates the customer's vaulted information.
If the customer closes the modal at any time, then they can re-load it by clicking the "Show Modal" icon.
Anchor to Show modalShow modal
The Show modal icon doesn't come with any inherent styling, so it's up to the merchant to place this button appropriately. It's recommended to place this within the email entry field, aligned to the right side, with appropriate padding.
It's important to test the implementation with both long email addresses and password managers that inject their own icons into the email address field to ensure that neither of these conflicts with your implementation.
Anchor to CheckoutCheckout
When the customer has an active checkout, they can review their order and complete a few actions:
- Add, update, or delete a vaulted address and payment method.
- Choose their preferred shipping method.
- Enter discount codes.
- Opt out and return to your guest checkout using the Checkout as guest link.
- Proceed with payment using the Pay now button.
Some customers might have incomplete vaulted information. For example, they might be missing a payment method. These customers are able to add any missing information in the checkout popup.
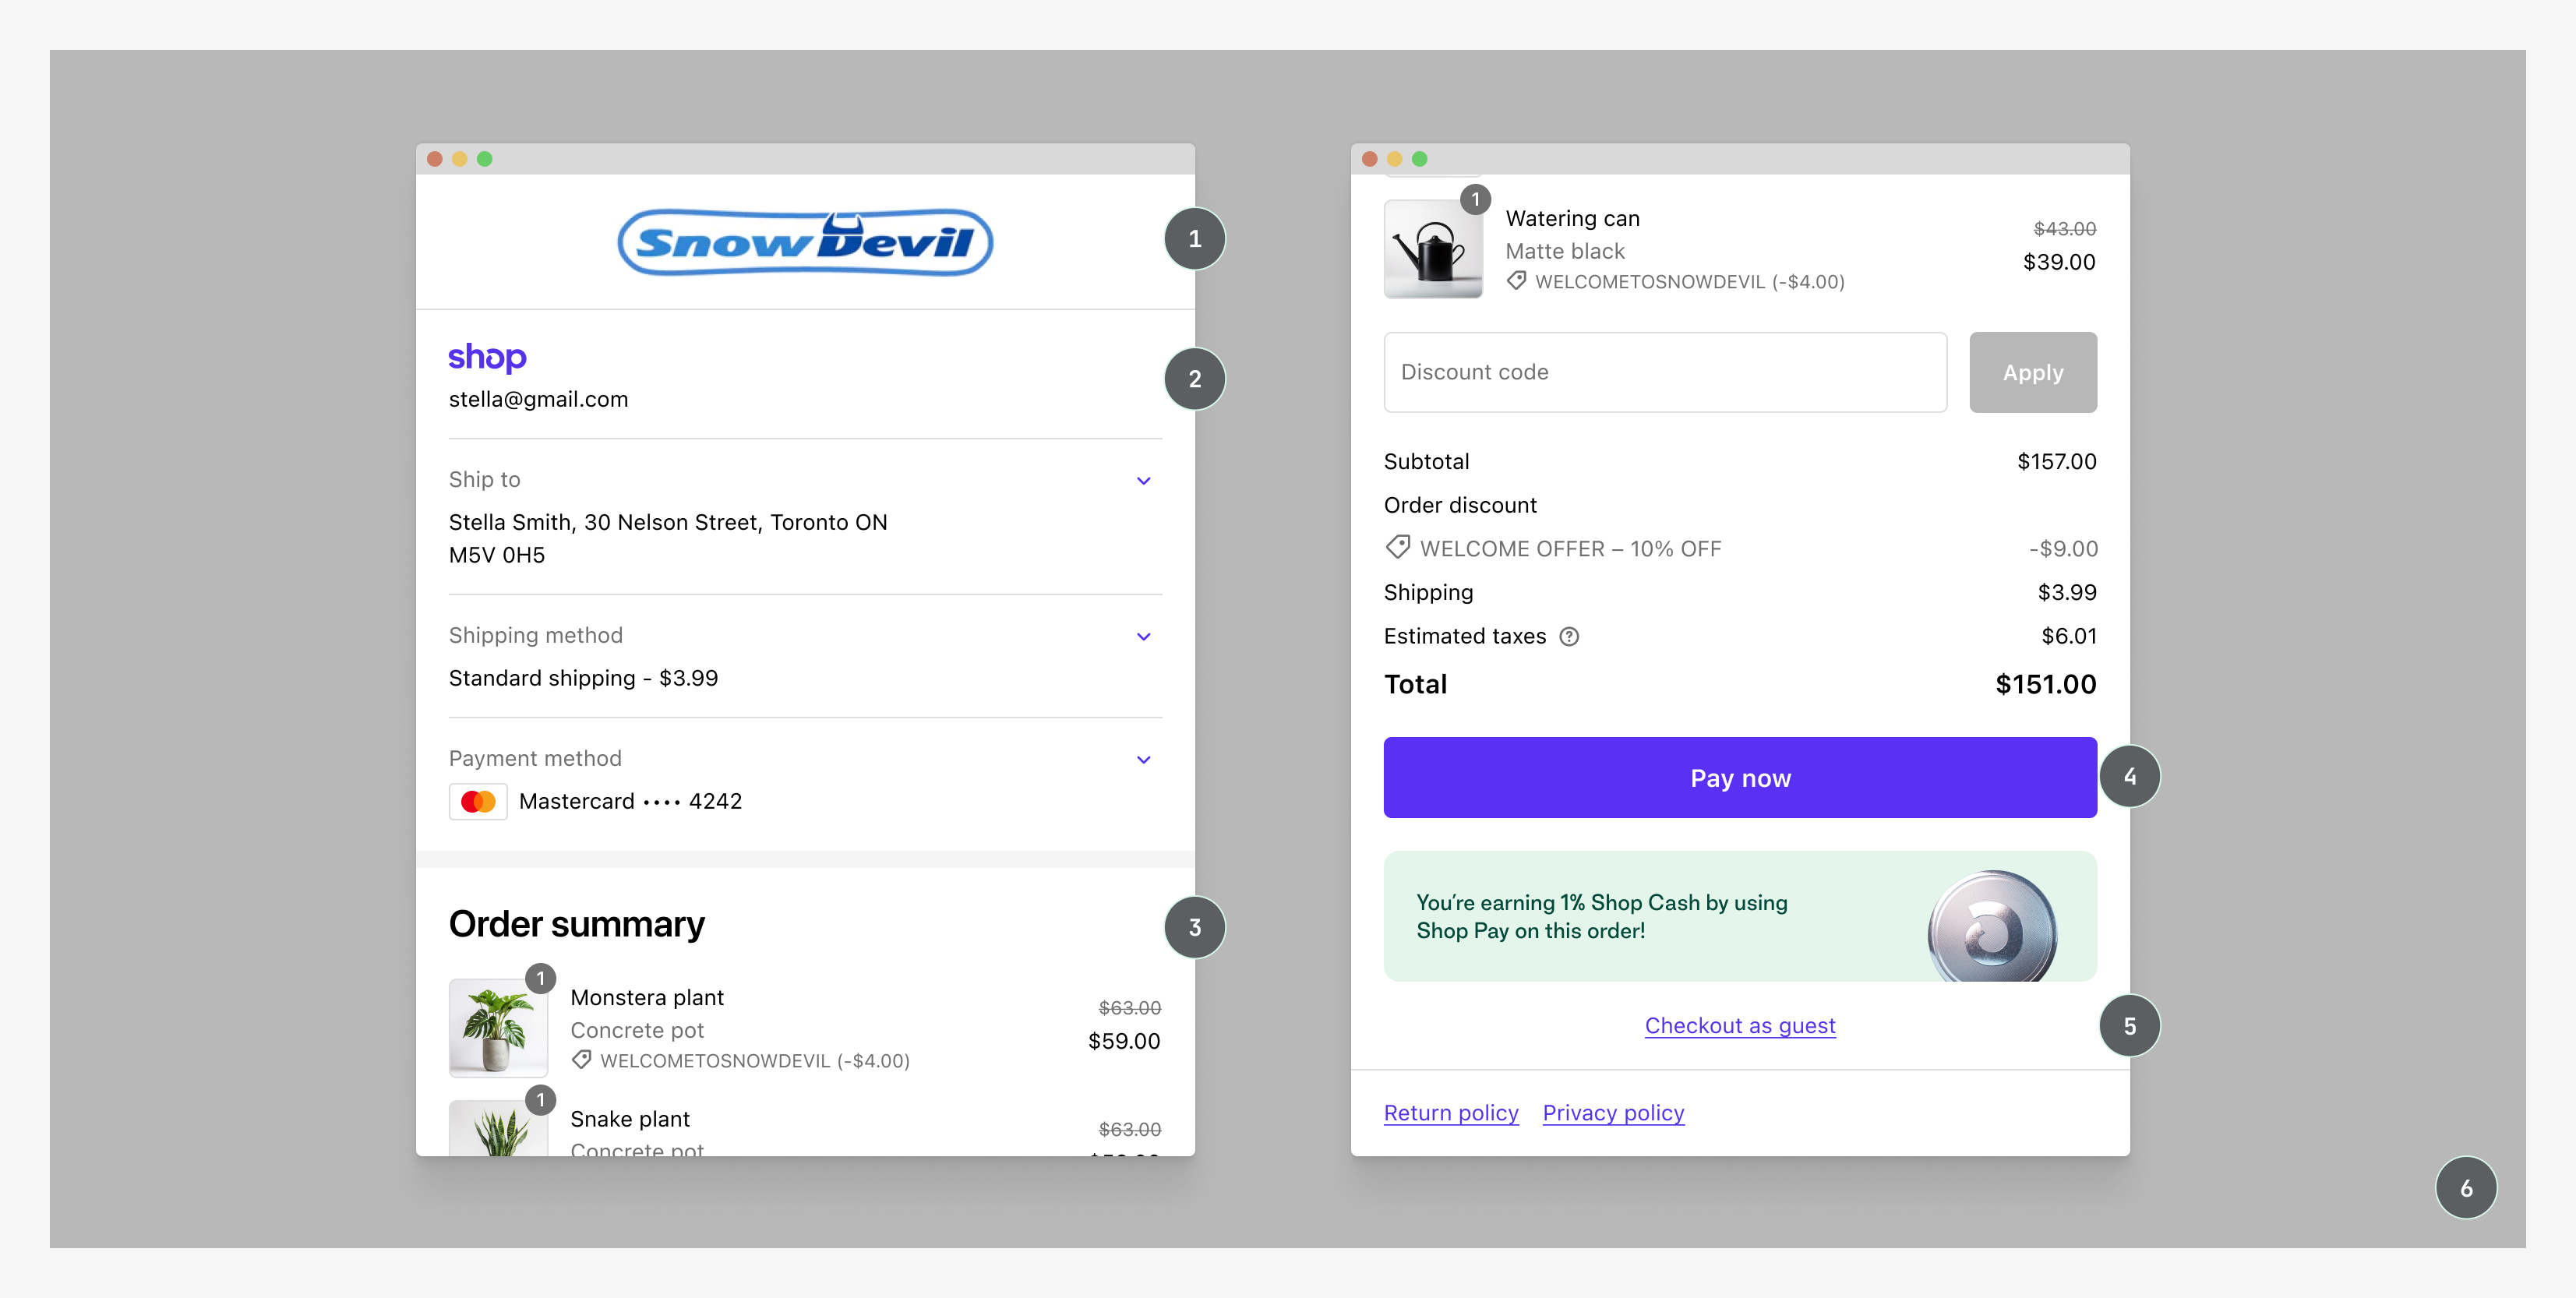
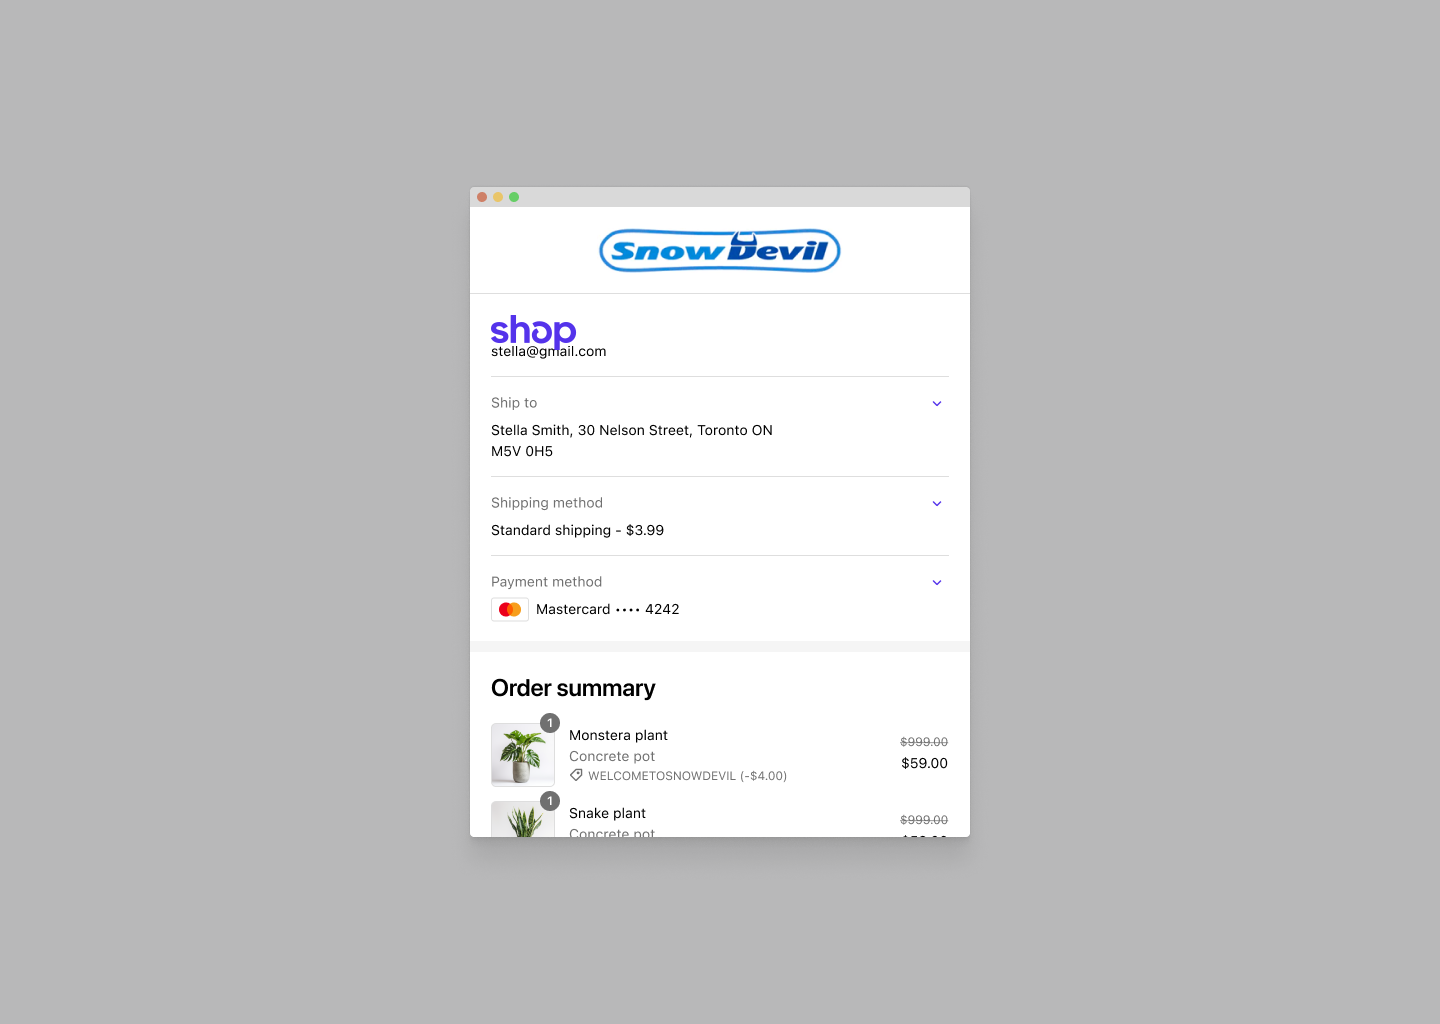
| # | Section | Description |
|---|---|---|
| 1 | Checkout logo | Your brand's logo, which helps to instill trust in the purchase. Review our logo specs. |
| 2 | Vaulted information | All the information stored in a customer's Shop account. Each section opens to reveal relevant actions. This section is replaced with the login card if the customer isn't yet authenticated. If the customer doesn't have a complete account, the required input fields will display below any vaulted information. |
| 3 | Order summary | Includes the order total, line items, a discount entry field, and anything affecting the total like shipping, taxes, and discounts. |
| 4 | Pay now button | Triggers the payment when the customer is comfortable to proceed. |
| 5 | Checkout as guest | Allows the customer to cancel the payment, close the popup, and return to your guest checkout. |
| 6 | Overlay | A dark background placed on top of your site to draw greater focus to the popup. |
Anchor to Post-paymentPost-payment
After the user presses Pay now, the popup displays a spinner and a Your order's being processed message.
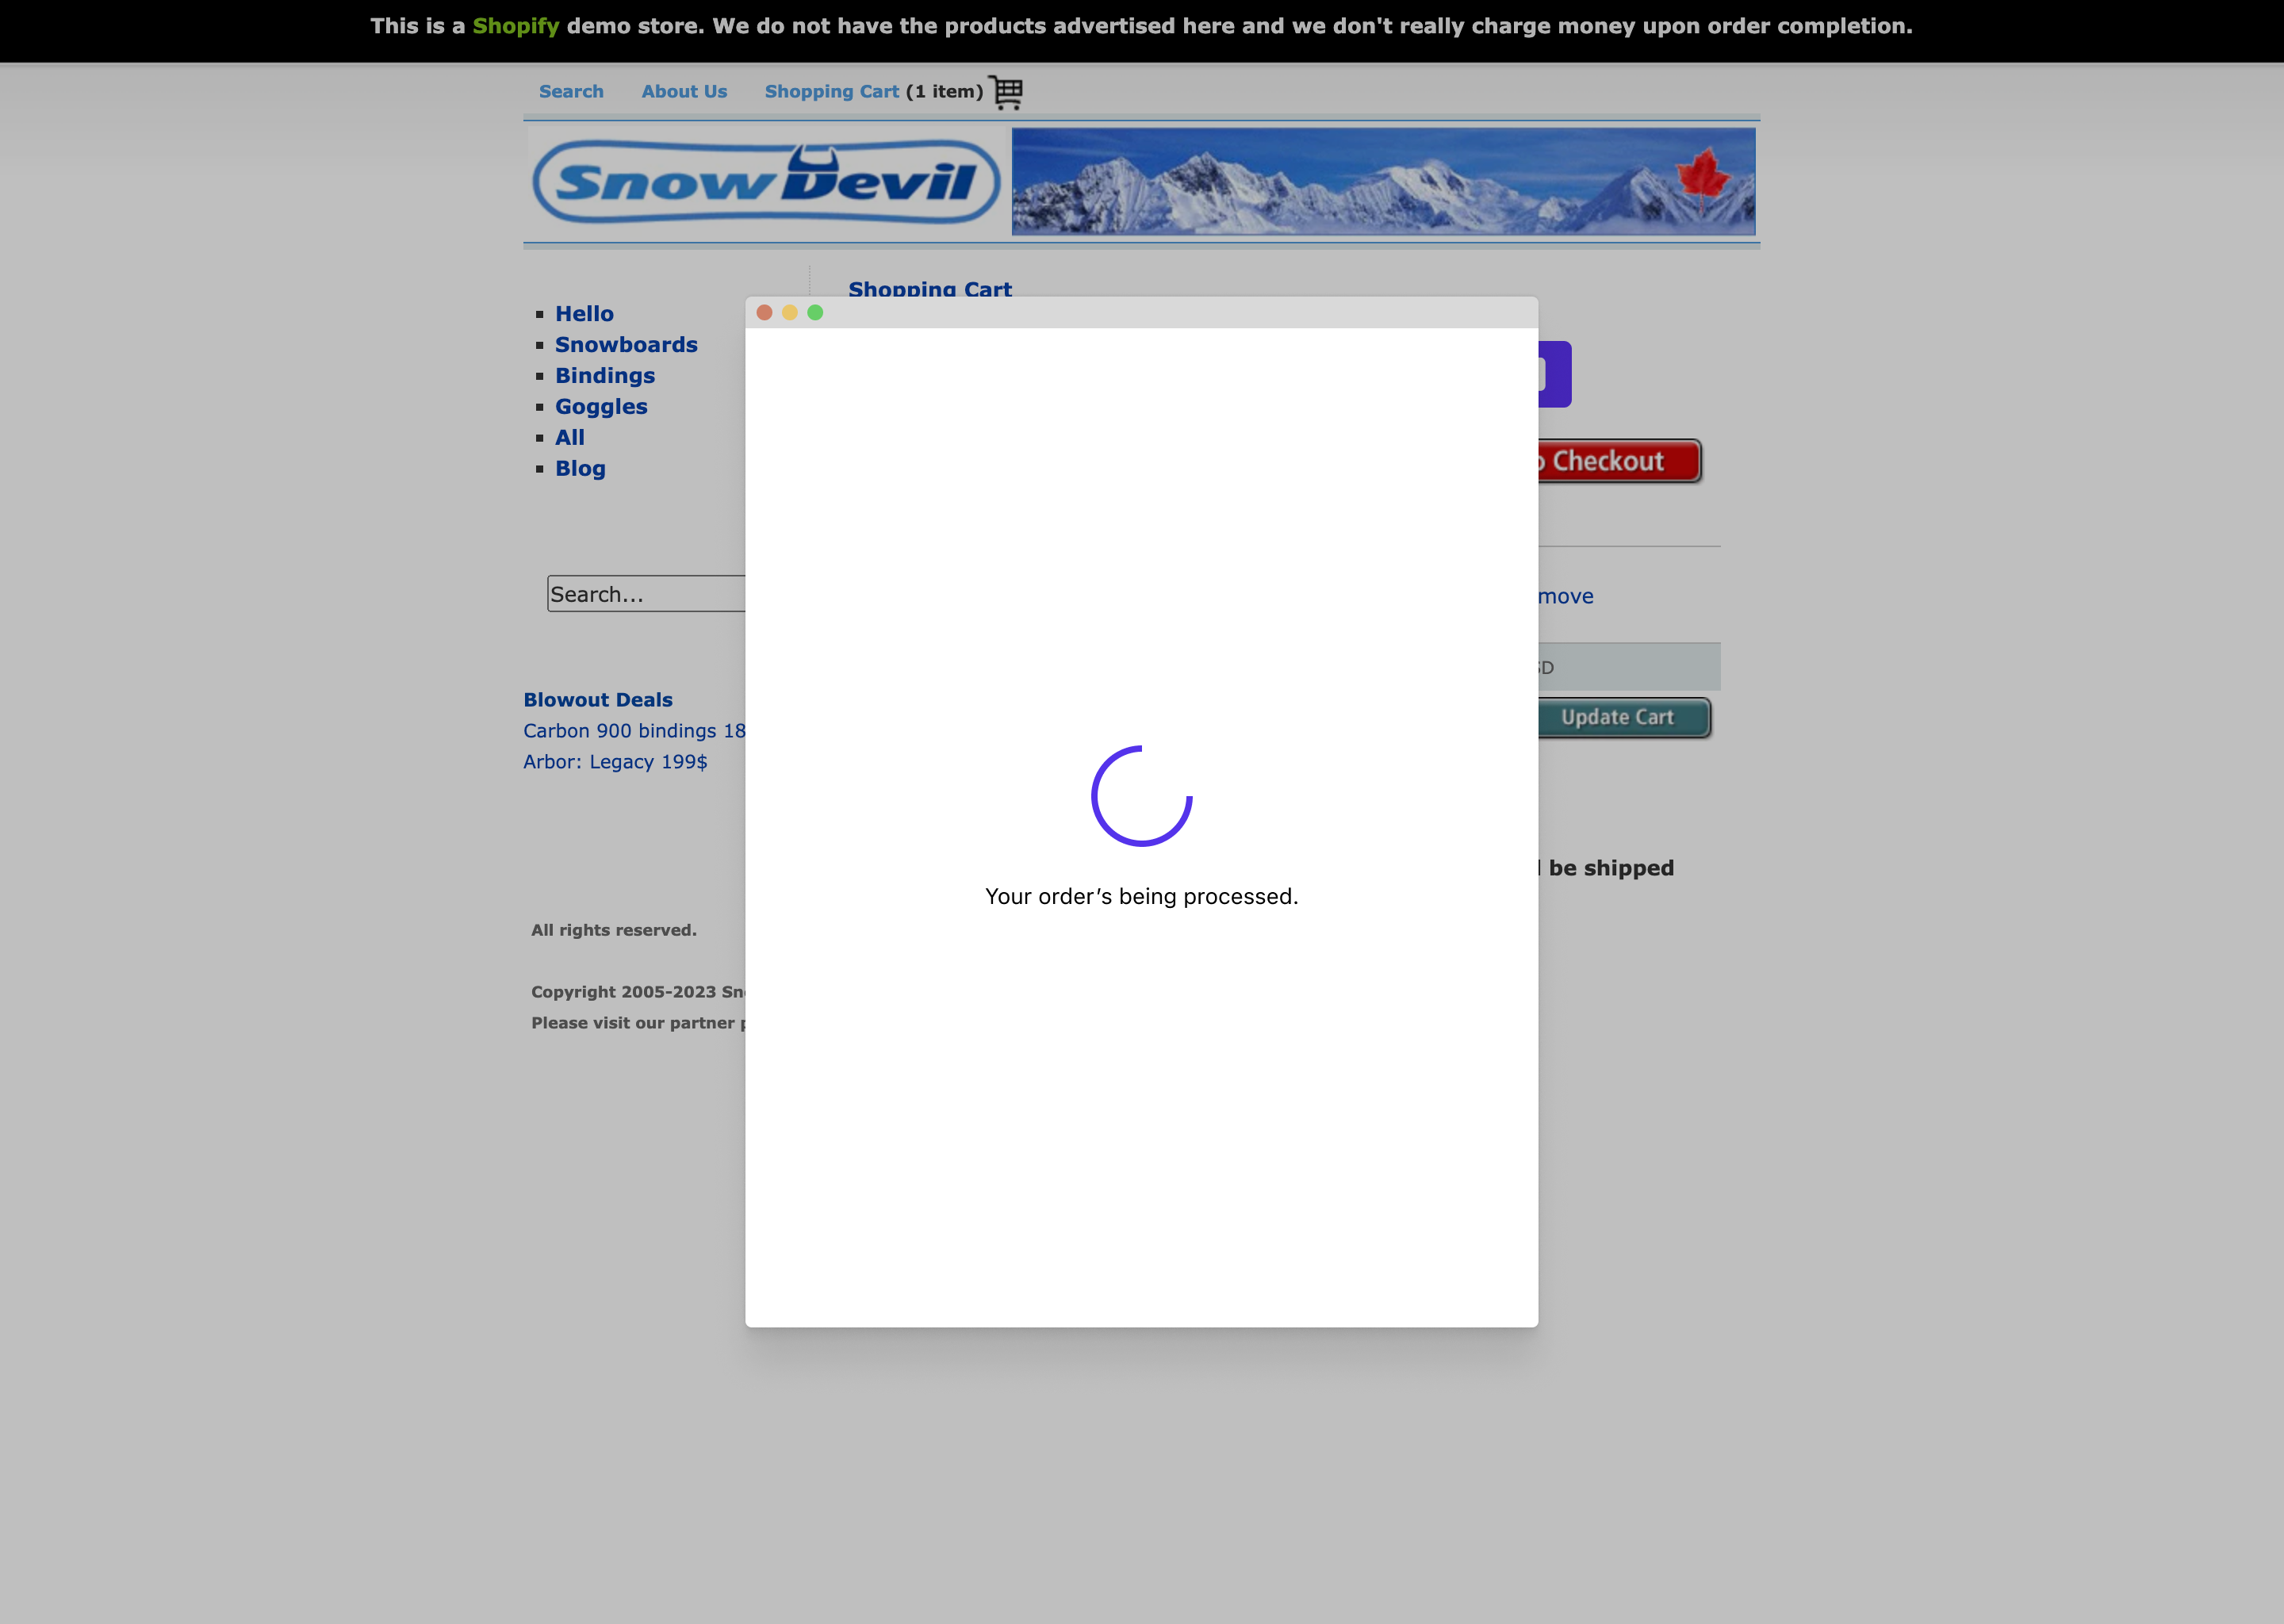
After the payment is successfully processed, the popup closes. You should show the customer their order confirmation. For example, you might direct the customer to your store's Thank you page.
As part of supporting installments purchases, it's recommended that you inform the user they paid with installments,
and provide a link to their account URL where they can manage their installments payments. The payment type and
account URL are provided in the paymentComplete event's .processingStatus field for completed receipts. See ShopPayPaymentRequestReceiptCompleted. The thank you page and order confirmation e-mail are the best places to include this information.
Anchor to Specs and customizationSpecs and customization
The Shop experience is something that millions of customers are familiar with. Changes to this core UX/UI runs the risk of diminishing trust and creating uncertainty during a checkout. However, there are a few customizations available to you to make the components feel like a part of your customer experience you've designed and built.
To better match your existing button styles, you can use the following properties to customize the Shop button:
-
Width.
-
Height.
-
BorderRadii.
-
Variant.
For a full list of properties and constraints, refer to the documentation for the
shop-pay-payment-request-button.You can't change the following attributes:
-
fontFamily. The font used for "Buy with" is part of the Shop branding. -
Logo size.
-
Logo position.
-
Button color (must be Shop purple, black, or white. See the Shop brand assets guidelines).
-
Logo color.
If you place the button on a surface that has low contrast with the button background, the button automatically renders a
border: 1px solid rgba(255, 255, 255, 0.50)to give the button definition.
Like other accelerated checkout buttons, we recommend that you add the Shop button to the first step of a checkout, and converting pages like the cart or product page.
We recommend that you use the Buy with Shop button variant when the button will trigger a checkout for a specific item or collection. For example, you might use this button on product pages. We recommend that you use the logo-only variant on your cart and guest checkout, where Shop acts as a checkout option.
Anchor to Checkout logoCheckout logo
You can customize the Shop popup checkout's appearance by adding your own logo to the top section of the popup.
The logo will appear centrally in a card with 21px padding.
Horizontal logotypes work best as they provide brand recognition without pushing the checkout too far down the popup or mobile screen.
For reference, the logo in this screenshot is 246px x 45px.
Anchor to Email recognition modalEmail recognition modal
The email recognition modal is a Shop branded experience and isn't customizable.