--- title: Build an admin print action UI extension description: Learn how to create UI extensions for print actions in Shopify admin. source_url: html: https://shopify.dev/docs/apps/build/admin/actions-blocks/build-admin-print-action md: https://shopify.dev/docs/apps/build/admin/actions-blocks/build-admin-print-action.md --- # Build an admin print action UI extension This guide demonstrates how to build a UI extension for a print action in Shopify admin. This extension lets users print invoices and packing slips directly from order detail pages. ![A UI extension for a print action, as displayed in Shopify admin](https://cdn.shopify.com/shopifycloud/shopify-dev/production/assets/assets/admin/admin-actions-and-block/build-an-admin-print-action/print-action-extension-example-BZoi8wgN.png) ## What you'll learn In this tutorial, you'll learn how to do the following tasks: * Serve a printable document from your app's backend. * Create a UI extension for an admin print action that displays on the order details page. * Create an interface for the extension, allowing merchants to select the documents to print. * Run your extension locally and test it on a development store. ## Requirements [Create a Partner account](https://www.shopify.com/partners) [Create a development store](https://shopify.dev/docs/apps/tools/development-stores#create-a-development-store-to-test-your-app) [Scaffold an app](https://shopify.dev/docs/apps/build/scaffold-app) Scaffold an app with the `read_orders` access scope that uses [Shopify CLI 3.78 or higher](https://shopify.dev/docs/api/shopify-cli#upgrade). * You need to explicitly grant the `read_orders` [access scope](https://shopify.dev/docs/api/usage/access-scopes) to your custom app. * You need to [request](https://shopify.dev/docs/api/usage/access-scopes#orders-permissions) the `read_all_orders` access scope. You will need this for your extension to work with orders that are more than 60 days old. * You need to request access to [protected customer data](https://shopify.dev/docs/apps/launch/protected-customer-data). * You need to create at least one order in your development store to test the extension. Make sure to mark the order as paid to convert it from a draft order to a fulfilled order. ## Project [View on GitHub](https://github.com/Shopify/example-admin-action-and-block-preact) ## Create a route to serve the printable document To begin, you need to create a route in your app that returns the printable documents for an order. You can use JavaScript to customize the document on your app's backend, but the route must return static HTML without any scripts. Add a new route file at `app/routes/print.js`. This file contains the route that will serve the printable document. Use `authenticate.admin(request)` to authenticate your request and retrieve the `cors` utility. ## /app/routes/print.js ```javascript import { authenticate } from "../shopify.server"; export async function loader({ request }) { const { cors, admin } = await authenticate.admin(request); const url = new URL(request.url); const query = url.searchParams; const docs = query.get("printType").split(","); const orderId = query.get("orderId"); const response = await admin.graphql( `query getOrder($orderId: ID!) { order(id: $orderId) { name createdAt totalPriceSet { shopMoney { amount } } } }`, { variables: { orderId: orderId, }, }, ); const orderData = await response.json(); const order = orderData.data.order; const pages = docs.map((docType) => orderPage(docType, order)); const print = printHTML(pages); return cors( new Response(print, { ``` Define and handle any routes or URL parameters so you can configure the order and documents to be printed. ## /app/routes/print.js ```javascript import { authenticate } from "../shopify.server"; export async function loader({ request }) { const { cors, admin } = await authenticate.admin(request); const url = new URL(request.url); const query = url.searchParams; const docs = query.get("printType").split(","); const orderId = query.get("orderId"); const response = await admin.graphql( `query getOrder($orderId: ID!) { order(id: $orderId) { name createdAt totalPriceSet { shopMoney { amount } } } }`, { variables: { orderId: orderId, }, }, ); const orderData = await response.json(); const order = orderData.data.order; const pages = docs.map((docType) => orderPage(docType, order)); const print = printHTML(pages); return cors( new Response(print, { ``` After you've authenticated your app, you can query the GraphQL Admin API to fetch data which you can use to populate the document. ## /app/routes/print.js ```javascript import { authenticate } from "../shopify.server"; export async function loader({ request }) { const { cors, admin } = await authenticate.admin(request); const url = new URL(request.url); const query = url.searchParams; const docs = query.get("printType").split(","); const orderId = query.get("orderId"); const response = await admin.graphql( `query getOrder($orderId: ID!) { order(id: $orderId) { name createdAt totalPriceSet { shopMoney { amount } } } }`, { variables: { orderId: orderId, }, }, ); const orderData = await response.json(); const order = orderData.data.order; const pages = docs.map((docType) => orderPage(docType, order)); const print = printHTML(pages); return cors( new Response(print, { ``` Using the data you've fetched, return the printable document as an HTML response. Be sure to wrap your response in the `cors` method to automatically set CORS headers. If you need to set CORS headers manually, then set `Access-Control-Allow-Origin: "*"` after authenticating the request. ## /app/routes/print.js ```javascript import { authenticate } from "../shopify.server"; export async function loader({ request }) { const { cors, admin } = await authenticate.admin(request); const url = new URL(request.url); const query = url.searchParams; const docs = query.get("printType").split(","); const orderId = query.get("orderId"); const response = await admin.graphql( `query getOrder($orderId: ID!) { order(id: $orderId) { name createdAt totalPriceSet { shopMoney { amount } } } }`, { variables: { orderId: orderId, }, }, ); const orderData = await response.json(); const order = orderData.data.order; const pages = docs.map((docType) => orderPage(docType, order)); const print = printHTML(pages); return cors( new Response(print, { ``` Set the title for the printable document using the [``](https://developer.mozilla.org/en-US/docs/Web/HTML/Element/title) element. Most browsers will include the document's title by default on the final printed page. ## /app/routes/print.js ```javascript import { authenticate } from "../shopify.server"; export async function loader({ request }) { const { cors, admin } = await authenticate.admin(request); const url = new URL(request.url); const query = url.searchParams; const docs = query.get("printType").split(","); const orderId = query.get("orderId"); const response = await admin.graphql( `query getOrder($orderId: ID!) { order(id: $orderId) { name createdAt totalPriceSet { shopMoney { amount } } } }`, { variables: { orderId: orderId, }, }, ); const orderData = await response.json(); const order = orderData.data.order; const pages = docs.map((docType) => orderPage(docType, order)); const print = printHTML(pages); return cors( new Response(print, { ``` If your extension will return multiple documents, be sure to create visual breaks in the CSS so each document is printed as a separate page and users know where each document begins. We recommend using the CSS `@media print` rule and styles here to ensure that the document prints correctly. ## /app/routes/print.js ```javascript import { authenticate } from "../shopify.server"; export async function loader({ request }) { const { cors, admin } = await authenticate.admin(request); const url = new URL(request.url); const query = url.searchParams; const docs = query.get("printType").split(","); const orderId = query.get("orderId"); const response = await admin.graphql( `query getOrder($orderId: ID!) { order(id: $orderId) { name createdAt totalPriceSet { shopMoney { amount } } } }`, { variables: { orderId: orderId, }, }, ); const orderData = await response.json(); const order = orderData.data.order; const pages = docs.map((docType) => orderPage(docType, order)); const print = printHTML(pages); return cors( new Response(print, { ``` Shopify CLI uses Cloudflare tunnels to serve your app. These tunnels default to obfuscating email addresses in the app. Wrap the email in a magic comment to ensure that the email address is visible in the document. ## /app/routes/print.js ```javascript import { authenticate } from "../shopify.server"; export async function loader({ request }) { const { cors, admin } = await authenticate.admin(request); const url = new URL(request.url); const query = url.searchParams; const docs = query.get("printType").split(","); const orderId = query.get("orderId"); const response = await admin.graphql( `query getOrder($orderId: ID!) { order(id: $orderId) { name createdAt totalPriceSet { shopMoney { amount } } } }`, { variables: { orderId: orderId, }, }, ); const orderData = await response.json(); const order = orderData.data.order; const pages = docs.map((docType) => orderPage(docType, order)); const print = printHTML(pages); return cors( new Response(print, { ``` ## Create an admin print action UI extension After you've created a route to serve the printable document, you can create a new UI extension for a print action that displays on the order details page of Shopify admin. The UI extension will use the route you created in the previous step to fetch the documents. Use Shopify CLI to [generate starter code](https://shopify.dev/docs/api/shopify-cli/app/app-generate-extension) for your UI extension. 1. Navigate to your app directory: ## Terminal ```bash cd <directory> ``` 2. Run the following command to create a new UI extension for a print action in Shopify admin: ## Terminal ```bash POLARIS_UNIFIED=true shopify app generate extension --template admin_print ``` The command creates a new UI extension template in your app's `extensions` directory with the following structure: ## Admin print action structure ```text extensions/admin-print ├── README.md ├── locales │ ├── en.default.json // The default locale for the extension │ └── fr.json // The French language translations for the extension ├── package.json ├── shopify.extension.toml // The config file for the extension ├── tsconfig.json ├── shopify.d.ts // Provides types for components and APIs available to the extension └── src └── PrintActionExtension.jsx // The code that defines the print action's UI and behavior ``` ## Create the interface for the UI extension You can configure the UI extension's interface to allow merchants to select the documents they want to print. Complete the following steps to create the interface for the UI extension: ### Review the configuration The UI extension's static configuration is stored in its `.toml` file. To ensure that the print action displays on the order details page, validate that the `target` is set to `admin.order-details.print-action.render`. [admin.order-details.print-action.render](https://shopify.dev/docs/api/admin-extensions/unstable/extension-targets#print-locations) ## /extensions/admin-print/shopify.extension.toml ```toml api_version = "2025-10" [[extensions]] name = "admin-print" handle = "admin-print" type = "ui_extension" # Only 1 target can be specified for each admin print action extension [[extensions.targeting]] module = "./src/PrintActionExtension.jsx" target = "admin.order-details.print-action.render" ``` ### Note the export You can view the source of your extension in the `src/ActionExtension.jsx` file. This file defines an `extension` function that calls the `render` method from Preact. You can create the extension's body by using the Polaris web components that are automatically provided. Admin UI extensions are rendered using [Remote DOM](https://github.com/Shopify/remote-dom/tree/remote-dom), which is a fast and secure remote-rendering framework. Because Shopify renders the UI remotely, components used in the extensions must comply with a contract in the Shopify host. We provide these components automatically to the extension. ## /extensions/admin-print/src/PrintActionExtension.jsx ```jsx import { useEffect, useState } from "preact/hooks"; import { render } from "preact"; export default async () => { { render(<Extension />, document.body); } function Extension() { const { i18n, data } = shopify; const [src, setSrc] = useState(null); const [printInvoice, setPrintInvoice] = useState(true); const [printPackingSlip, setPrintPackingSlip] = useState(false); useEffect(() => { const printTypes = []; if (printInvoice) { printTypes.push("Invoice"); } if (printPackingSlip) { printTypes.push("Packing Slip"); } if (printTypes.length) { const params = new URLSearchParams({ printType: printTypes.join(","), orderId: data.selected[0].id, }); const fullSrc = `/print?${params.toString()}`; setSrc(fullSrc); } else { setSrc(null); } }, [data.selected, printInvoice, printPackingSlip]); return ( /* The s-admin-print-action component provides an API for setting the src of the Print Action extension wrapper. The document you set as src will be displayed as a print preview. When the user clicks the Print button, the browser will print that document. HTML, PDFs and images are supported. The `src` prop can be a... - Full URL: https://cdn.shopify.com/static/extensibility/print-example/document1.html - Relative path in your app: print-example/document1.html or /print-example/document1.html - Custom app: protocol: app:print (https://shopify.dev/docs/api/admin-extensions#custom-protocols) */ <s-admin-print-action src={src}> <s-stack direction="block"> <s-text type="strong">{i18n.translate("documents")}</s-text> <s-checkbox name="Invoice" checked={printInvoice} onChange={(value) => { setPrintInvoice(value); }} label={i18n.translate("invoice")} ></s-checkbox> <s-checkbox name="Packing Slips" checked={printPackingSlip} onChange={(value) => { setPrintPackingSlip(value); }} label={i18n.translate("packingSlip")} ></s-checkbox> </s-stack> </s-admin-print-action> ); } ``` Configure your app's state to set the printable source URL based on the user's inputs. Passing the ID of the current resource to the `AdminPrintAction` component sets the document to be previewed and printed. ## /extensions/admin-print/src/PrintActionExtension.jsx ```jsx import { useEffect, useState } from "preact/hooks"; import { render } from "preact"; export default async () => { { render(<Extension />, document.body); } function Extension() { const { i18n, data } = shopify; const [src, setSrc] = useState(null); const [printInvoice, setPrintInvoice] = useState(true); const [printPackingSlip, setPrintPackingSlip] = useState(false); useEffect(() => { const printTypes = []; if (printInvoice) { printTypes.push("Invoice"); } if (printPackingSlip) { printTypes.push("Packing Slip"); } if (printTypes.length) { const params = new URLSearchParams({ printType: printTypes.join(","), orderId: data.selected[0].id, }); const fullSrc = `/print?${params.toString()}`; setSrc(fullSrc); } else { setSrc(null); } }, [data.selected, printInvoice, printPackingSlip]); return ( /* The s-admin-print-action component provides an API for setting the src of the Print Action extension wrapper. The document you set as src will be displayed as a print preview. When the user clicks the Print button, the browser will print that document. HTML, PDFs and images are supported. The `src` prop can be a... - Full URL: https://cdn.shopify.com/static/extensibility/print-example/document1.html - Relative path in your app: print-example/document1.html or /print-example/document1.html - Custom app: protocol: app:print (https://shopify.dev/docs/api/admin-extensions#custom-protocols) */ <s-admin-print-action src={src}> <s-stack direction="block"> <s-text type="strong">{i18n.translate("documents")}</s-text> <s-checkbox name="Invoice" checked={printInvoice} onChange={(value) => { setPrintInvoice(value); }} label={i18n.translate("invoice")} ></s-checkbox> <s-checkbox name="Packing Slips" checked={printPackingSlip} onChange={(value) => { setPrintPackingSlip(value); }} label={i18n.translate("packingSlip")} ></s-checkbox> </s-stack> </s-admin-print-action> ); } ``` ### Render a UI To build the interface for your UI extension, return components from `src/PrintActionExtension.jsx`. Setting the `src` prop of the `AdminPrintAction` container component will display the print preview of the document and enable printing. HTML, PDF, and images are supported. Tip If there is no document to print, then pass `null` to the `src` prop. You might also want to add an error banner to your extension's UI to indicate to the user why no document is available. ## /extensions/admin-print/src/PrintActionExtension.jsx ```jsx import { useEffect, useState } from "preact/hooks"; import { render } from "preact"; export default async () => { { render(<Extension />, document.body); } function Extension() { const { i18n, data } = shopify; const [src, setSrc] = useState(null); const [printInvoice, setPrintInvoice] = useState(true); const [printPackingSlip, setPrintPackingSlip] = useState(false); useEffect(() => { const printTypes = []; if (printInvoice) { printTypes.push("Invoice"); } if (printPackingSlip) { printTypes.push("Packing Slip"); } if (printTypes.length) { const params = new URLSearchParams({ printType: printTypes.join(","), orderId: data.selected[0].id, }); const fullSrc = `/print?${params.toString()}`; setSrc(fullSrc); } else { setSrc(null); } }, [data.selected, printInvoice, printPackingSlip]); return ( /* The s-admin-print-action component provides an API for setting the src of the Print Action extension wrapper. The document you set as src will be displayed as a print preview. When the user clicks the Print button, the browser will print that document. HTML, PDFs and images are supported. The `src` prop can be a... - Full URL: https://cdn.shopify.com/static/extensibility/print-example/document1.html - Relative path in your app: print-example/document1.html or /print-example/document1.html - Custom app: protocol: app:print (https://shopify.dev/docs/api/admin-extensions#custom-protocols) */ <s-admin-print-action src={src}> <s-stack direction="block"> <s-text type="strong">{i18n.translate("documents")}</s-text> <s-checkbox name="Invoice" checked={printInvoice} onChange={(value) => { setPrintInvoice(value); }} label={i18n.translate("invoice")} ></s-checkbox> <s-checkbox name="Packing Slips" checked={printPackingSlip} onChange={(value) => { setPrintPackingSlip(value); }} label={i18n.translate("packingSlip")} ></s-checkbox> </s-stack> </s-admin-print-action> ); } ``` ## Test the extension At this point, you can use the Dev Console to [run your app's server and preview your UI extension](#step-4-test-the-extension). As you preview the UI extension, changes to its code automatically cause it to reload. After you've built the UI extension, test it with the following steps: 1. Navigate to your app directory: ## Terminal ```bash cd <directory> ``` 2. To build and preview your app, either start or restart your server with the following command: ## Terminal ```bash shopify app dev ``` 3. Press `p` to open the Dev Console. 4. In the Dev Console, click on the preview link for your print action UI extension. 5. The order details page opens. If you don't have an order in your store, then you need to create one. Warning If you do not have the `read_all_orders` access scope, ensure that the order you use to test the UI extension is less than 60 days old. Otherwise, your app will fail when fetching the order data.
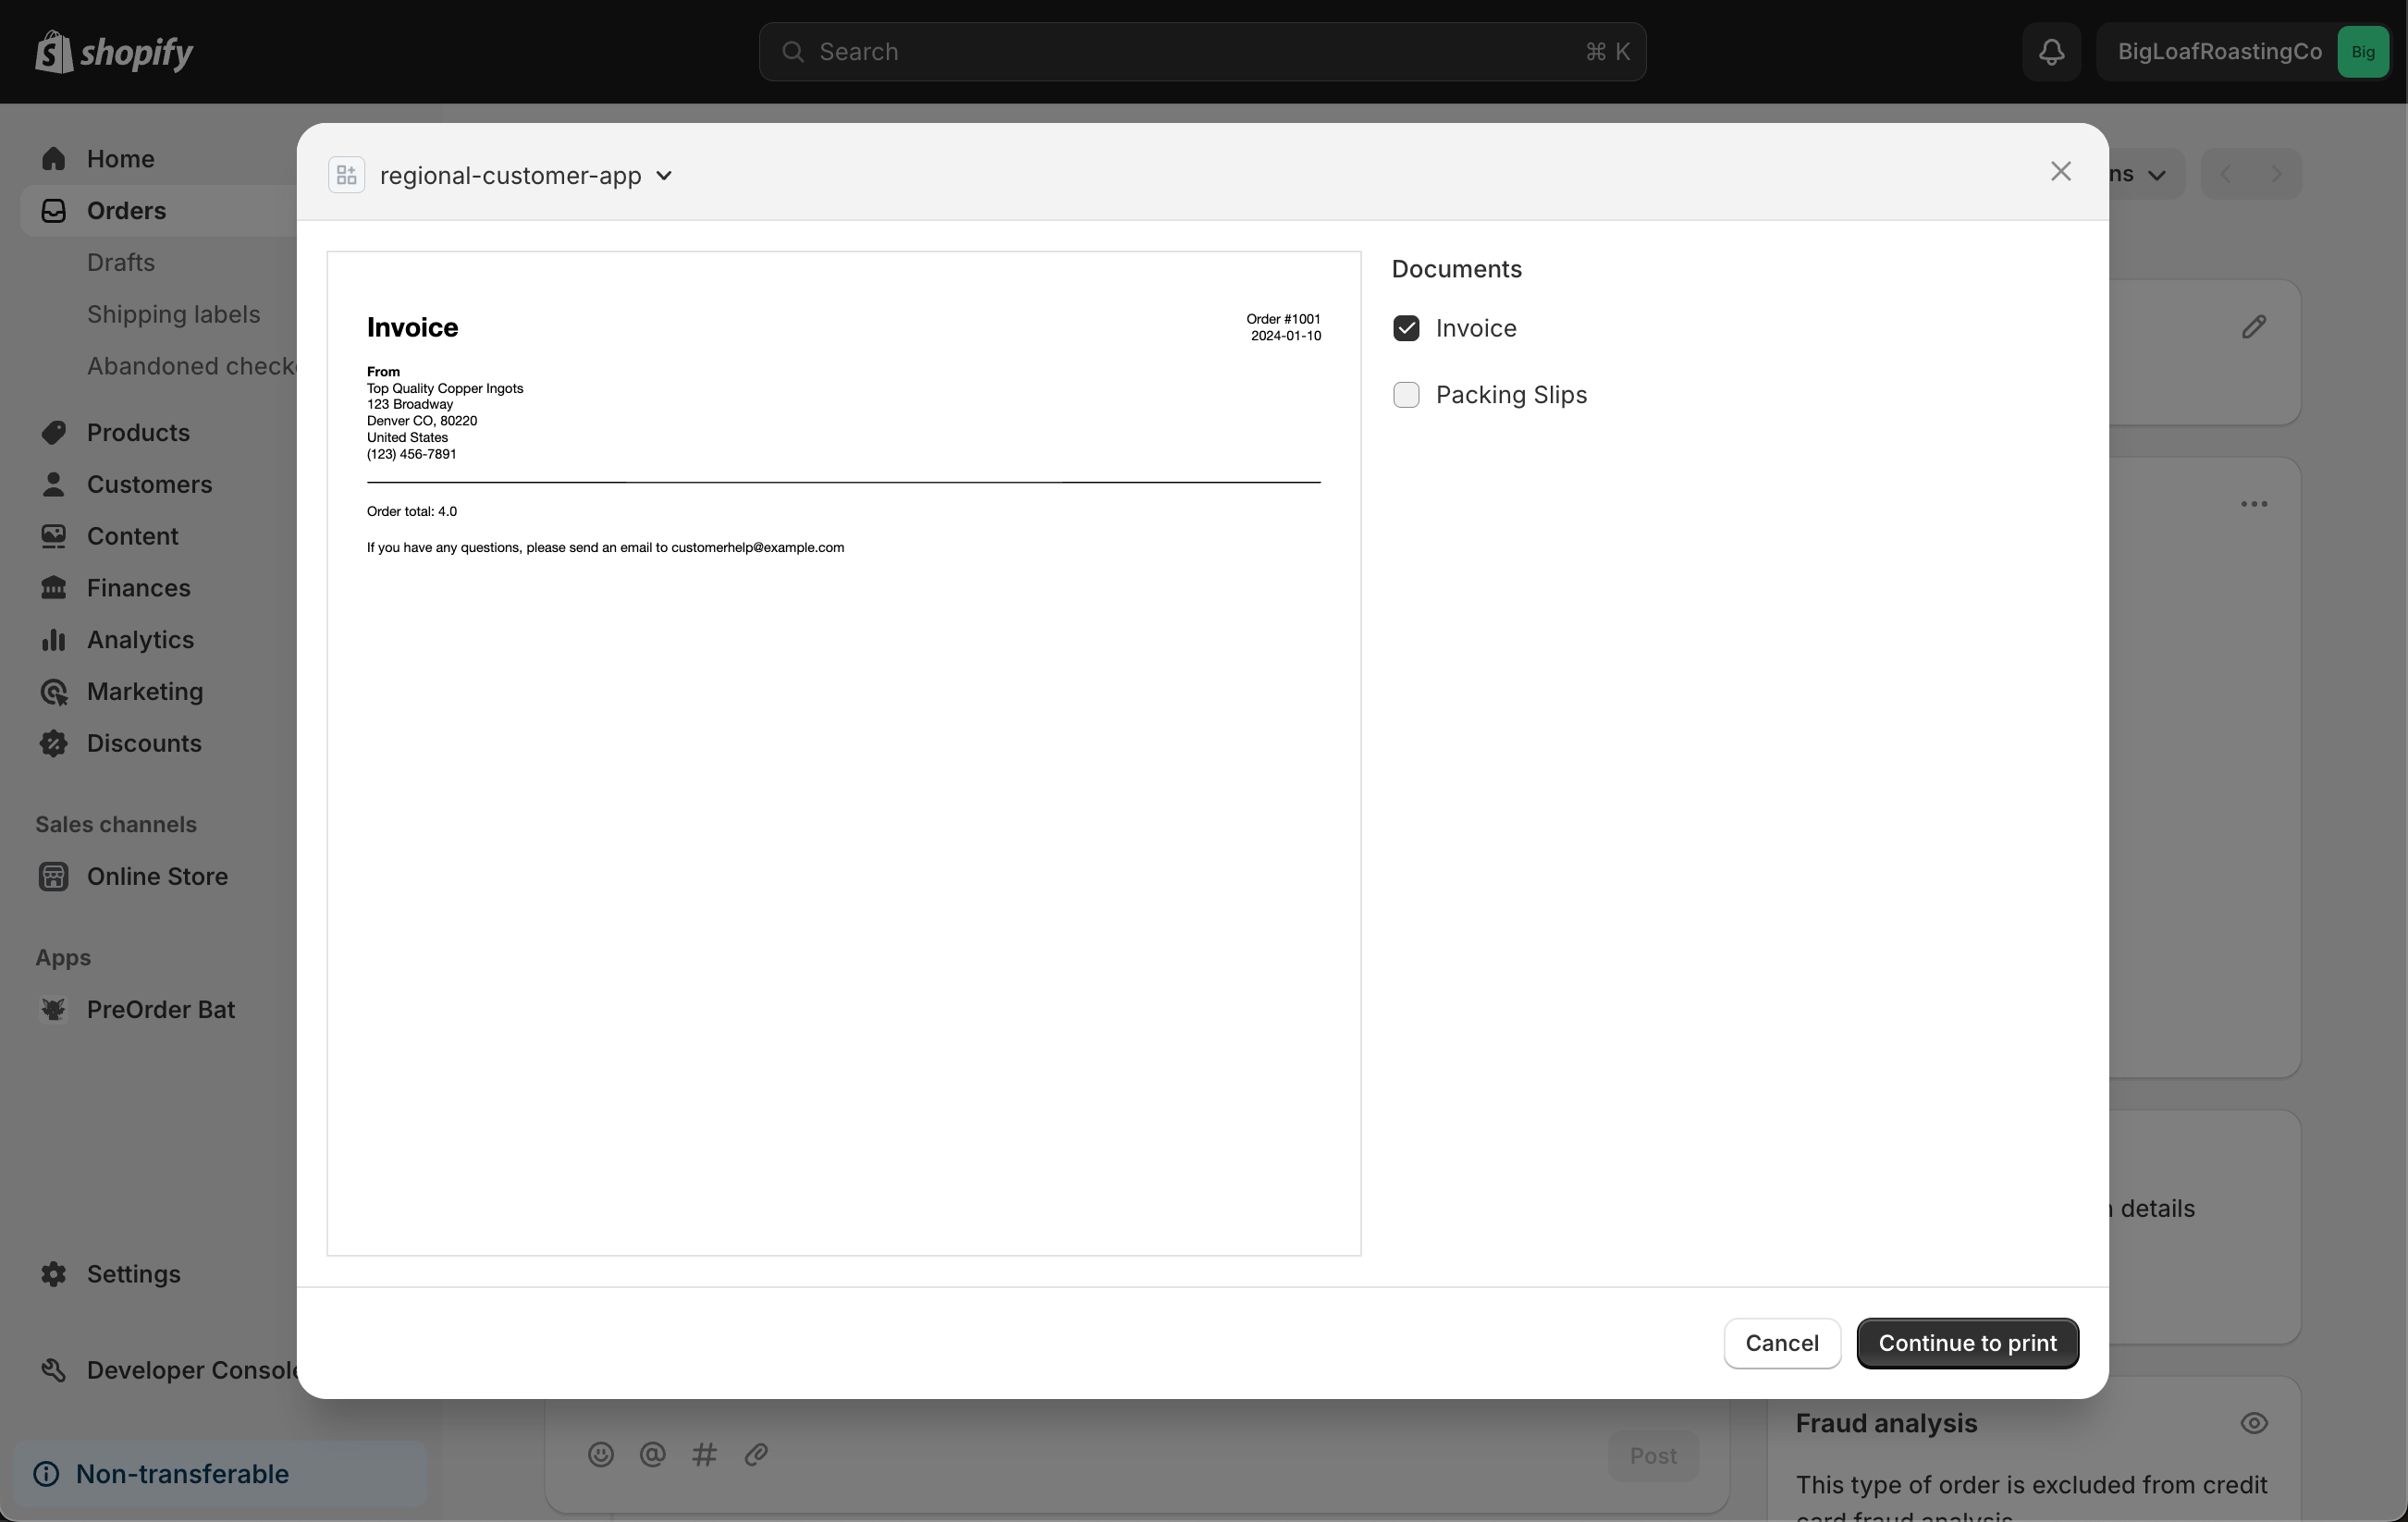
 6. To launch your UI extension, click the **Print** dropdown list and select your extension. 7. Select some options and click **Continue to print**. 8. The browser print dialog opens, and you can print the document. ## /app/routes/print.js ```javascript import { authenticate } from "../shopify.server"; export async function loader({ request }) { const { cors, admin } = await authenticate.admin(request); const url = new URL(request.url); const query = url.searchParams; const docs = query.get("printType").split(","); const orderId = query.get("orderId"); const response = await admin.graphql( `query getOrder($orderId: ID!) { order(id: $orderId) { name createdAt totalPriceSet { shopMoney { amount } } } }`, { variables: { orderId: orderId, }, }, ); const orderData = await response.json(); const order = orderData.data.order; const pages = docs.map((docType) => orderPage(docType, order)); const print = printHTML(pages); return cors( new Response(print, { ``` ### Next steps [![](https://shopify.dev/images/icons/32/blocks.png)![](https://shopify.dev/images/icons/32/blocks-dark.png)](https://shopify.dev/docs/apps/admin/admin-actions-and-blocks/build-an-admin-action) [Action and block UI extensions](https://shopify.dev/docs/apps/admin/admin-actions-and-blocks/build-an-admin-action) [Complete a tutorial series that describes how to build an UI extension for an issue tracker, using actions and blocks in Shopify admin.](https://shopify.dev/docs/apps/admin/admin-actions-and-blocks/build-an-admin-action) [![](https://shopify.dev/images/icons/32/blocks.png)![](https://shopify.dev/images/icons/32/blocks-dark.png)](https://shopify.dev/docs/api/admin-extensions/extension-targets) [Extension targets](https://shopify.dev/docs/api/admin-extensions/extension-targets) [Learn about the various places in Shopify admin where UI extensions can be displayed.](https://shopify.dev/docs/api/admin-extensions/extension-targets) [![](https://shopify.dev/images/icons/32/blocks.png)![](https://shopify.dev/images/icons/32/blocks-dark.png)](https://shopify.dev/docs/api/admin-extensions/components) [Components](https://shopify.dev/docs/api/admin-extensions/components) [Learn about the full set of available components for writing admin UI extensions.](https://shopify.dev/docs/api/admin-extensions/components)