Build a date picker for a specific shipping rate
Collecting extra information in relation to specific shipping rates, like a preferred delivery date, is a common situation. In this tutorial, you'll use checkout UI extensions to collect a delivery date for a specific shipping rate.
Checkout UI extensions are available only to stores on a Shopify Plus plan.
Checkout UI extensions are available only to stores on a Shopify Plus plan.
Anchor to What you'll learnWhat you'll learn
In this tutorial, you'll learn how to do the following tasks:
- Generate a checkout UI extension, using Shopify CLI.
- Configure your checkout UI extension in the extension TOML file.
- Query the Storefront API from the extension code to get shipping rate data.
- Use the web component library to add new user interface to the checkout.
- Use the checkout UI extension API to read and write order information.
- Save the date to a metafield and display the value in the Shopify admin.
Requirements
-
You're a user with app development permissions.
-
You've created a new development store with test data generated by Shopify.
-
You've created an app that uses Shopify CLI 3.85.1 or higher.
- You've reviewed the UX guidelines for customizing delivery methods.
Project
Anchor to Create a checkout UI extensionCreate a checkout UI extension
To create a checkout UI extension, you'll use Shopify CLI, which generates starter code for building your extension.
To create a checkout UI extension, you can use Shopify CLI, which generates starter code for building your extension and automates common development tasks.
-
Navigate to your app directory:
Terminal
cd <directory> -
Run the following command to create a new checkout UI extension:
Terminal
shopify app generate extension --template checkout_ui --name my-checkout-ui-extension -
Select
Checkout UI.You should now have a new extension directory in your app's directory. The extension directory includes the extension script at
src/Checkout.jsx. The following is an example directory structure:Checkout UI extension file structure
└── my-app└── extensions└── my-checkout-ui-extension├── src│ └── Checkout.jsx OR Checkout.js // The index page of the checkout UI extension├── locales│ ├── en.default.json // The default locale for the checkout UI extension│ └── fr.json // The locale file for non-regional French translations├── shopify.extension.toml // The config file for the checkout UI extension└── package.json -
Start your development server to build and preview your app:
Terminal
shopify app devRead more about the processes that are executed when you run
app dev. -
Press
pto open the Dev Console. -
In the extension list for your app, click on the preview link for your extension.
Anchor to Set up a targetSet up a target
Set up a target for your checkout UI extension. Targets control where your extension renders in the checkout flow.
Anchor to Render the extension from your script fileRender the extension from your script file
In your Checkout.jsx file, render the extension so it can be referenced in your configuration.
This example code uses the purchase.checkout.shipping-option-list.render-after target, so it renders the extension after the shipping methods section on the shipping step of the checkout.
You can update the checkout URL to test the extension in different locations in the checkout.
Anchor to Reference the extension targets in your configuration fileReference the extension targets in your configuration file
You can define more than one target so that app users can add the extension to multiple locations in the checkout.
In your checkout UI extension's configuration file, for each of your targets, create an [[extensions.targeting]] section with the following information:
-
module: The path to the file that contains the extension code. -
target: An identifier that specifies where you're injecting code into Shopify.
shopify.extension.toml is the configuration file for your extension. It contains basic information and settings.
Whenever you edit your extension configuration file, you need to restart your server for the changes to take effect.
Terminal
Whenever you edit your extension configuration file, you need to restart your server for the changes to take effect.
Terminal
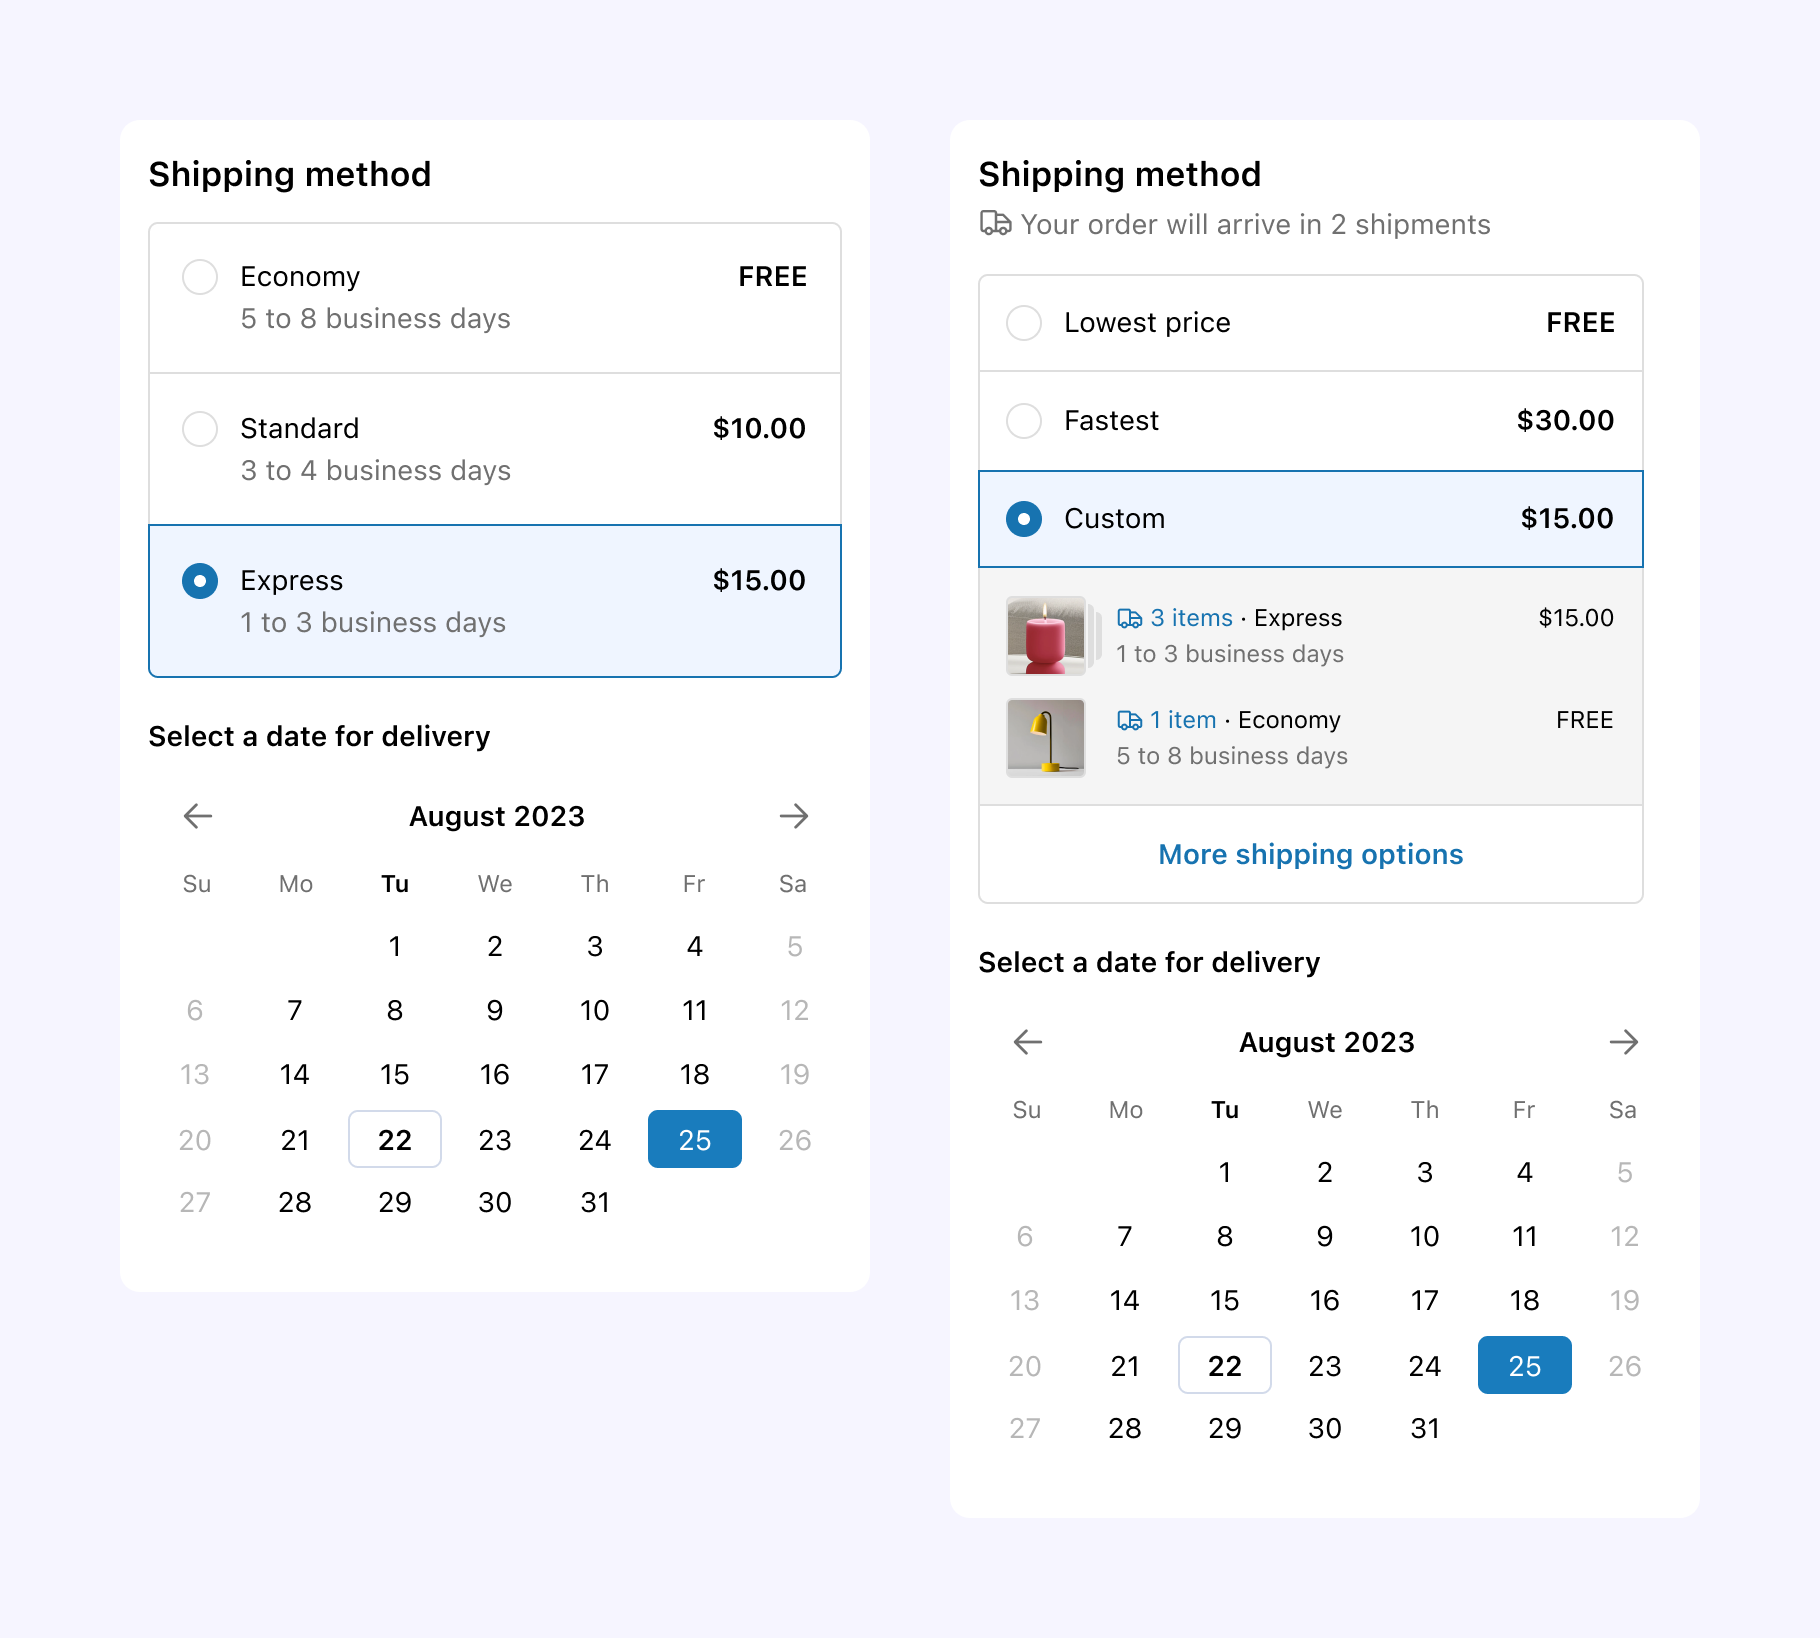
Anchor to Render the date picker and set the constraintsRender the date picker and set the constraints
In this step, you'll render a calendar where customers can select a delivery date, which is then saved to a metafield. The date picker component will display the available dates.
Anchor to Set up a metafieldSet up a metafield
In this step, you'll set a namespace and key for the metafield where you want to store the custom field value. Later, you'll expose values stored in this metafield to merchants in the Shopify admin.
A metafield is a custom field that you can use to store additional information about a Shopify resource. You can use metafields to store information specific to your app without setting up your own storage.
Anchor to Render the date pickerRender the date picker
In this step, you'll render a calendar where customers can select a delivery date. The date picker component will display the available dates.
Anchor to Set the constraints for the date picker componentSet the constraints for the date picker component
If there are only certain dates that delivery can happen, then you can customize how the date picker component can be used by buyers by passing disabled dates through disallow and disallowDates properties.
Anchor to Store the user input in the metafieldStore the user input in the metafield
You can use the applyMetafieldChange method to store the value that the customer enters in the metafields property of the checkout. This metafield value is later associated with the order.
applyMetafieldChange is part of the Metafields API. To learn more about it and other available APIs, refer to the Checkout UI Extension APIs reference.
Anchor to Limit the date picker component to a specific shipping rateLimit the date picker component to a specific shipping rate
If you want to limit the date picker component to a specific shipping rate, you can use the Delivery API to get the shipping rate data and then limit the render of the date picker component.
Anchor to Show the selected date in the Shopify adminShow the selected date in the Shopify admin
After you've saved the date picker metafield to the order, you can display it on the order details page in the Shopify admin so that merchants can view it.
Anchor to Add a metafield definition for ordersAdd a metafield definition for orders
In the Shopify admin, add a metafield definition for orders. Use the same namespace and key as defined in your /src/Checkout.jsx file.
If you already placed an order with delivery instructions, then you might need to select the metafield from the Metafields without a definition list.
If you already placed an order with delivery instructions, then you might need to select the metafield from the Metafields without a definition list.
Anchor to Preview the extensionPreview the extension
Preview your extension to make sure that it works as expected.
Anchor to Start your serverStart your server
Run the Shopify CLI dev command to build your app and preview it on your development store.
-
In a terminal, navigate to your app directory.
-
Either start or restart your server to build and preview your app:
Terminal
shopify app dev -
Press
pto open the Dev Console. -
In the extension list for your app, click on the preview link for the custom date picker extension.
The checkout opens.
This section describes how to solve some potential errors when you run dev for an app that contains a checkout UI extension.
Anchor to Property token errorProperty token error
If you receive the error ShopifyCLI:AdminAPI requires the property token to be set, then you'll need to use the --checkout-cart-url flag to direct Shopify CLI to open a checkout session for you.
Terminal
Anchor to Missing checkout linkMissing checkout link
If you don't receive the test checkout URL when you run dev, then verify the following:
-
You have a development store populated with products.
-
You're logged in to the correct Partners organization and development store. To verify, check your app info using the following command:
Terminal
shopify app info
Otherwise, you can manually create a checkout with the following steps:
-
From your development store's storefront, add some products to your cart.
-
From the cart, click Checkout.
-
From directory of the app that contains your extension, run
devto preview your app:Terminal
shopify app dev -
On the checkout page for your store, change the URL by appending the
?dev=https://{tunnel_url}/extensionsquery string and reload the page. Thetunnel_urlparameter allows your app to be accessed using a unique HTTPS URL.You should now see a rendered order note that corresponds to the code in your project template.
Anchor to Test the extension functionalityTest the extension functionality
Test your extension to make sure that it works as expected by placing an order with delivery instructions in checkout.
-
With your server running, open the storefront of your dev store.
-
Add a product to the cart and then check out.
-
Fill out the contact and shipping address information, and then move to the Shipping step of the checkout.
-
Select Express Shipping. A date picker appears.
-
Select a date and then complete the checkout.
-
In the Shopify admin for the dev store, open the order details page for the order that you just placed.
The delivery date that you entered is displayed in the Metafields section, with the delivery date field that you created.
When you're ready to release your changes to users, you can create and release an app version. An app version is a snapshot of your app configuration and all extensions.
-
Navigate to your app directory.
-
Run the following command.
Optionally, you can provide a name or message for the version using the
--versionand--messageflags.Terminal
shopify app deploy
Releasing an app version replaces the current active version that's served to stores that have your app installed. It might take several minutes for app users to be upgraded to the new version.
If you want to create a version, but avoid releasing it to users, then run the deploy command with a --no-release flag.
You can release the unreleased app version using Shopify CLI's release command, or through the Dev Dashboard.
If you want to create a version, but avoid releasing it to users, then run the deploy command with a --no-release flag.
You can release the unreleased app version using Shopify CLI's release command, or through the Dev Dashboard.
Anchor to Tutorial complete!Tutorial complete!
Nice work - what you just built could be used by Shopify merchants around the world! Keep the momentum going with these related tutorials and resources.
Anchor to Next stepsNext steps
Build a good delivery method experience by following our UX guidelines.
Localize your extensionLearn how to localize the text and number formats in your extension.
Explore the web components referenceLearn about all of the components that you can use in your checkout UI extension.
Explore the checkout UI targetsLearn about the targets offered in the checkout.