Add a banner to checkout
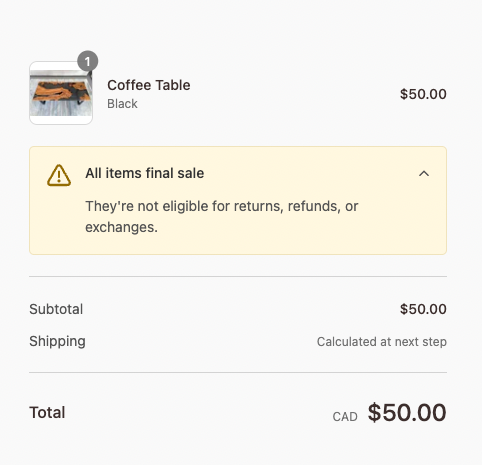
A custom banner is a notice that you can display to customers. For example, you might want to show a banner that indicates that items are final sale and can't be returned or exchanged.
In this tutorial, you'll use checkout UI extensions to add a customizable banner.
Follow along with this tutorial to build a sample app, or clone the completed sample app.
Checkout UI extensions are available only to Shopify Plus merchants.
Checkout UI extensions are available only to Shopify Plus merchants.
Anchor to What you'll learnWhat you'll learn
In this tutorial, you'll learn how to do the following:
- Generate a checkout UI extension that appears in the checkout flow using Shopify CLI.
- Set up a banner to display to customers.
- Configure settings that enable app users to control the banner content.
- Support multiple targets that enable app users to choose where to render the banner.
- Deploy your extension code to Shopify.
Requirements
-
You're a user with app development permissions.
-
You've created a new development store with test data generated by Shopify.
-
You've created an app that uses Shopify CLI 3.85.1 or higher.
Project
Anchor to Create a checkout UI extensionCreate a checkout UI extension
To create a checkout UI extension, use Shopify CLI, which generates starter code for building your extension.
To create a checkout UI extension, you can use Shopify CLI, which generates starter code for building your extension and automates common development tasks.
-
Navigate to your app directory:
Terminal
cd <directory> -
Run the following command to create a new checkout UI extension:
Terminal
shopify app generate extension --template checkout_ui --name my-checkout-ui-extension -
Select
Checkout UI.You should now have a new extension directory in your app's directory. The extension directory includes the extension script at
src/Checkout.jsx. The following is an example directory structure:Checkout UI extension file structure
└── my-app└── extensions└── my-checkout-ui-extension├── src│ └── Checkout.jsx OR Checkout.js // The index page of the checkout UI extension├── locales│ ├── en.default.json // The default locale for the checkout UI extension│ └── fr.json // The locale file for non-regional French translations├── shopify.extension.toml // The config file for the checkout UI extension└── package.json -
Start your development server to build and preview your app:
Terminal
shopify app devRead more about the processes that are executed when you run
app dev. -
Press
pto open the Dev Console. -
In the extension list for your app, click on the preview link for your extension.
Anchor to Set up a target for your extensionSet up a target for your extension
Set up a target for your checkout UI extension. Targets control where your extension renders in the checkout flow.
Anchor to Reference the extension targets in your configuration fileReference the extension targets in your configuration file
You can define more than one target so that app users can add the extension to multiple locations in the checkout.
In your checkout UI extension's configuration file, for each of your targets, create an [[extensions.targeting]] section with the following information:
-
module: The path to the file that contains the extension code. -
target: An identifier that specifies where you're injecting code into Shopify.
shopify.extension.toml is the configuration file for your extension. It contains basic information and settings.
Whenever you edit your extension configuration file, you need to restart your server for the changes to take effect.
Terminal
Whenever you edit your extension configuration file, you need to restart your server for the changes to take effect.
Terminal
Anchor to Configure the settingsConfigure the settings
The settings for a checkout UI extension define fields that the app user can set from the checkout editor.
You can use validation options to apply additional constraints to the data that the setting can store, such as a minimum or maximum value.
Anchor to Define the required properties for the settingsDefine the required properties for the settings
Define the settings that you want to expose to app users in shopify.extension.toml. For each setting, define the required properties: key, type, and name.
The key property defines a string that's used to access the setting values from your extension code.
The type property determines the type of information that the setting can store. Each setting types has built-in validation on the setting input.
The name property defines the name for the setting that's displayed to the app user in the checkout editor.
Anchor to Define the optional properties for the settingsDefine the optional properties for the settings
For each setting, define the optional properties: description and validations.
The description property is displayed to the app user in the checkout editor.
The validations property defines constraints on the setting input that Shopify validates.
Anchor to Use the configured settings in the UI extensionUse the configured settings in the UI extension
Use the values that have been configured by the app user in the checkout UI extension.
Anchor to Access app user settingsAccess app user settings
Retrieve the settings values within your extension. Set default settings so the app can be previewed without being deployed.
In Preact, shopify.settings.value is derived from a Signal and re-renders your extension with the latest values.
When an extension is being installed in the checkout editor, the settings are empty until an app user sets a value. This object is updated in real time as the app user fills in the settings.
Render the checkout UI extension banner component with the content from the settings that you configured.
Anchor to Preview the extensionPreview the extension
Preview your extension to make sure that it works as expected.
Anchor to Start your serverStart your server
Run the Shopify CLI dev command to build your app and preview it on your development store.
-
In a terminal, navigate to your app directory.
-
Either start or restart your server to build and preview your app:
Terminal
shopify app dev -
Press
pto open the Dev Console. -
In the extension list for your app, click on the preview link for the custom banner extension.
The checkout opens.
This section describes how to solve some potential errors when you run dev for an app that contains a checkout UI extension.
Anchor to Property token errorProperty token error
If you receive the error ShopifyCLI:AdminAPI requires the property token to be set, then you'll need to use the --checkout-cart-url flag to direct Shopify CLI to open a checkout session for you.
Terminal
Anchor to Missing checkout linkMissing checkout link
If you don't receive the test checkout URL when you run dev, then verify the following:
-
You have a development store populated with products.
-
You're logged in to the correct Partners organization and development store. To verify, check your app info using the following command:
Terminal
shopify app info
Otherwise, you can manually create a checkout with the following steps:
-
From your development store's storefront, add some products to your cart.
-
From the cart, click Checkout.
-
From directory of the app that contains your extension, run
devto preview your app:Terminal
shopify app dev -
On the checkout page for your store, change the URL by appending the
?dev=https://{tunnel_url}/extensionsquery string and reload the page. Thetunnel_urlparameter allows your app to be accessed using a unique HTTPS URL.You should now see a rendered order note that corresponds to the code in your project template.
When you're ready to release your changes to users, you can create and release an app version. An app version is a snapshot of your app configuration and all extensions.
-
Navigate to your app directory.
-
Run the following command.
Optionally, you can provide a name or message for the version using the
--versionand--messageflags.Terminal
shopify app deploy
Releasing an app version replaces the current active version that's served to stores that have your app installed. It might take several minutes for app users to be upgraded to the new version.
If you want to create a version, but avoid releasing it to users, then run the deploy command with a --no-release flag.
You can release the unreleased app version using Shopify CLI's release command, or through the Dev Dashboard.
If you want to create a version, but avoid releasing it to users, then run the deploy command with a --no-release flag.
You can release the unreleased app version using Shopify CLI's release command, or through the Dev Dashboard.
After the extension has been deployed, app users can edit the banner settings in the checkout editor. Test the banner settings so that you can see how they appear to app users.
-
In the dev store where your app is installed, open the checkout editor: in the Shopify admin for the dev store, navigate to Settings > Checkout > Customize.
-
In the checkout editor, select Add an app block, and then select your extension.
-
In the App block settings section, update the banner title, description, and status.
-
To preview your changes, do the following:
- From your dev store's storefront, add products to your cart.
- Click Check out.
- View the banner on the first page of the checkout. The banner reflects the settings that you set in the checkout editor.
Anchor to Tutorial complete!Tutorial complete!
Nice work - what you just built could be used by Shopify merchants around the world! Keep the momentum going with these related tutorials and resources.
Anchor to Next stepsNext steps
Learn how to localize the text and number formats in your extension.
Explore the checkout UI extension component referenceLearn about all of the components that you can use in your checkout UI extension.
Explore the checkout UI targets referenceLearn about the targets offered in the checkout.