Build new pages in customer accounts
Full-page UI extensions enable you to create a page within the customer account experience while preserving a merchant's branding.
In this tutorial, you'll learn how to create a standalone full-page UI extension that customers can access without leaving their account or needing to log in again.
Anchor to What you'll learnWhat you'll learn
In this tutorial, you'll learn how to do the following tasks:
- Create a full-page UI extension in customer accounts
- Create a full-page extension entry point to test your full-page extension
- Use web components like page and section to build a page for customer wishlists
- Query the Storefront API to retrieve a list of products
- Navigate to your full-page extension
- Run the extension locally and test it on a dev store
Requirements
The development store should be pre-populated with test data, including an order associated with the email address you'll use to log in to the customer account experience.
You'll need to use the latest version of Shopify CLI.
Scaffold an app that uses Shopify CLI.
Project
Anchor to Create a customer account UI extension for the full-page targetCreate a customer account UI extension for the full-page target
To create a customer account UI extension, you can use Shopify CLI, which generates starter code for building your extension and automates common development tasks.
-
Navigate to your app directory:
Terminal
cd <directory> -
Run the following command to create a new customer account UI extension:
Terminal
shopify app generate extension --template customer_account_ui --name customer-account-ui-extensionYou should now have a new extension directory in your app's directory. The extension directory includes the extension script at
src/{FileName}.jsx. The following is an example directory structure:Customer account UI extension file structure
└── my-app└── extensions└── my-customer-account-ui-extension├── src│ └── CustomerAccount.jsx // The index page of the customer account UI extension├── locales│ ├── en.default.json // The default locale for the customer account UI extension│ └── fr.json // The locale file for non-regional French translations├── shopify.extension.toml // The config file for the customer account UI extension└── package.json
-
Start your development server to build and preview your app:
Terminal
shopify app devTo learn about the processes that are executed when you run
dev, refer to the Shopify CLI command reference. -
Press
pto open the Dev Console. -
In the extension list for your app, click on the preview link for your extension.
Anchor to Set up the target for your full-page extensionSet up the target for your full-page extension
Set up the targets for your customer account UI extension. Targets control where your extension renders in the account. A full-page target cannot coexist with any other targets in the same extension.
In this example, you'll create a page that lists products in the customer's wishlist, and a link to that page.
Anchor to Reference the targets in your configuration fileReference the targets in your configuration file
This example code uses the customer-account.page.render target.
In your extension's shopify.extension.toml configuration file, for each of the targets, create an [[extensions.targeting]] section with the following information:
target: An identifier that specifies where you're injecting code into Shopify.module: The path to the file that contains the extension code.
Anchor to Create files for your targetsCreate files for your targets
Create a file in your extension's src directory for each of your targets. In this example, you'll create a file for the profile block extension and a file for the full-page extension. The filenames must match the module paths you specified.
Anchor to Create a customer account UI extension for the full-page entry point for testingCreate a customer account UI extension for the full-page entry point for testing
Create an extension, to define an entry point to the full-page extension created above.
To create a customer account UI extension, you can use Shopify CLI, which generates starter code for building your extension and automates common development tasks.
-
Navigate to your app directory:
Terminal
cd <directory> -
Run the following command to create a new customer account UI extension:
Terminal
shopify app generate extension --template customer_account_ui --name customer-account-ui-extensionYou should now have a new extension directory in your app's directory. The extension directory includes the extension script at
src/{FileName}.jsx. The following is an example directory structure:Customer account UI extension file structure
└── my-app└── extensions└── my-customer-account-ui-extension├── src│ └── CustomerAccount.jsx // The index page of the customer account UI extension├── locales│ ├── en.default.json // The default locale for the customer account UI extension│ └── fr.json // The locale file for non-regional French translations├── shopify.extension.toml // The config file for the customer account UI extension└── package.json
-
Start your development server to build and preview your app:
Terminal
shopify app devTo learn about the processes that are executed when you run
dev, refer to the Shopify CLI command reference. -
Press
pto open the Dev Console. -
In the extension list for your app, click on the preview link for your extension.
Anchor to Set up the target for your entry pointSet up the target for your entry point
Set up the target for your customer account UI extension. Targets control where your extension renders in the customer account flow.
The example code uses the customer-account.profile.block.render target
Anchor to Add the ,[object Object], target to your configuration fileAdd the customer-account.profile.block.render target to your configuration file
customer-account.profile.block.render target to your configuration fileIn your extension's configuration file, for the customer-account.profile.block.render target, create an [[extensions.targeting]] section with the following information:
target: An identifier that specifies where you're injecting code into Shopify.
module: The path to the file that contains the extension code.
Anchor to Create files for your targetsCreate files for your targets
Create a file in your extension's src directory for the target. In this example, you'll create a file for the profile block extension. Make sure that the name of the files match the module paths that you specified.
shopify.extension.toml is the configuration file for your extension.
Anchor to Build the full-page extensionBuild the full-page extension
Anchor to Fetch the customer's wishlistFetch the customer's wishlist
Create an asynchronous function to fetch the wishlist from your server, and invoke it within a side effect.
In this example, you'll retrieve the shop's first ten products from the Storefront API. In a production-ready application, first retrieve the customer's wishlist from your server, and then retrieve the product details from the Storefront API.
Anchor to Build the page UIBuild the page UI
In your full-page extension file, create a function to set up the page UI. To match the look and feel of the customer accounts experience, use the page and section components.
Customer account UI extensions are limited to specific UI components exposed by the platform for security reasons. You can use checkout UI components and customer account UI components to create a UI that feels seamless within the customer accounts experience, and that inherits a merchant's brand settings.
Anchor to Add a link to your full-page extensionAdd a link to your full-page extension
In your profile block extension file, create a function to set up the link that routes to your full-page extension. Setting the href prop to extension:wishlist-extension-preact/ instructs the router to navigate to the full-page extension that you created.
When navigating to a full-page extension from another extension within the same app, use the extension:$full-page-extension-handle/ protocol.
In a production-ready application, don't include this link in your extension. Instead, only publish the full-page extension. Merchants can add a link to it in the header navigation menu of their customer accounts experience.
Anchor to Preview and test the extensionPreview and test the extension
Preview your extension to make sure that it works as expected.
Anchor to Start your serverStart your server
Run the Shopify CLI dev command to build your app and preview it on your development store.
-
In a terminal, navigate to your app directory.
-
Either start or restart your server to build and preview your app:
Terminal
shopify app dev -
If prompted, select a development store.
-
Press
pto open the Dev Console. -
In the extension list for your app, click on the preview link for your extension.
The customer accounts experience opens.
Anchor to Test the full-page extensionTest the full-page extension
-
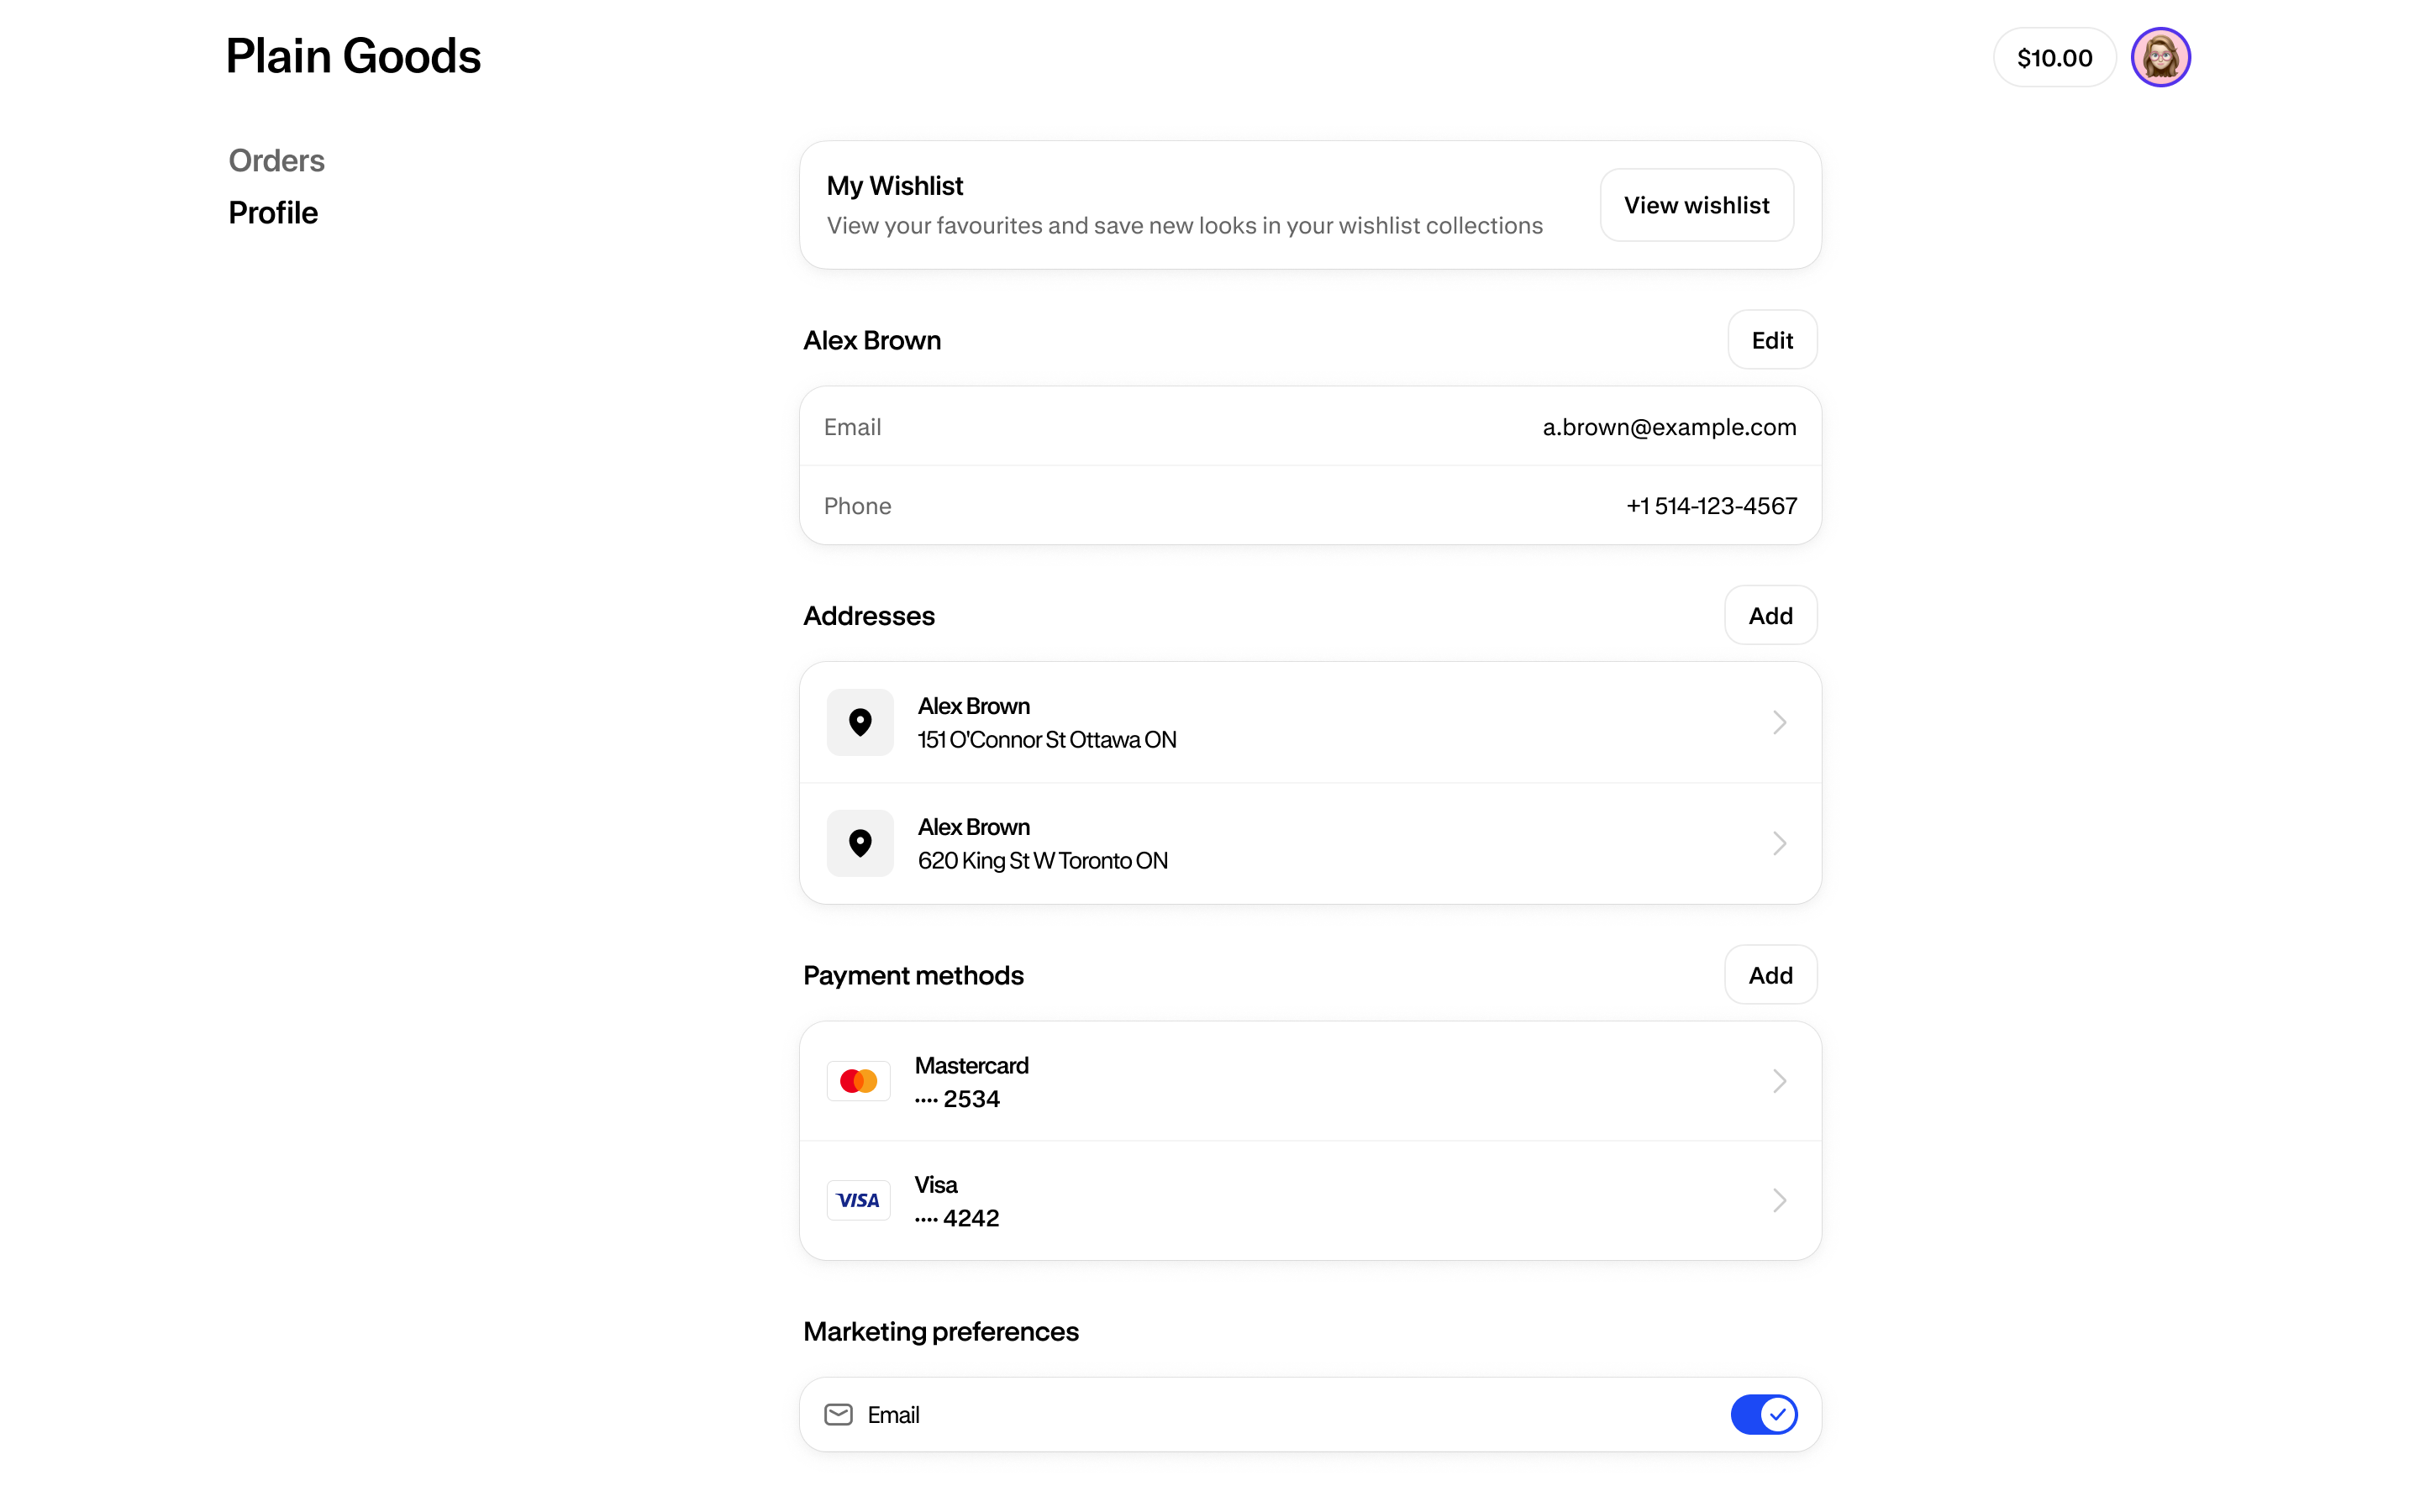
Navigate to the profile page by clicking the dropdown in the top right corner of the customer account and selecting Profile.
-
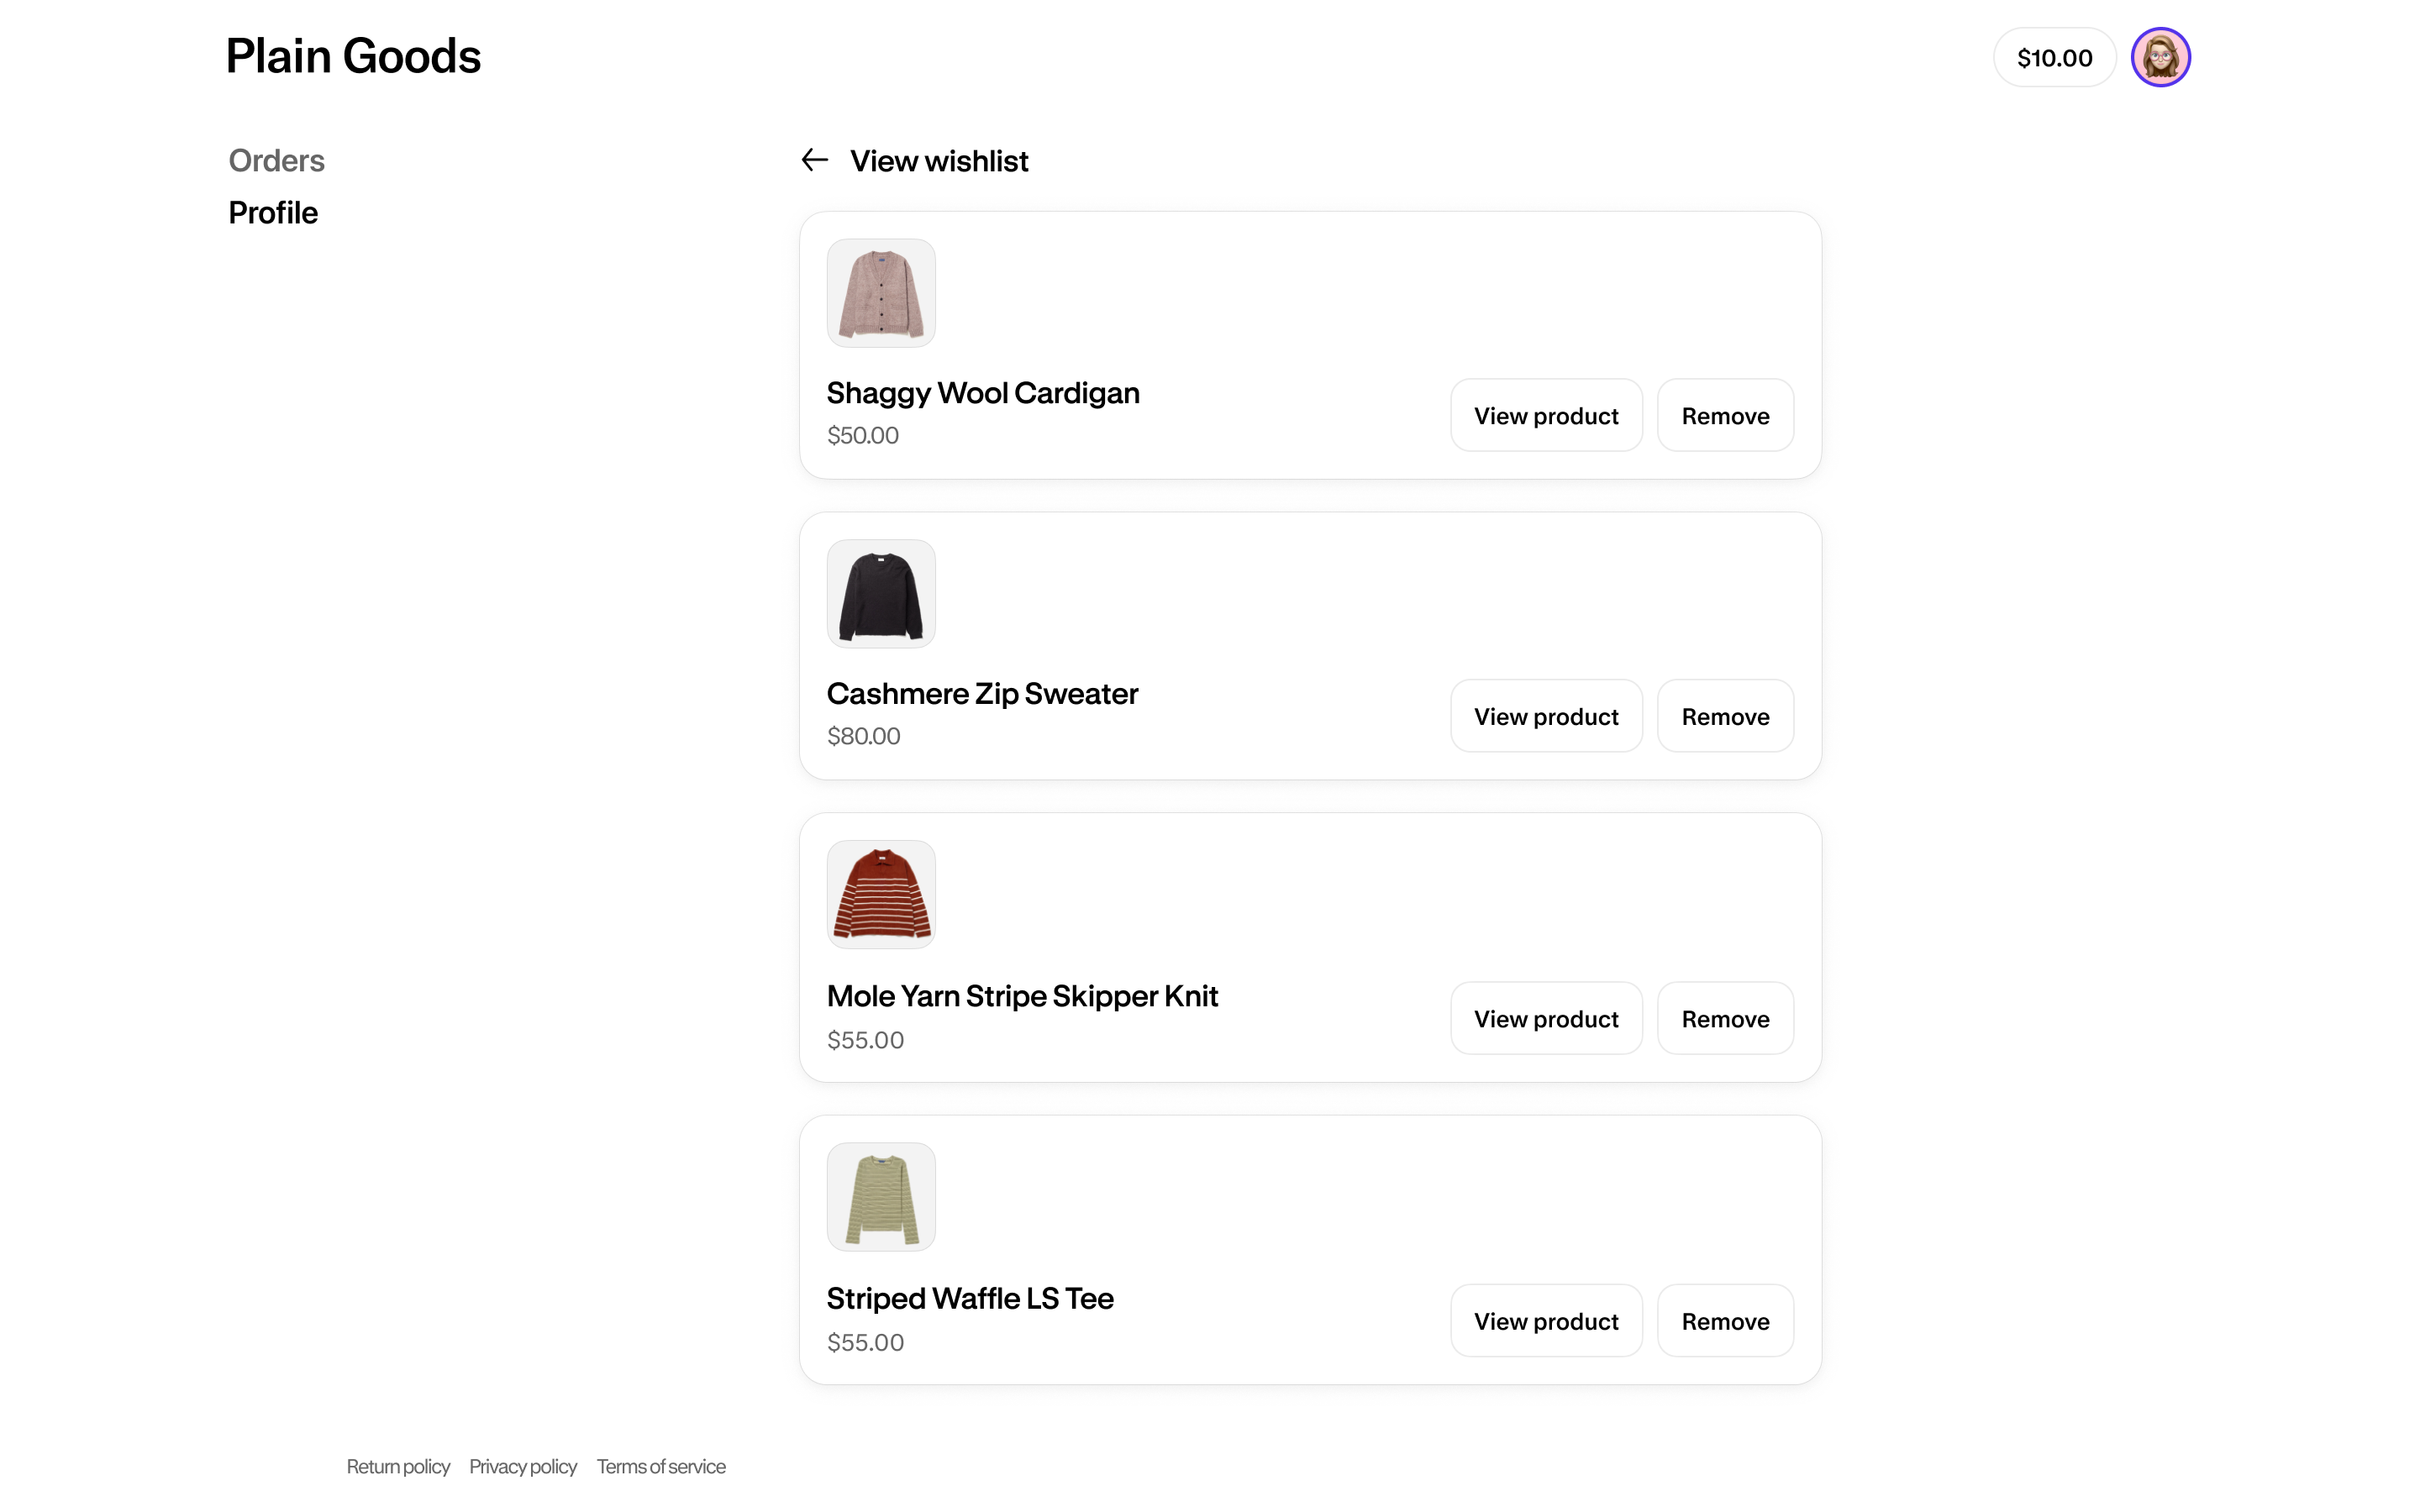
Click the View wishlist link in the banner that you created.
You're taken to the full-page extension you created, which lists out the products in the customer's wishlist.
Anchor to Tutorial complete!Tutorial complete!
Nice work - what you just built could be used by Shopify merchants around the world! Keep the momentum going with these related tutorials and resources.
Anchor to Next StepsNext Steps
Explore extension placement options and make informed decisions on where to position them.
Localize your extensionLearn about localizing your customer account UI extensions for international merchants and customers.
TargetsLearn about the targets offered for customer accounts.
UX guidelinesFollow our UX guidelines for customer accounts to ensure a consistent and satisfying user experience.
Web componentsLearn about the components you can use to build customer account UI extensions.
Editor extension collectionsLearn how to create editor extension collections to group related extensions.