---
title: Build a discount UI extension
description: >-
Learn how to develop a scaffolded POS UI extension into a simple discount UI
extension.
source_url:
html: 'https://shopify.dev/docs/apps/build/pos/build-discount-extension'
md: 'https://shopify.dev/docs/apps/build/pos/build-discount-extension.md'
---
# Build a discount UI extension
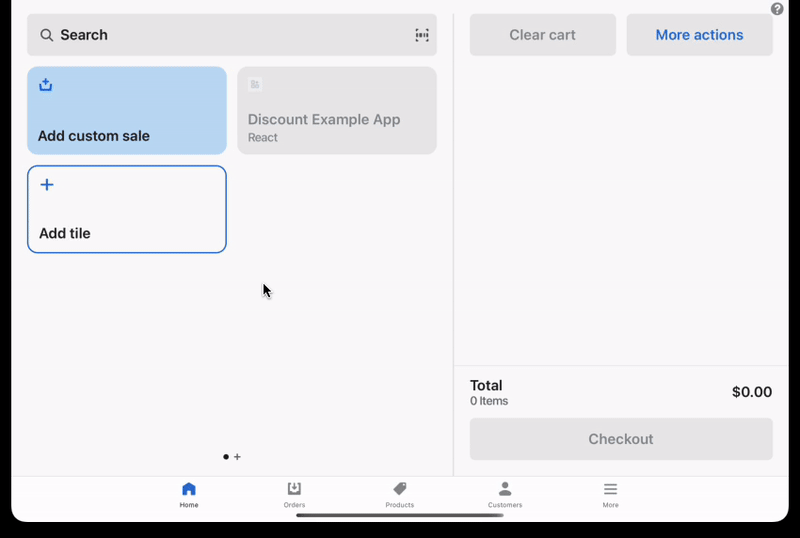
This tutorial shows you how to use the `pos.home.tile.render` and `pos.home.modal.render` [extension targets](https://shopify.dev/docs/api/pos-ui-extensions/targets) to build a simple POS UI extension that quickly applies discounts to items in the cart.
You'll create a smart grid tile that's enabled after a cart reaches a specified value. Tapping the tile opens a modal displaying buttons for available discounts. Pressing a button applies a discount to the cart and presents a success notification.
## What you'll learn
In this tutorial, you'll learn how to do the following tasks:
* Subscribe to cart changes.
* Enable or disable the tile based on cart contents.
* Add buttons to the modal that apply a discount and show a toast when tapped.
* Deploy your extension to Shopify, create a version, and publish.
## Requirements
[Create a Partner account](https://www.shopify.com/partners)
[Create a development store](https://shopify.dev/docs/apps/tools/development-stores#create-a-development-store-to-test-your-app)
[Scaffold an app](https://shopify.dev/docs/apps/build/scaffold-app)
Scaffold an app using Shopify CLI. This tutorial is compatible with the [extension-only template](https://shopify.dev/docs/apps/structure/app-extensions/extension-only-apps).
[Generate a POS UI extension](https://shopify.dev/docs/apps/build/pos/getting-started)
Generate a POS UI extension using the Shopify CLI.
## Project
[View on GitHub](https://github.com/Shopify/pos-ui-extensions-tutorials/tree/main/example-pos-ui-extensions--discounts--preact)
### Subscribe to cart changes
You previously created an app and generated a POS UI extension using Shopify CLI. You now need to subscribe to cart changes to get the contents of a cart. By subscribing to cart changes, you'll be able to control whether the smart grid tile is enabled after a cart reaches a specified value.
In the tile code, subscribe to cart changes and mutate the state based on the updated cart.
## /example-pos-ui-extensions--discounts--preact/extensions/discount/src/Tile.jsx
```jsx
import {render} from 'preact';
import {useState, useEffect} from 'preact/hooks';
export default async () => {
render(, document.body);
}
function Extension() {
const shouldDisable = (subtotal) => {
return Number(subtotal) <= 100;
};
const [disabled, setDisabled] = useState(
shouldDisable(shopify.cart.current.value.subtotal),
);
useEffect(() => {
const unsubscribe = shopify.cart.current.subscribe((cart) => {
setDisabled(shouldDisable(cart.subtotal));
});
return unsubscribe;
}, []);
return (
shopify.action.presentModal()}
disabled={disabled}
/>
);
}
```
### Enable or disable the tile based on cart contents
With the cart contents in place, you can now enable or disable the tile based on cart contents. You can enable or disable the tile based on cart contents by accessing its `subscribable` property.
In the tile code, initialize the state based on the initial value of the `subscribable` property.
## /example-pos-ui-extensions--discounts--preact/extensions/discount/src/Tile.jsx
```jsx
import {render} from 'preact';
import {useState, useEffect} from 'preact/hooks';
export default async () => {
render(, document.body);
}
function Extension() {
const shouldDisable = (subtotal) => {
return Number(subtotal) <= 100;
};
const [disabled, setDisabled] = useState(
shouldDisable(shopify.cart.current.value.subtotal),
);
useEffect(() => {
const unsubscribe = shopify.cart.current.subscribe((cart) => {
setDisabled(shouldDisable(cart.subtotal));
});
return unsubscribe;
}, []);
return (
shopify.action.presentModal()}
disabled={disabled}
/>
);
}
```
### Add buttons
With the cart contents in place, you can now add buttons to the modal that apply a discount and display a toast when tapped. You can add buttons to the modal that trigger some action on press.
Create the buttons on the modal. Note that most components belong in an `s-scroll-box`, so that the UI works well on different device sizes, and can scroll as needed.
### Define a function to trigger an action
To trigger an action when a user clicks the button, you need to define an `onClick` function. In the context of this tutorial, you'll apply the discount and show the toast.
Define an `onClick` function to apply the discount and show the toast.
## /example-pos-ui-extensions--discounts--preact/extensions/discount/src/Modal.jsx
```jsx
import { render } from "preact";
export default async () => {
render(, document.body);
};
function Extension() {
const onButtonClick = (type, title, amount) => {
shopify.cart.applyCartDiscount(type, title, amount);
shopify.toast.show("Discount applied");
};
return (
onButtonClick("Percentage", "25% off", "25")}>
25%
onButtonClick("FixedAmount", "$10 off", "10")}>
$10
);
}
```
### Add a description for your extension
In POS, the description is used to help merchants discover and add your extension. This description is used as the label for your extension in POS.
Your extension's description is visible to the merchant when they discover and add it to their POS.
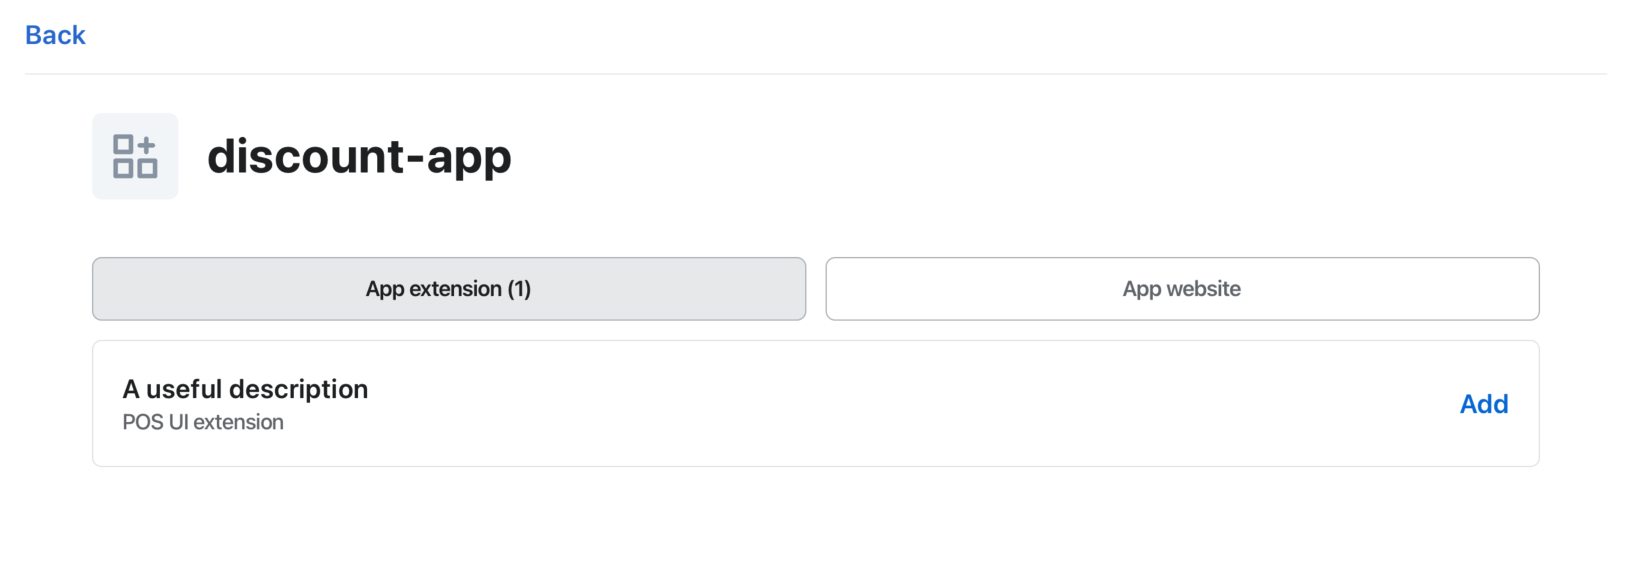
When you generate a POS UI extension from Shopify CLI, the extension description defaults to the name of the extension. You can update the description in the generated `toml` file (`shopify.extension.toml`).
### Test the extension
To test the extension, you'll need to run your app locally and test the extension in the POS.
1. Navigate to your app directory and start your development server.
2. Press `p` to open the developer console.
3. In the developer console, click on the **view mobile** or scan the provided QR code to preview your extension.
### Deploy and release
Congratulations! You've created a POS UI extension that applies discounts to items in the cart. Now you can deploy and release your extension.
Refer to [Deploy app extensions](https://shopify.dev/docs/apps/deployment/app-versions) for more information.
## /example-pos-ui-extensions--discounts--preact/extensions/discount/src/Tile.jsx
```jsx
import {render} from 'preact';
import {useState, useEffect} from 'preact/hooks';
export default async () => {
render(, document.body);
}
function Extension() {
const shouldDisable = (subtotal) => {
return Number(subtotal) <= 100;
};
const [disabled, setDisabled] = useState(
shouldDisable(shopify.cart.current.value.subtotal),
);
useEffect(() => {
const unsubscribe = shopify.cart.current.subscribe((cart) => {
setDisabled(shouldDisable(cart.subtotal));
});
return unsubscribe;
}, []);
return (
shopify.action.presentModal()}
disabled={disabled}
/>
);
}
```
## /example-pos-ui-extensions--discounts--preact/extensions/discount/src/Modal.jsx
```jsx
import { render } from "preact";
export default async () => {
render(, document.body);
};
function Extension() {
const onButtonClick = (type, title, amount) => {
shopify.cart.applyCartDiscount(type, title, amount);
shopify.toast.show("Discount applied");
};
return (
onButtonClick("Percentage", "25% off", "25")}>
25%
onButtonClick("FixedAmount", "$10 off", "10")}>
$10
);
}
```
## /example-pos-ui-extensions--discounts--preact/extensions/discount/shopify.extension.toml
```toml
api_version = "2025-10"
[[extensions]]
type = "ui_extension"
name = "Discount"
uid = "bdff5acd-d192-ddcd-05cf-ad6d759e978ac7c62980"
handle = "discount"
description = "Add discount"
# module: file that contains your extension’s source code
# target: location where your extension appears in POS
[[extensions.targeting]]
module = "./src/Tile.jsx"
target = "pos.home.tile.render"
[[extensions.targeting]]
module = "./src/Modal.jsx"
target = "pos.home.modal.render"
```