Build a post-purchase product offer checkout extension
Post-purchase checkout extensions are in beta and can be used without restrictions in a development store. To use post-purchase extensions on a live store, you need to request access.
Post-purchase checkout extensions are in beta and can be used without restrictions in a development store. To use post-purchase extensions on a live store, you need to request access.
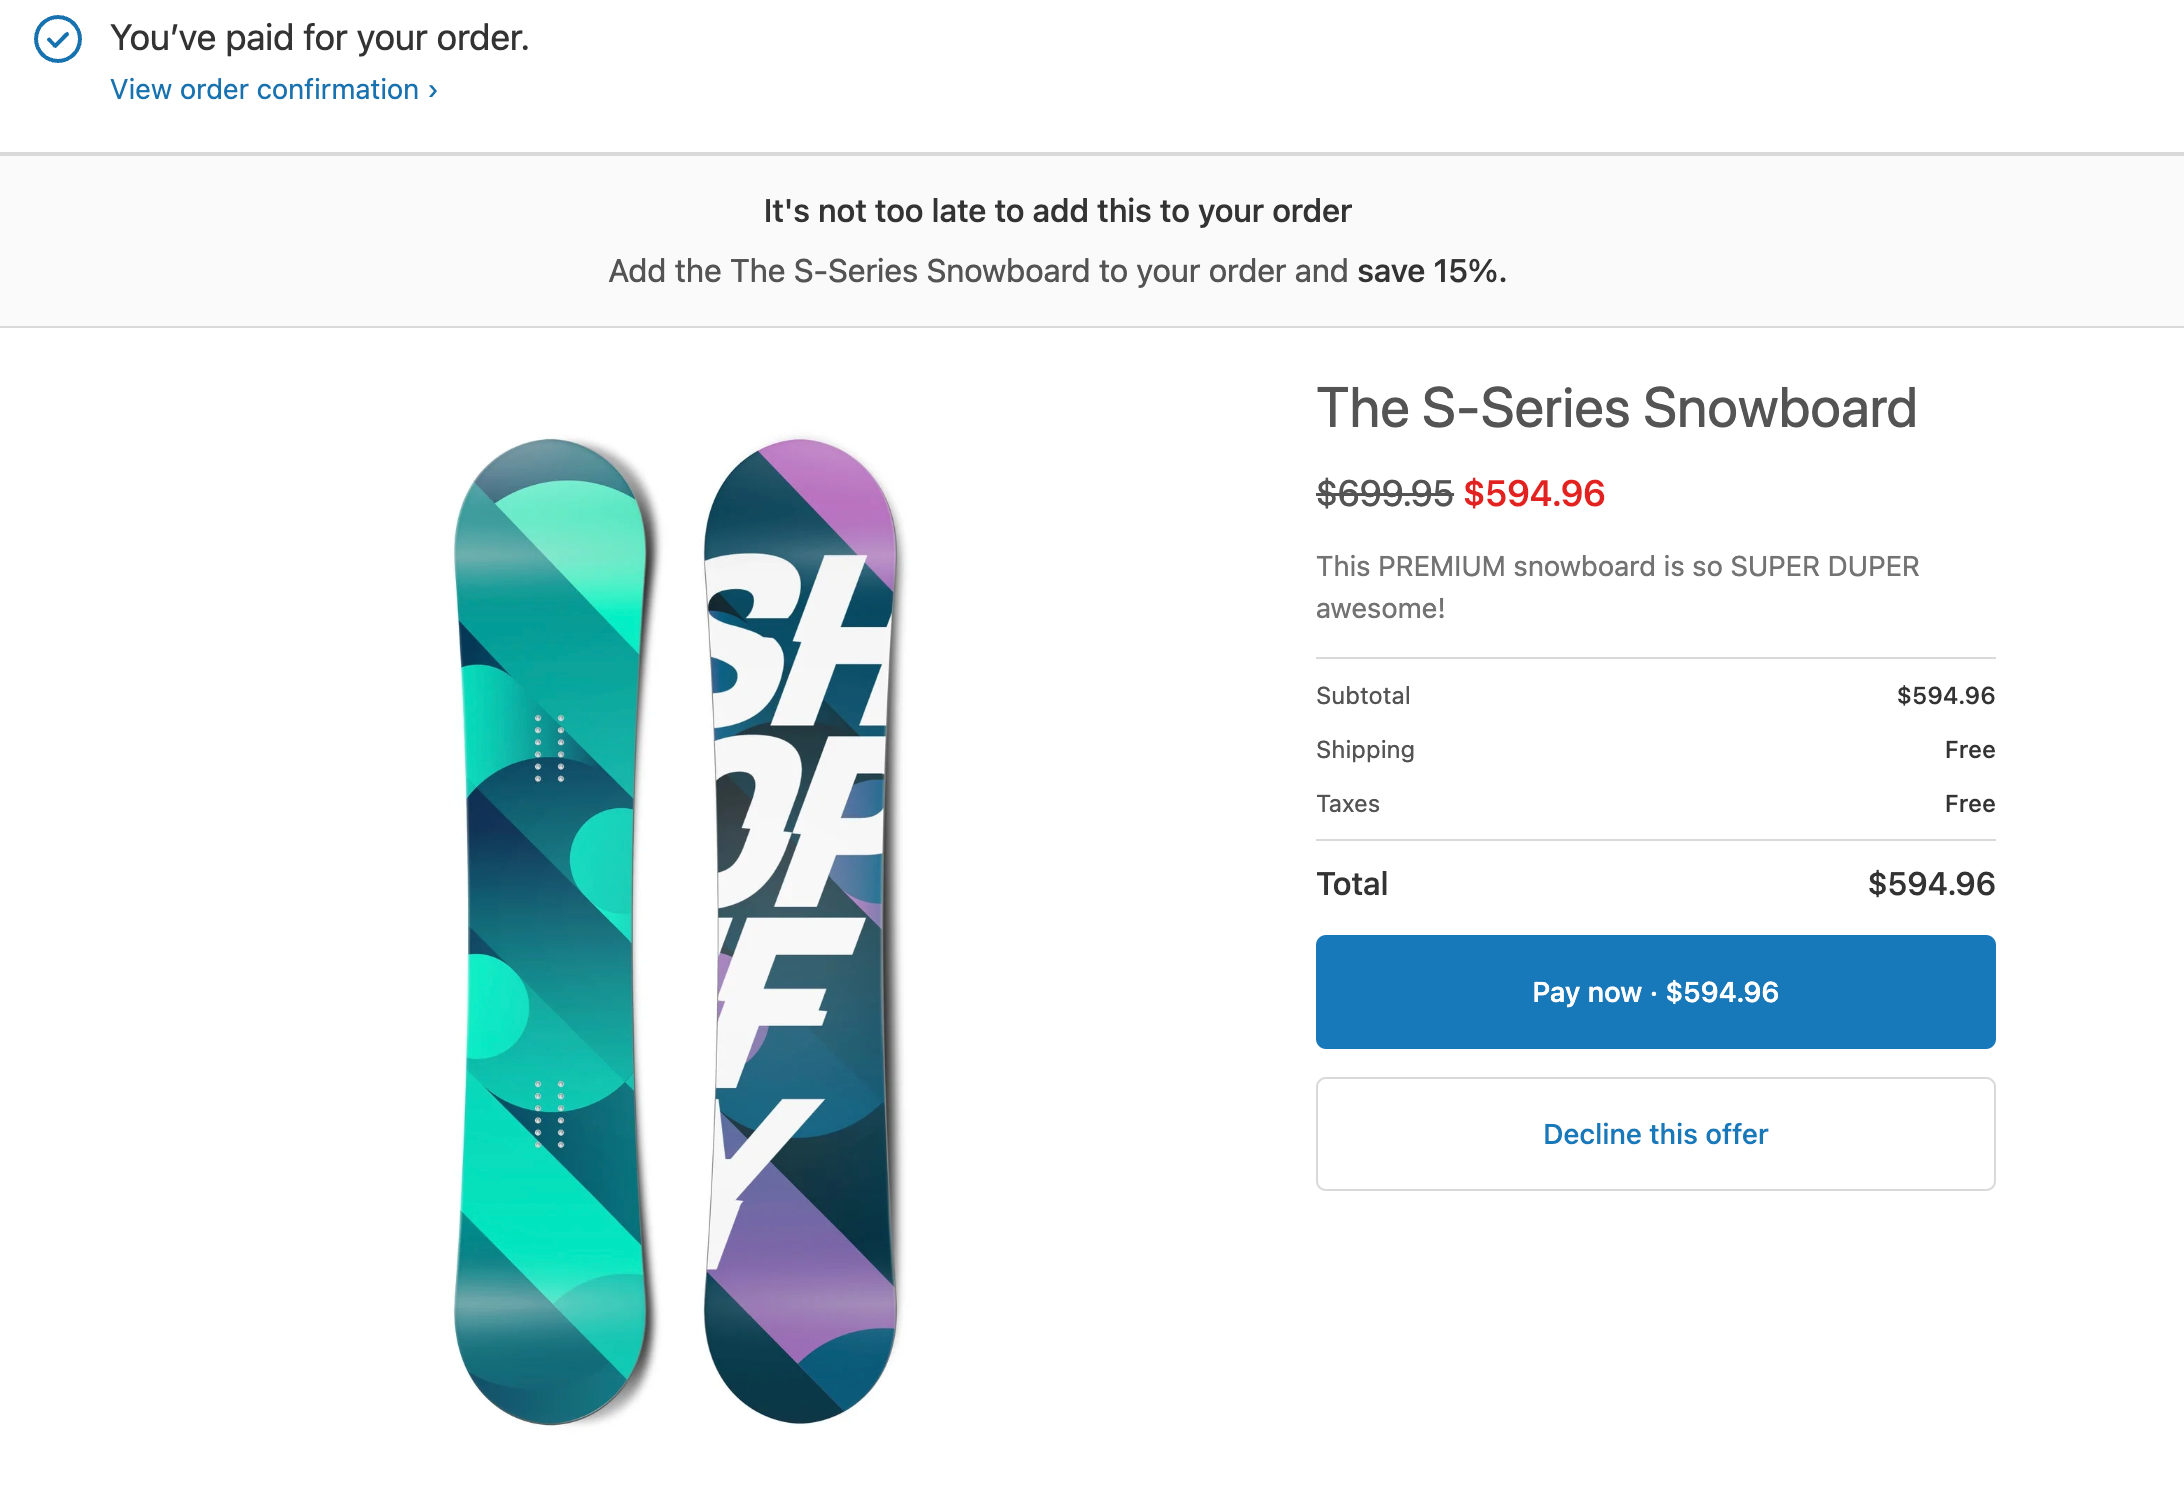
This guide shows you how to create an upsell offer on the post-purchase page in checkout. An upsell offer enables buyers to add products to their order after they've completed their payment.
Anchor to What you'll learnWhat you'll learn
In this tutorial, you'll learn how to do the following tasks:
- Generate a post-purchase extension with Shopify CLI.
- Run the extension locally and test it on a dev store.
- Build the extension UI with the component library.
- Authenticate requests from the extension to your app server.
- Deploy your extension code to Shopify.
- Create a version of your extension and publish it.
- Request access to run the post-purchase checkout extension on a live store.
Anchor to RequirementsRequirements
- You're familiar with post-purchase checkout extensions.
- You've created a Partner account and a dev store.
- You can place test orders on your dev store.
- You've created an app that uses the React Router template.
Anchor to Step 1: Create the extensionStep 1: Create the extension
To create a post-purchase checkout extension, use Shopify CLI, which generates starter code for building your extension and automates common development tasks.
In your app directory, run the following command to create a new post-purchase checkout extension:
Terminal
You should now have a new extension directory that includes the extension script at extensions/my-post-purchase-ui-extension/src/index.{file-extension}.
Anchor to Install dependenciesInstall dependencies
Run the following command to install the dependencies required for the app server inside the extension directory that you created:
Terminal
npm
npm install jsonwebtoken uuidYarn
yarn add jsonwebtoken uuidpnpm
pnpm add jsonwebtoken uuidAnchor to Step 2: Test the extensionStep 2: Test the extension
Post-purchase checkout extensions in production are hosted and served by Shopify. During development and testing, you need to use a Shopify browser extension to render your local extensions in checkout.
As you're testing, the browser extension automatically updates the checkout URLs.
-
Navigate to your app directory.
-
Either start or restart your server to build and preview your app:
Terminal
shopify app dev
When you run the
devcommand, Shopify CLI builds and serves your app. It also instructs you through multiple configuration steps. If you've already rundevfor this app, then some of these steps are skipped.To learn about the processes that are executed when you run
dev, refer to the Shopify CLI command reference. -
Press
pto open the Dev Console. In the extension list for your app, click on the checkout post-purchase link to be redirected to the checkout, to test the extension. -
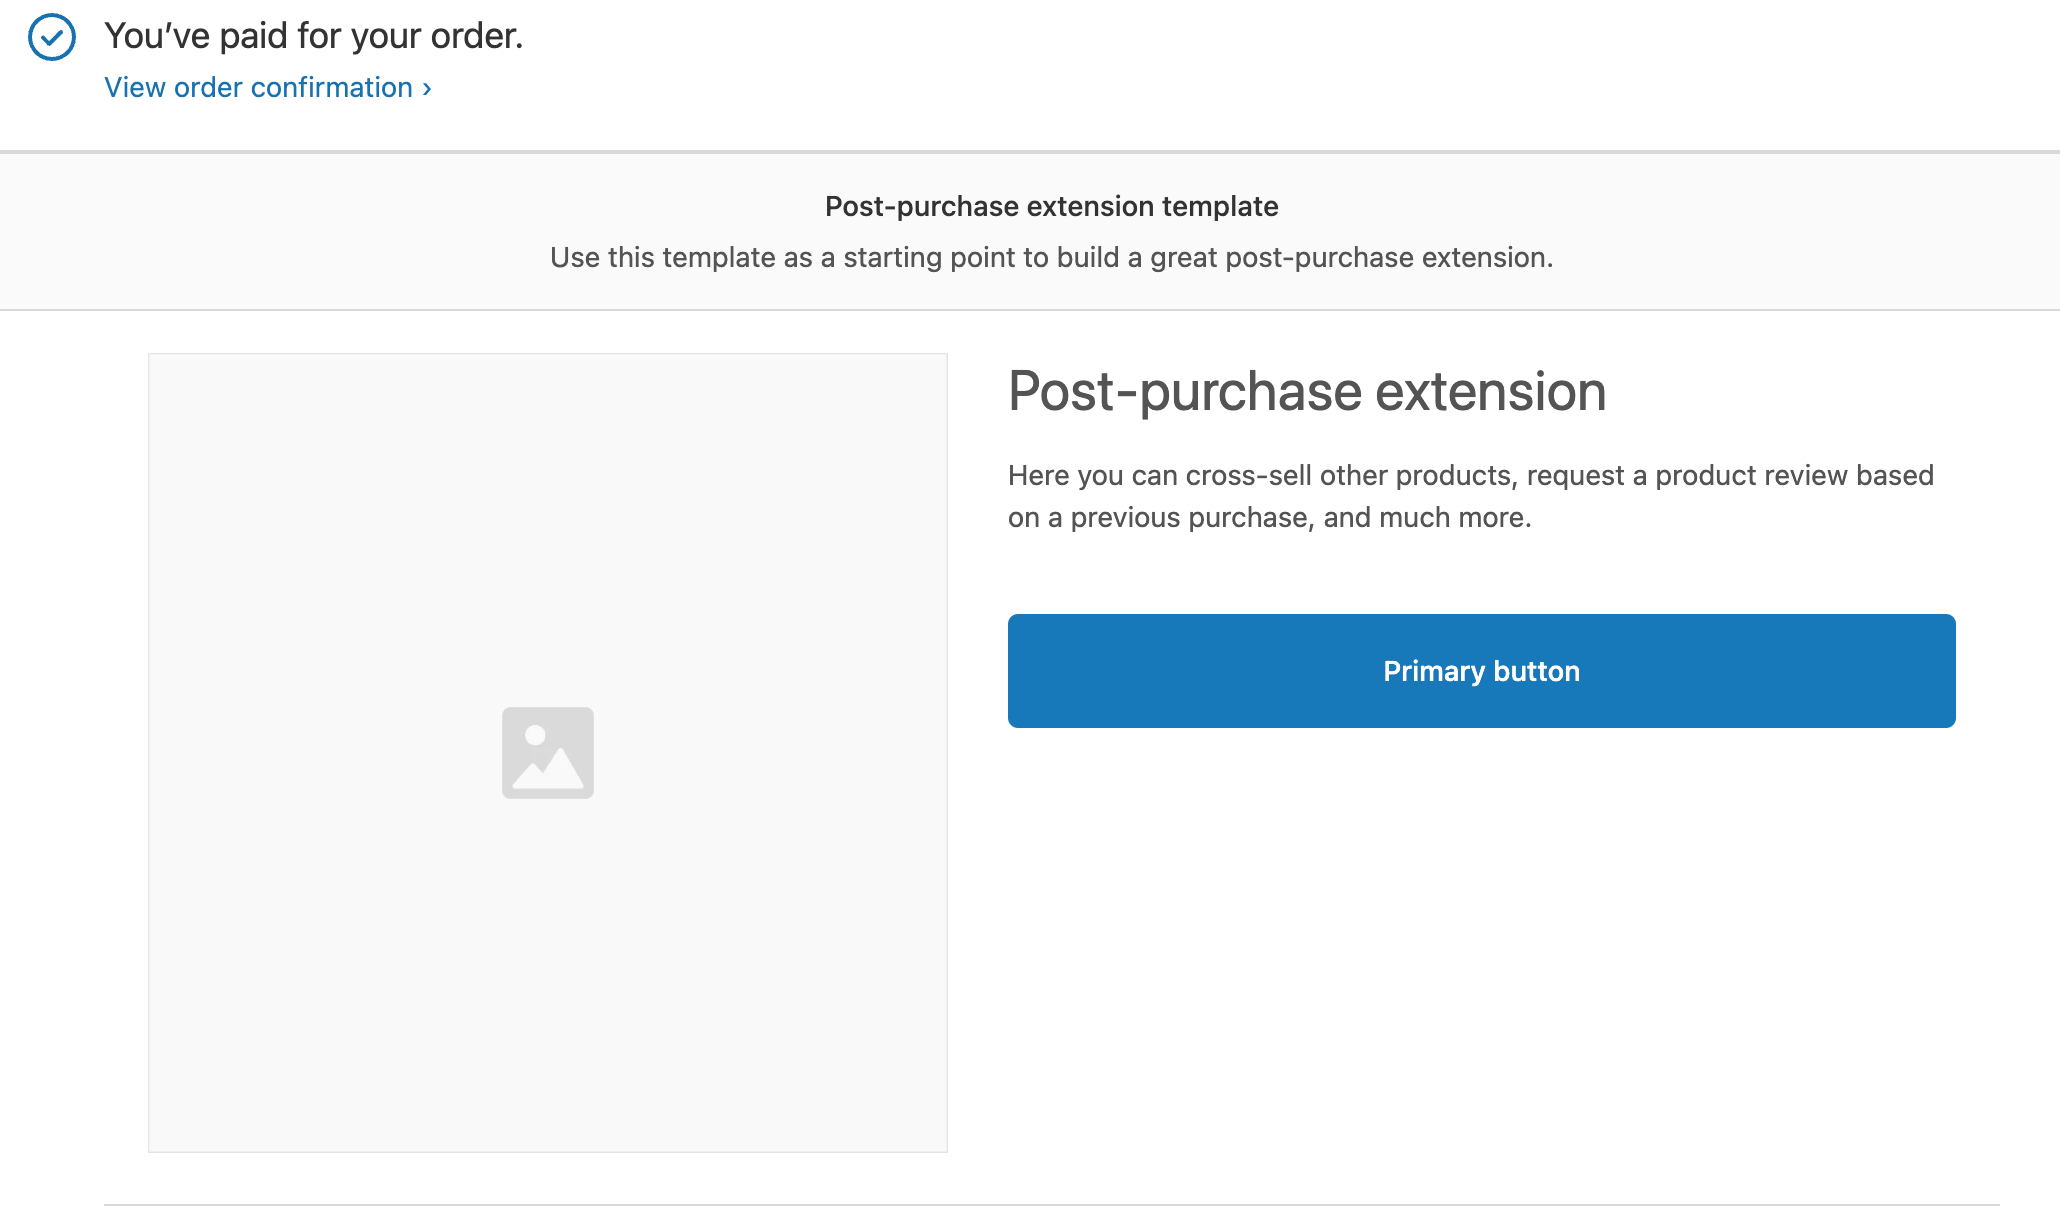
Place a test order in your dev store and go through the checkout steps. The post-purchase UI extension is shown after the payment step, but before the Order status page:
NoteEnsure that your store's payment settings allow you to place test orders through the Bogus gateway at this point.
Consult the documentation for details related to how you can use Bogus credit card numbers, Card Security Code, and Expiry Date, as well as simulating transaction states.
Note:Ensure that your store's payment settings allow you to place test orders through the Bogus gateway at this point.
Consult the documentation for details related to how you can use Bogus credit card numbers, Card Security Code, and Expiry Date, as well as simulating transaction states.
Anchor to Step 3: Build the extension UIStep 3: Build the extension UI
The UI components for post-purchase checkout extensions are managed by Shopify to ensure that the checkout is fast, optimized for mobile, and integrated with Shop Pay.
Post-purchase extensions have access to the Checkout::PostPurchase::ShouldRender and Checkout::PostPurchase::Render extension points.
The extension points API provides helper functions to allow you to calculate potential order totals, update the order, modify metafields, and more.
Update the extensions/my-post-purchase-ui-extension/src/index file with the following code. Replace the APP_URL constant, at the top of the file, with your local tunnel URL:
src/index
src/index.jsx
React
import { useEffect, useState } from "react";
import {
extend,
render,
useExtensionInput,
BlockStack,
Button,
CalloutBanner,
Heading,
Image,
Text,
TextContainer,
Separator,
Tiles,
TextBlock,
Layout,
} from "@shopify/post-purchase-ui-extensions-react";
// For local development, replace APP_URL with your local tunnel URL.
const APP_URL = "https://abcd-1234.trycloudflare.com";
// Preload data from your app server to ensure that the extension loads quickly.
extend(
"Checkout::PostPurchase::ShouldRender",
async ({ inputData, storage }) => {
const postPurchaseOffer = await fetch(`${APP_URL}/api/offer`, {
method: "POST",
headers: {
Authorization: `Bearer ${inputData.token}`,
"Content-Type": "application/json",
},
body: JSON.stringify({
referenceId: inputData.initialPurchase.referenceId,
}),
}).then((response) => response.json());
await storage.update(postPurchaseOffer);
// For local development, always show the post-purchase page
return { render: true };
}
);
render("Checkout::PostPurchase::Render", () => <App />);
export function App() {
const { storage, inputData, calculateChangeset, applyChangeset, done } =
useExtensionInput();
const [loading, setLoading] = useState(true);
const [calculatedPurchase, setCalculatedPurchase] = useState();
const { offers } = storage.initialData;
const purchaseOption = offers[0];
// Define the changes that you want to make to the purchase, including the discount to the product.
useEffect(() => {
async function calculatePurchase() {
// Call Shopify to calculate the new price of the purchase, if the above changes are applied.
const result = await calculateChangeset({
changes: purchaseOption.changes,
});
setCalculatedPurchase(result.calculatedPurchase);
setLoading(false);
}
calculatePurchase();
}, [calculateChangeset, purchaseOption.changes]);
// Extract values from the calculated purchase.
const shipping =
calculatedPurchase?.addedShippingLines[0]?.priceSet?.presentmentMoney
?.amount;
const taxes =
calculatedPurchase?.addedTaxLines[0]?.priceSet?.presentmentMoney?.amount;
const total = calculatedPurchase?.totalOutstandingSet.presentmentMoney.amount;
const discountedPrice =
calculatedPurchase?.updatedLineItems[0].totalPriceSet.presentmentMoney
.amount;
const originalPrice =
calculatedPurchase?.updatedLineItems[0].priceSet.presentmentMoney.amount;
async function acceptOffer() {
setLoading(true);
// Make a request to your app server to sign the changeset with your app's API secret key.
const token = await fetch(`${APP_URL}/api/sign-changeset`, {
method: "POST",
headers: {
Authorization: `Bearer ${inputData.token}`,
"Content-Type": "application/json",
},
body: JSON.stringify({
referenceId: inputData.initialPurchase.referenceId,
changes: purchaseOption.id,
}),
})
.then((response) => response.json())
.then((response) => response.token)
.catch((e) => console.log(e));
// Make a request to Shopify servers to apply the changeset.
await applyChangeset(token);
// Redirect to the thank-you page.
done();
}
function declineOffer() {
setLoading(true);
// Redirect to the thank-you page
done();
}
return (
<BlockStack spacing="loose">
<CalloutBanner>
<BlockStack spacing="tight">
<TextContainer>
<Text size="medium" emphasized>
It's not too late to add this to your order
</Text>
</TextContainer>
<TextContainer>
<Text size="medium">
Add the {purchaseOption.productTitle} to your order and{" "}
</Text>
<Text size="medium" emphasized>
{purchaseOption.changes[0].discount.title}
</Text>
</TextContainer>
</BlockStack>
</CalloutBanner>
<Layout
media={[
{ viewportSize: "small", sizes: [1, 0, 1], maxInlineSize: 0.9 },
{ viewportSize: "medium", sizes: [532, 0, 1], maxInlineSize: 420 },
{ viewportSize: "large", sizes: [560, 38, 340] },
]}
>
<Image
description="product photo"
source={purchaseOption.productImageURL}
/>
<BlockStack />
<BlockStack>
<Heading>{purchaseOption.productTitle}</Heading>
<PriceHeader
discountedPrice={discountedPrice}
originalPrice={originalPrice}
loading={!calculatedPurchase}
/>
<ProductDescription textLines={purchaseOption.productDescription} />
<BlockStack spacing="tight">
<Separator />
<MoneyLine
label="Subtotal"
amount={discountedPrice}
loading={!calculatedPurchase}
/>
<MoneyLine
label="Shipping"
amount={shipping}
loading={!calculatedPurchase}
/>
<MoneyLine
label="Taxes"
amount={taxes}
loading={!calculatedPurchase}
/>
<Separator />
<MoneySummary label="Total" amount={total} />
</BlockStack>
<BlockStack>
<Button onPress={acceptOffer} submit loading={loading}>
Pay now · {formatCurrency(total)}
</Button>
<Button onPress={declineOffer} subdued loading={loading}>
Decline this offer
</Button>
</BlockStack>
</BlockStack>
</Layout>
</BlockStack>
);
}
function PriceHeader({ discountedPrice, originalPrice, loading }) {
return (
<TextContainer alignment="leading" spacing="loose">
<Text role="deletion" size="large">
{!loading && formatCurrency(originalPrice)}
</Text>
<Text emphasized size="large" appearance="critical">
{" "}
{!loading && formatCurrency(discountedPrice)}
</Text>
</TextContainer>
);
}
function ProductDescription({ textLines }) {
return (
<BlockStack spacing="xtight">
{textLines.map((text, index) => (
<TextBlock key={index} subdued>
{text}
</TextBlock>
))}
</BlockStack>
);
}
function MoneyLine({ label, amount, loading = false }) {
return (
<Tiles>
<TextBlock size="small">{label}</TextBlock>
<TextContainer alignment="trailing">
<TextBlock emphasized size="small">
{loading ? "-" : formatCurrency(amount)}
</TextBlock>
</TextContainer>
</Tiles>
);
}
function MoneySummary({ label, amount }) {
return (
<Tiles>
<TextBlock size="medium" emphasized>
{label}
</TextBlock>
<TextContainer alignment="trailing">
<TextBlock emphasized size="medium">
{formatCurrency(amount)}
</TextBlock>
</TextContainer>
</Tiles>
);
}
function formatCurrency(amount) {
if (!amount || parseInt(amount, 10) === 0) {
return "Free";
}
return `$${amount}`;
}Vanilla
import {
  extend,
  BlockStack,
  Button,
  CalloutBanner,
  Heading,
  Image,
  Text,
  TextContainer,
  Separator,
  Tiles,
  TextBlock,
  Layout,
} from "@shopify/post-purchase-ui-extensions";

// For local development, replace APP_URL with your local tunnel URL.
const APP_URL = "https://abcd-1234.trycloudflare.com";

// Preload data from your app server to ensure the extension loads quickly.
extend(
  "Checkout::PostPurchase::ShouldRender",
  async ({ inputData, storage }) => {
    const postPurchaseOffer = await fetch(`${APP_URL}/api/offer`, {
      method: "POST",
      headers: {
        Authorization: `Bearer ${inputData.token}`,
        "Content-Type": "application/json",
      },
      body: JSON.stringify({
        referenceId: inputData.initialPurchase.referenceId,
      }),
    })
      .then((response) => response.json())
      .catch((error) => console.log(error));

    await storage.update(postPurchaseOffer);

    // For local development, always show the post-purchase page
    return { render: true };
  }
);

extend(
  "Checkout::PostPurchase::Render",
  (root, { done, storage, calculateChangeset, applyChangeset, inputData }) => {
    const { offers } = storage.initialData;
    const {
      id,
      productTitle,
      productImageURL,
      productDescription,
      discountedPrice,
      originalPrice,
      changes,
    } = offers[0];

    const calloutBannerComponent = root.createComponent(
      CalloutBanner,
      { title: "It's not too late to add this to your order." },
      [
        root.createComponent(
          Text,
          { size: "medium" },
          `Add the ${productTitle} to your order and `
        ),
        root.createComponent(
          Text,
          { size: "medium", emphasized: true },
          "save 15%."
        ),
      ]
    );

    const originalPriceAmount = root.createText(formatCurrency(originalPrice));
    const discountedPriceAmount = root.createText(
      formatCurrency(discountedPrice)
    );

    const priceHeaderComponent = root.createComponent(
      TextContainer,
      { alignment: "leading", spacing: "loose" },
      [
        root.createComponent(
          Text,
          { role: "deletion", size: "large" },
          originalPriceAmount
        ),
        " ",
        root.createComponent(
          Text,
          { emphasized: true, size: "large", appearance: "critical" },
          discountedPriceAmount
        ),
      ]
    );

    const productDescriptionComponent = root.createComponent(
      BlockStack,
      { spacing: "xtight" },
      productDescription.map((text) =>
        root.createComponent(TextBlock, { subdued: true }, text)
      )
    );

    const moneyLineComponent = (label, amount) =>
      root.createComponent(Tiles, {}, [
        root.createComponent(TextBlock, { size: "small" }, label),
        root.createComponent(
          TextContainer,
          { alignment: "trailing" },
          root.createComponent(
            TextBlock,
            { emphasized: true, size: "small" },
            formatCurrency(amount)
          )
        ),
      ]);

    const moneySummaryComponent = (label, amount) =>
      root.createComponent(Tiles, {}, [
        root.createComponent(
          TextBlock,
          { size: "medium", emphasized: true },
          label
        ),
        root.createComponent(
          TextContainer,
          { alignment: "trailing" },
          root.createComponent(
            TextBlock,
            { emphasized: true, size: "medium" },
            formatCurrency(amount)
          )
        ),
      ]);

    const acceptOfferButton = root.createComponent(
      Button,
      {
        onPress: async () => {
          // Make a request to your app server to sign the changeset.
          const token = await fetch(`${APP_URL}/api/sign-changeset`, {
            method: "POST",
            headers: {
              Authorization: `Bearer ${inputData.token}`,
              "Content-Type": "application/json",
            },
            body: JSON.stringify({
              referenceId: inputData.initialPurchase.referenceId,
              changes: id,
            }),
          })
            .then((response) => response.json())
            .then((response) => response.token)
            .catch((error) => console.log(error));

          // Apply the changeset and proceed to thank you page
          await applyChangeset(token);
          done();
        },
        submit: true,
      },
      "Accept Offer"
    );

    const declineOfferButton = root.createComponent(
      Button,
      {
        onPress: () => done(),
        subdued: true,
      },
      "Decline Offer"
    );

    const layout = root.createComponent(Layout, {
      media: [
        { viewportSize: "small", sizes: [1, 0, 1], maxInlineSize: 0.9 },
        { viewportSize: "medium", sizes: [532, 0, 1], maxInlineSize: 420 },
        { viewportSize: "large", sizes: [560, 38, 340] },
      ],
    });

    const image = root.createComponent(Image, {
      description: "product photo",
      source: productImageURL,
    });

    const heading = root.createComponent(Heading, {}, productTitle);

    const content = root.createComponent(
      BlockStack,
      { spacing: "loose" },
      [
        calloutBannerComponent,
        layout,
        [
          image,
          root.createComponent(BlockStack),
          root.createComponent(BlockStack, {}, [
            heading,
            priceHeaderComponent,
            productDescriptionComponent,
            root.createComponent(BlockStack, { spacing: "tight" }, [
              root.createComponent(Separator),
              moneyLineComponent("Subtotal", discountedPrice),
              moneyLineComponent("Shipping", "0"),
              moneyLineComponent("Taxes", "0"),
              root.createComponent(Separator),
              moneySummaryComponent("Total", discountedPrice),
            ]),
            root.createComponent(BlockStack, {}, [
              acceptOfferButton,
              declineOfferButton,
            ]),
          ]),
        ],
      ]
    );

    root.appendChild(content);
  }
);

function formatCurrency(amount) {
  if (!amount || parseInt(amount, 10) === 0) {
    return "Free";
  }
  return `$${amount}`;
}
Anchor to How the extension code worksHow the extension code works
The following sections explain how different parts of the example extension code work.
Anchor to Fetch product data in ,[object Object]Fetch product data in Checkout::PostPurchase::ShouldRender
Checkout::PostPurchase::ShouldRenderThe Checkout::PostPurchase::ShouldRender handler pre-fetches product data from the server that's running locally. You pass the token in the Authorization header so that you can authenticate it with authenticate.public.checkout in the React Router app, and POST the referenceId to the server. By doing this, it's possible to verify that the request came from Shopify, and that the request is signed with the same secret key as the app.
The data returned from the server is then stored in the extension's storage.
src/index
src/index.jsx
React
extend(
  "Checkout::PostPurchase::ShouldRender",
  async ({ inputData, storage }) => {
    const postPurchaseOffer = await fetch(`${APP_URL}/api/offer`, {
      method: "POST",
      headers: {
        Authorization: `Bearer ${inputData.token}`,
        "Content-Type": "application/json",
      },
      body: JSON.stringify({
        referenceId: inputData.initialPurchase.referenceId,
      }),
    }).then((response) => response.json());

    await storage.update(postPurchaseOffer);

    // For local development, always show the post-purchase page
    return { render: true };
  }
);
Vanilla
extend(
  "Checkout::PostPurchase::ShouldRender",
  async ({ inputData, storage }) => {
    const postPurchaseOffer = await fetch(`${APP_URL}/api/offer`, {
      method: "POST",
      headers: {
        Authorization: `Bearer ${inputData.token}`,
        "Content-Type": "application/json",
      },
      body: JSON.stringify({
        referenceId: inputData.initialPurchase.referenceId,
      }),
    }).catch((error) => console.log(error));

    await storage.update(postPurchaseOffer);

    // For local development, always show the post-purchase page
    return { render: true };
  }
);
Anchor to Compute shipping and taxes using ,[object Object]Compute shipping and taxes using calculateChangeset
calculateChangesetShipping costs and taxes are calculated based on the shipping address.
The order changes are passed to the calculateChangeset function provided by the API. The returned data is used to update the UI.
src/index
src/index.jsx
React
// Define the changes that you want to make to the purchase, including the discount to the product.
  useEffect(() => {
    async function calculatePurchase() {
      // Call Shopify to calculate the new price of the purchase, if the above changes are applied.
      const result = await calculateChangeset({
        changes: purchaseOption.changes,
      });

      setCalculatedPurchase(result.calculatedPurchase);
      setLoading(false);
    }

    calculatePurchase();
  }, [calculateChangeset, purchaseOption.changes]);
Vanilla
// Request Shopify to calculate shipping costs and taxes for the upsell.
const result = await calculateChangeset({ changes });

// Extract values from response.
const shipping =
  result.calculatedPurchase?.addedShippingLines[0]?.priceSet
    ?.presentmentMoney?.amount;
const taxes =
  result.calculatedPurchase?.addedTaxLines[0]?.priceSet?.presentmentMoney
    ?.amount;
const total =
  result.calculatedPurchase?.totalOutstandingSet.presentmentMoney.amount;
  const originalPrice =
  result.calculatedPurchase?.updatedLineItems[0].priceSet.presentmentMoney
    .amount;
const discountedPrice =
  result.calculatedPurchase?.updatedLineItems[0].totalPriceSet
    .presentmentMoney.amount;
Anchor to Update the order using ,[object Object]Update the order using applyChangeset
applyChangesetThe acceptOffer handler posts a request to the server to sign the changes as a JWT token. The request includes inputData.token, which the server uses to verify Shopify's request. The following code calls applyChangeset with the JWT token returned from the server.
src/index
src/index.jsx
React
async function acceptOffer() {
  setLoading(true);

  // Make a request to your app server to sign the changeset with your app's API secret key.
  const token = await fetch(`${APP_URL}/api/sign-changeset`, {
    method: "POST",
    headers: {
      Authorization: `Bearer ${inputData.token}`,
      "Content-Type": "application/json",
    },
    body: JSON.stringify({
      referenceId: inputData.initialPurchase.referenceId,
      changes: purchaseOption.id,
    }),
  })
    .then((response) => response.json())
    .then((response) => response.token)
    .catch((e) => console.log(e));

  // Make a request to Shopify servers to apply the changeset.
  await applyChangeset(token);

  // Redirect to the thank-you page.
  done();
}

function declineOffer() {
  setLoading(true);
  // Redirect to the thank-you page
  done();
}
Vanilla
async function acceptOffer() {
  async function doAcceptOrder() {
    // Make a request to your app server to sign the changeset with your app's API secret key.
    const token = await fetch(`${APP_URL}/api/sign-changeset`, {
      method: "POST",
      headers: {
        Authorization: `Bearer ${inputData.token}`,
        "Content-Type": "application/json",
      },
      body: JSON.stringify({
        referenceId: inputData.initialPurchase.referenceId,
        changes: id,
      }),
    })
      .then((response) => response.json())
      .then((response) => response.token)
      .catch((e) => console.log(e));

    // Make a request to Shopify servers to apply the changeset.
    await applyChangeset(token);
  }

  // First update the state of the buttons, then call the async function.
  acceptButton.updateProps({ disabled: true, loading: true });
  declineButton.updateProps({ disabled: true });
  await doAcceptOrder();
  done();
}
Anchor to Step 4: Update the app serverStep 4: Update the app server
Your app requires two endpoints to support the extension. The first endpoint is used to fetch the product data for the upsell. The second endpoint is used to sign the changeset, so Shopify can verify the request to edit the order that came from your app.
Anchor to Define upsell product dataDefine upsell product data
Use the following GraphQL query to fetch the first product in your Shopify store. Update the getOffer function with the data returned from the query, or the information from the product page in your Shopify admin.
POST https://{shop}.myshopify.com/api/{api_version}/graphql.json
GraphQL mutation
JSON response
Install the Shopify GraphiQL app to make GraphQL queries to your store.
Install the Shopify GraphiQL app to make GraphQL queries to your store.
Copy two values from the response for use in the next step:
- The product image's URL (
data.products.edges[0].node.featuredMedia.preview.image.url). In the example response above, this ishttps://cdn.shopify.com/s/files/1/123. - The product's variant ID (
data.products.edges[0].node.variants.edges[0].node.id), keeping only the number (gid://shopify/ProductVariant/<COPY_THIS_ID>). In the example response above, this is987654321.
Create a new file called app/offer.server.js, which defines a function that's used to fetch the product data for the upsell. For simplicity in this tutorial, you'll hardcode the product data. The following logic can be replaced with an API call to Shopify or your own database:
app/offer.server.js
Anchor to Define the offer and sign changeset endpointsDefine the offer and sign changeset endpoints
If you haven't already done so, ensure your .env file contains definitions for both a SHOPIFY_API_KEY and a SHOPIFY_API_SECRET. You can generate access tokens in the Shopify admin.
If you haven't already done so, ensure your .env file contains definitions for both a SHOPIFY_API_KEY and a SHOPIFY_API_SECRET. You can generate access tokens in the Shopify admin.
In the app/routes folder, define two new routes. The first route is used to fetch the product data that you previously defined for the upsell. The second route is used to sign the changeset, so Shopify can verify that the request came from your app.
Both routes will verify that the request came from Shopify by checking that the JWT token is signed by the app's secret key using authenticate.public.checkout.
Add the following files to your project:
File
app/routes/api.offer.jsx
Get offers
import { authenticate } from "../shopify.server";
import { getOffers } from "../offer.server";

// The loader responds to preflight requests from Shopify
export const loader = async ({ request }) => {
  const { cors } = await authenticate.public.checkout(request);
  return cors();
};

// The action responds to the POST request from the extension. Make sure to use the cors helper for the request to work.
export const action = async ({ request }) => {
  const { cors } = await authenticate.public.checkout(request);

  const offers = getOffers();
  return cors(Response.json({ offers }));
};
Sign changeset
import { v4 as uuidv4 } from "uuid";
import jwt from "jsonwebtoken";

import { authenticate } from "../shopify.server";
import { getSelectedOffer } from "../offer.server";

// The loader responds to preflight requests from Shopify
export const loader = async ({ request }) => {
  const { cors } = await authenticate.public.checkout(request);
  return cors();
};

// The action responds to the POST request from the extension. Make sure to use the cors helper for the request to work.
export const action = async ({ request }) => {
  const { cors } = await authenticate.public.checkout(request);

  const body = await request.json();

  const selectedOffer = getSelectedOffer(body.changes);

  const payload = {
    iss: process.env.SHOPIFY_API_KEY,
    jti: uuidv4(),
    iat: Date.now(),
    sub: body.referenceId,
    changes: selectedOffer?.changes,
  };

  const token = jwt.sign(payload, process.env.SHOPIFY_API_SECRET);
  return cors(Response.json({ token }));
};
You are now ready to test your upsell functionality extension. Refer to Step 2 for testing in these instructions.
Anchor to Step 5: Deploy the extensionStep 5: Deploy the extension
When you're ready to release your changes to users, you can create and release an app version. An app version is a snapshot of your app configuration and all extensions.
-
Navigate to your app directory.
-
Run the following command.
Optionally, you can provide a name or message for the version using the
--versionand--messageflags.Terminal
shopify app deploy
Releasing an app version replaces the current active version that's served to stores that have your app installed. It might take several minutes for app users to be upgraded to the new version.
If you want to create a version, but avoid releasing it to users, then run the deploy command with a --no-release flag.
You can release the unreleased app version using Shopify CLI's release command, or through the Dev Dashboard.
If you want to create a version, but avoid releasing it to users, then run the deploy command with a --no-release flag.
You can release the unreleased app version using Shopify CLI's release command, or through the Dev Dashboard.
Anchor to Step 6: Request accessStep 6: Request access
If you want to run the post-purchase checkout extension on a live store, then you need to request access. Before you request access, you need an unpublished app in a dev store.
After your access request has been approved, any apps that you distribute through the Shopify App Store also need to be submitted for review in the Partner Dashboard. The review process is slightly different for existing apps and new apps.
All merchants can install apps from the Shopify App Store that use post-purchase checkout extensions. Only Plus merchants can install custom apps which use post-purchase checkout extensions.
All merchants can install apps from the Shopify App Store that use post-purchase checkout extensions. Only Plus merchants can install custom apps which use post-purchase checkout extensions.
For existing apps:
- You need to test your app using an unpublished app in a dev store.
- To add the post-purchase checkout extension to a published app, you must submit the unpublished testing app for review in the Partner Dashboard.
- If the new app meets the stated requirements, then it will be approved and the post-purchase extension can be added to your existing published app.
For new apps:
- You need to test your app using an unpublished app in a dev store.
- To add the post-purchase checkout extension to a published app, you must submit the unpublished testing app for review in the Partner Dashboard.
- If the new app meets the stated requirements, then it will be approved and listed in the Shopify App Store.
Anchor to Request access from the Partner DashboardRequest access from the Partner Dashboard
- From your Partner Dashboard, click Apps.
- Click the name of the app that you want to change.
- Click API access.
- On the Access post-purchase extensions card, click Request access.
- In the Post-purchase page that opens, describe why you're applying for access.
- You'll see a banner that your request is under review. The review process can take up to seven days.
After your request is approved, you're notified in the Partner Dashboard that your app has full access to the post-purchase extensions.
Anchor to Next stepsNext steps
- Learn how to create a post-purchase subscription upsell.
- Review the post-purchase targets API reference.