Create checkout validation
You can build validation functions to ensure that purchases meet certain criteria before checking out or completing an order. In this tutorial, you'll use Shopify Functions to enforce an order maximum for buyers with insufficient order history, preventing them from placing their order.
Errors from validation functions are exposed to the Storefront API's Cart object, in themes using the cart template, and during checkout.
Errors from validation functions are exposed to the Storefront API's Cart object, in themes using the cart template, and during checkout.
Anchor to What you'll learnWhat you'll learn
In this tutorial, you'll learn how to do the following tasks:
- Generate starter code for Shopify Functions.
- Use GraphQL to define the input of your function.
- Deploy functions to the Shopify platform.
- Review logs for your function.
Storefront API example response
Anchor to RequirementsRequirements
Shopify defaults to Rust as the most performant and recommended language choice to stay within the platform limits. For more information, refer to language considerations.
Shopify defaults to Rust as the most performant and recommended language choice to stay within the platform limits. For more information, refer to language considerations.
- You're a user with app development permissions.
- You've created a development store.
- You've created an app using Shopify CLI. If you previously installed Shopify CLI, then make sure that you're using the latest version. If you plan to create a UI for your extension, then start with the React Router app template.
- You've installed Node.js 16 or higher.
- You've installed your app on the development store.
- You're using API version 2025-07 or higher for your function.
Anchor to Rust-specific requirementsRust-specific requirements
The following requirements are specific to Rust-based development with Shopify Functions.
-
You've installed Rust.
On Windows, Rust requires the Microsoft C++ Build Tools. Make sure to select the Desktop development with C++ workload when installing the tools.
-
You've installed the
wasm32-unknown-unknowntarget:Terminal
rustup target add wasm32-unknown-unknown
Anchor to Step 1: Create the validation functionStep 1: Create the validation function
To create your validation function, you can use Shopify CLI to generate a starter function, specify the inputs for your function using an input query, and implement your function logic using JavaScript or Rust.
-
Navigate to your app directory:
Terminal
cd <directory> -
Run the following command to create a new validation function:
Terminal
shopify app generate extension --template cart_checkout_validation --name cart-checkout-validationTipShopify Functions support any language that compiles to WebAssembly (Wasm), such as Rust, AssemblyScript, or TinyGo. You specify the Wasm template option when you're using a language other than Rust and can conform to the Wasm API. Learn more about the Wasm API.
Tip:Shopify Functions support any language that compiles to WebAssembly (Wasm), such as Rust, AssemblyScript, or TinyGo. You specify the Wasm template option when you're using a language other than Rust and can conform to the Wasm API. Learn more about the Wasm API.
-
Choose the language that you want to use. For this tutorial, you should select either Rust or JavaScript.
Shopify defaults to Rust as the most performant and recommended language choice to stay within the platform limits. For more information, refer to language considerations.
Terminal
? What would you like to work in?> (1) Rust(2) JavaScript(3) TypeScript(4) Wasm
-
-
Navigate to
extensions/cart-checkout-validation:Terminal
cd extensions/cart-checkout-validation -
Replace the contents of
src/cart_validations_generate_run.graphqlfile with the following code.cart_validations_generate_run.graphqldefines the input for the function. You need the customer's order count and current cart subtotal.The query differs slightly in Rust and JavaScript because of code generation requirements.
cart_validations_generate_run.graphql
src/cart_validations_generate_run.graphql
query Input {cart {buyerIdentity {customer {numberOfOrders}}cost {subtotalAmount {amount}}}}query CartValidationsGenerateRunInput {cart {buyerIdentity {customer {numberOfOrders}}cost {subtotalAmount {amount}}}}Rust input query
query Input {
  cart {
    buyerIdentity {
      customer {
        numberOfOrders
      }
    }
    cost {
      subtotalAmount {
        amount
      }
    }
  }
}
JavaScript input query
query CartValidationsGenerateRunInput { cart { buyerIdentity { customer { numberOfOrders } } cost { subtotalAmount { amount } } } } -
If you're using JavaScript, then run the following command to regenerate types based on your input query:
Terminal
shopify app function typegen -
Replace the
src/cart_validations_generate_run.rsorsrc/cart_validations_generate_run.jsfile with the following code.This function logic checks for order subtotals greater than a set value and errors when a new customer is detected. You can adjust the subtotal limit or new customer detection logic as needed.
TipYou can associate a validation error with a specific checkout UI field by specifying the
targetproperty. Thetargetproperty follows the pattern that's provided in the Validation API reference. For example,$.cart.deliveryGroups[0].deliveryAddress.postalCode.Tip:You can associate a validation error with a specific checkout UI field by specifying the
targetproperty. Thetargetproperty follows the pattern that's provided in the Validation API reference. For example,$.cart.deliveryGroups[0].deliveryAddress.postalCode.File
src/cart_validations_generate_run.rs
use super::schema;use shopify_function::prelude::*;use shopify_function::Result;fn cart_validations_generate_run(input: schema::cart_validations_generate_run::Input) -> Result<schema::CartValidationsGenerateRunResult> {let mut operations = Vec::new();let mut errors = Vec::new();let error = schema::ValidationError {message:"There's an order maximum of $1,000 for customers without established order history".to_owned(),target: "cart".to_owned(),};let order_subtotal: f64 = input.cart().cost().subtotal_amount().amount().as_f64();if order_subtotal > 1000.0 {if let Some(buyer_identity) = input.cart().buyer_identity() {if let Some(customer) = buyer_identity.customer() {if *customer.number_of_orders() < 5 {errors.push(error);}} else {errors.push(error);}} else {errors.push(error);}}let operation = schema::ValidationAddOperation { errors };operations.push(schema::Operation::ValidationAdd(operation));Ok(schema::CartValidationsGenerateRunResult { operations })}// @ts-check// Use JSDoc annotations for type safety/*** @typedef {import("../generated/api").CartValidationsGenerateRunInput} CartValidationsGenerateRunInput* @typedef {import("../generated/api").CartValidationsGenerateRunResult} CartValidationsGenerateRunResult*/// The configured entrypoint for the 'cart.validations.generate.run' extension target/*** @param {CartValidationsGenerateRunInput} input* @returns {CartValidationsGenerateRunResult}*/export function cartValidationsGenerateRun(input) {// The errorconst error = {message:"There's an order maximum of $1,000 for customers without established order history",target: "cart"};// Parse the decimal (serialized as a string) into a float.const orderSubtotal = parseFloat(input.cart.cost.subtotalAmount.amount);const errors = [];// Orders with subtotals greater than $1,000 are available only to established customers.if (orderSubtotal > 1000.0) {// If the customer has ordered less than 5 times in the past,// then treat them as a new customer.const numberOfOrders = input.cart.buyerIdentity?.customer?.numberOfOrders ?? 0;if (numberOfOrders < 5) {errors.push(error);}}// A single validation operationconst operations = [{validationAdd: {errors},},];return { operations };};Rust
use super::schema;
use shopify_function::prelude::*;
use shopify_function::Result;

#[shopify_function]
fn cart_validations_generate_run(input: schema::cart_validations_generate_run::Input) -> Result<schema::CartValidationsGenerateRunResult> {
    let mut operations = Vec::new();
    let mut errors = Vec::new();
    let error = schema::ValidationError {
        message:
            "There's an order maximum of $1,000 for customers without established order history"
                .to_owned(),
        target: "cart".to_owned(),
    };

    let order_subtotal: f64 = input.cart().cost().subtotal_amount().amount().as_f64();

    if order_subtotal > 1000.0 {
        if let Some(buyer_identity) = input.cart().buyer_identity() {
            if let Some(customer) = buyer_identity.customer() {
                if *customer.number_of_orders() < 5 {
                    errors.push(error);
                }
            } else {
                errors.push(error);
            }
        } else {
            errors.push(error);
        }
    }

    let operation = schema::ValidationAddOperation { errors };
    operations.push(schema::Operation::ValidationAdd(operation));

    Ok(schema::CartValidationsGenerateRunResult { operations })
}
JavaScript
// @ts-check

// Use JSDoc annotations for type safety
/**
* @typedef {import("../generated/api").CartValidationsGenerateRunInput} CartValidationsGenerateRunInput
* @typedef {import("../generated/api").CartValidationsGenerateRunResult} CartValidationsGenerateRunResult
*/

// The configured entrypoint for the 'cart.validations.generate.run' extension target
/**
* @param {CartValidationsGenerateRunInput} input
* @returns {CartValidationsGenerateRunResult}
*/
export function cartValidationsGenerateRun(input) {
  // The error
  const error = {
    message:
        "There's an order maximum of $1,000 for customers without established order history",
    target: "cart"
  };
  // Parse the decimal (serialized as a string) into a float.
  const orderSubtotal = parseFloat(input.cart.cost.subtotalAmount.amount);
  const errors = [];

  // Orders with subtotals greater than $1,000 are available only to established customers.
  if (orderSubtotal > 1000.0) {
    // If the customer has ordered less than 5 times in the past,
    // then treat them as a new customer.
    const numberOfOrders = input.cart.buyerIdentity?.customer?.numberOfOrders ?? 0;

    if (numberOfOrders < 5) {
      errors.push(error);
    }
  }

  // A single validation operation
  const operations = [
    {
      validationAdd: {
        errors
      },
    },
  ];

  return { operations };
};
Anchor to Step 2: Preview the function on a dev storeStep 2: Preview the function on a dev store
To test your function, you need to make it available to your dev store.
- If you're developing a function in a language other than JavaScript or TypeScript, ensure you have configured
build.watchin your function extension configuration.
-
Navigate back to your app root:
Terminal
cd ../..
-
Use the Shopify CLI
devcommand to start the dev preview:Terminal
shopify app devYou can keep the preview running as you work on your function. When you make changes to a watched file, Shopify CLI rebuilds your function and updates the function extension's drafts, so you can immediately test your changes.
-
Follow the CLI prompts to preview your app on your development store.
Anchor to Step 3: Activate the validationStep 3: Activate the validation
-
From the Shopify admin, go to Settings > Checkout.
-
In the Checkout Rules section of the page, click Add rule.
A dialog opens and shows the
cart-checkout-validationfunction that you just deployed. -
To add a validation, click Add rule and select the validation.
-
To activate the validation, click Activate.
-
Click Save.
-
Optional: Control how checkout behaves when encountering runtime exceptions by clicking on the validation and selecting or deselecting Allow all customers to submit checkout.
Anchor to Step 4: Test the validationStep 4: Test the validation
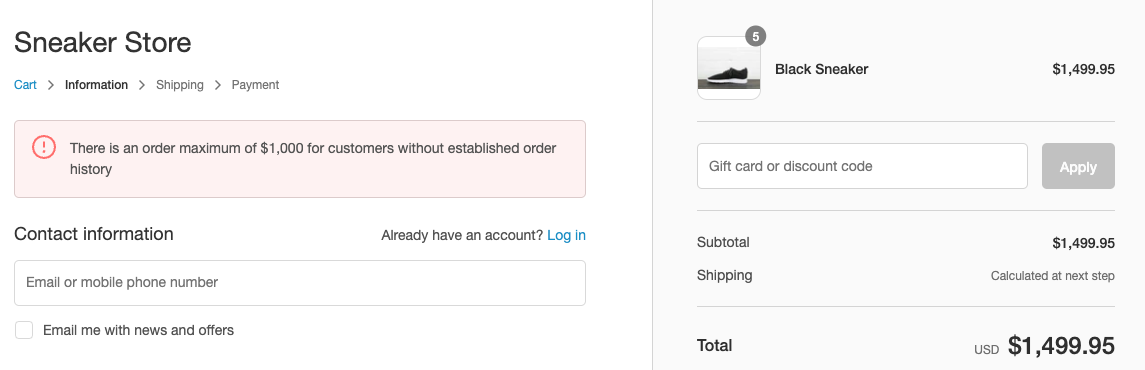
- From your online store, without logging in, create a cart with more than $1,000 in merchandise.
- Proceed to Checkout and verify that a warning message displays.
- Verify that checkout progress is blocked. Clicking Continue to shipping shouldn't allow the user to progress to the next step in checkout.
- Using the Storefront API
cartLinesAddmutation, confirm that the mutation'suserErrorsfield contains the function's error message, and that executing the mutation was unsuccessful.
-
Open your terminal where
shopify app devis running, and review your function executions.When testing functions on development stores, the output of
devincludes executions of your functions, any debug logging you have added to them, and a link to a local file with the full function execution details. -
In a new terminal window, use the Shopify CLI
app function replaycommand to replay a function execution locally, and debug your function without the need to re-trigger the function execution on Shopify.
Terminal
- Select the function execution from the top of the list. Press
qto quit when you are finished debugging.
Anchor to Next stepsNext steps
- Learn more about how Shopify Functions work and the benefits of using Shopify Functions.
- Consult the API references for Shopify Functions.
- Learn how to use variables in your input query.