Shopify Flow actions
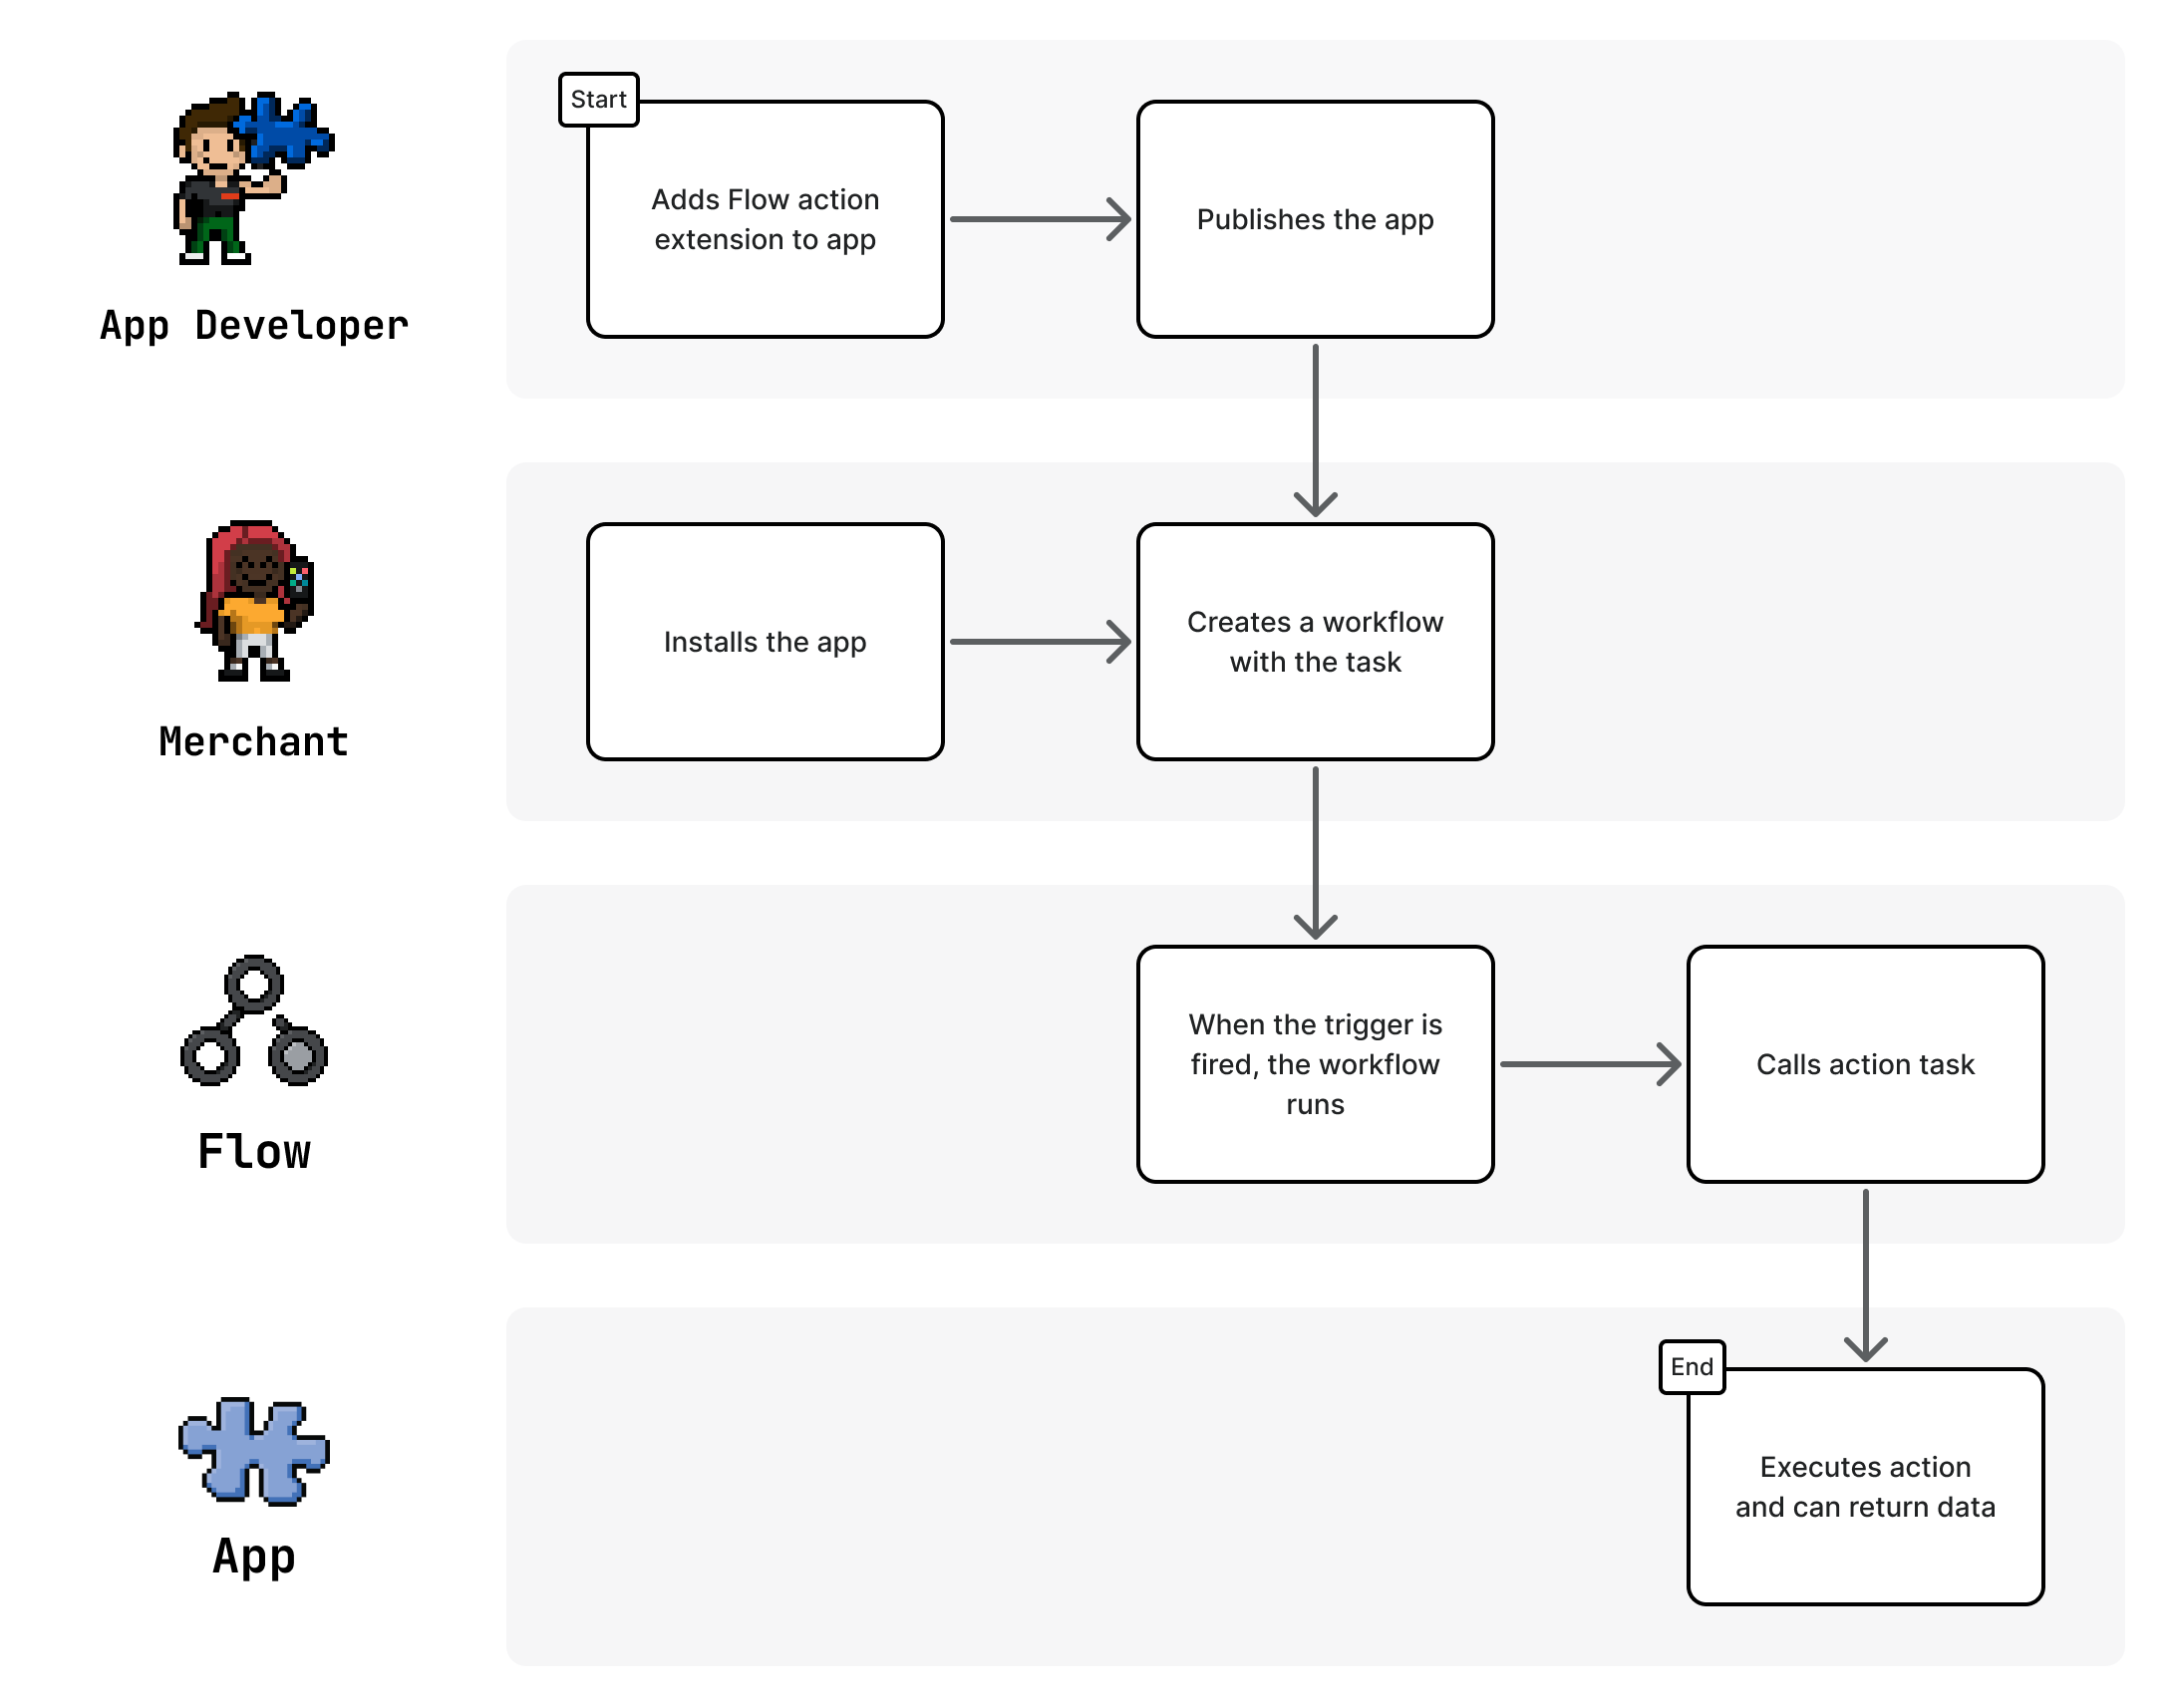
An action is a workflow component in Shopify Flow. It represents a task that's executed in a store or in an app when certain conditions are met. You can connect your app to Shopify Flow so that your app receives data when a workflow action runs.
This guide shows you how to add an action to your app so that merchants can use it in their workflows.
Requirements
Anchor link to section titled "Requirements"- You've completed the triggers tutorial, which shows you how to add a trigger to your app.
- You have the following:
- A test web server that has access to the Internet, so that it can receive POST requests from Shopify Flow
- A test app that works with the test web server
- A development store that has Shopify Flow and the test app installed
How actions work
Anchor link to section titled "How actions work"To create an action that merchants can use in their workflows, you need to add the action to your app. The action needs to contain the following information:
- The fields that the merchant needs to complete when they add the action to their workflows
- The URL that Shopify Flow uses to send (POST) the contents (JSON payload) of the action to your app
You also need to configure your app to process the data from the POST request when it arrives and to send status codes back to Shopify Flow.
HTTP status codes and retry exceptions
Anchor link to section titled "HTTP status codes and retry exceptions"After Shopify Flow sends an POST request to your web server, it waits for a maximum of 10 seconds for an HTTP status code.
If after 10 seconds Shopify Flow hasn't received a response from your web server, then Shopify Flow closes the connection to your web server and resends the request at a later time.
When Shopify Flow receives a response, it processes the codes as displayed in the following table:
Status codes | Description |
---|---|
200 Success | Shopify Flow assumes that the POST request has been processed by your web server. |
202 Success | Shopify Flow assumes that the POST request has been accepted but not processed by your web server. Shopify Flow will resend the POST request at increasing intervals for up to 24 hours. |
4XX Client errors |
If your web server sends a 429 status code without a If your web server sends a 429 status code with a
If your web server sends any other 4XX code, then Shopify Flow assumes that there was a failure and it doesn't resend the POST request. Merchants see a notification in Shopify Flow that includes the raw contents of your web server's response. Example: You can provide a merchant-friendly description of the error by adding a key named Example: |
5XX Server errors | Shopify Flow resends the POST request at increasing intervals for up to 24 hours. |
Other status code | If your web server returns a code that isn't described in this table, then Shopify Flow assumes that there was a failure and it doesn't resend the POST request. |
Prevent apps from processing duplicate requests
Anchor link to section titled "Prevent apps from processing duplicate requests"Each request from Shopify Flow contains an action_run_id
, which is unique to the associated action run (not to the request). This ID is included in the body of the request.
You can use action_run_id
as an idempotency key to check if the request is unique. In some cases, your app could receive the identical request more than once. For example, Shopify Flow might resend a request because it didn't receive your response in time. Your app can store the idempotency key in a cache with a set expiry time to avoid reprocessing duplicate requests.
Identify actions
Anchor link to section titled "Identify actions"When you create an action, an action_definition_id
is assigned to it.
You can find an action's action_definition_id
in its Payload preview in the Partner Dashboard:
The action_definition_id
is sent as part of the payload when the action is run. When your web server receives a request, verify that the action_definition_id
matches the ID of an action that you created.
If you've created multiple actions, then you can also use the action_definition_id
to sort the payload contents for processing in your web server or application.
1. Add an action
Anchor link to section titled "1. Add an action"To create an action that merchants can use in their workflows, you need to add the action to your app. The following steps show how to create an action that saves weather information (city and temperature) to a web server.
- In your Partner Dashboard, open the Shopify Flow app extension:
- Click Apps and then open your test app.
- Click Extensions and then click Create extension.
- Under Flow, click the Flow/Actions card.
- Enter an internal extension name for the action. For example, Log weather.
- On the extension's overview page, click Open draft to edit the details of the extension.
- Enter an action title and description that will be shown to merchants. In the Action Panel Preview area, a preview of the title and action shows how the fields display to merchants when they're choosing actions in Shopify Flow.
- Enter the URL that Shopify Flow will use to send the JSON payload to your web server.
Click Add a custom field, choose a data type, and create the fields that will appear in Shopify Flow when the merchant chooses your app action. For example, create fields that contain the following values:
Field 1 - Data type: Short Text
- Field name: Location
- Label: Location of weather change
- Help text (optional): Enter
{{trigger.location}}
to automatically populate the city.
Field 2 - Data type: Number
- Field name: Temperature
- Label: Temperature in Fahrenheit (rounded to the nearest whole number)
- Help text (optional): Enter
{{trigger.temperature}}
to automatically populate the temperature.
In the Payload preview area, you can see the data model that Shopify Flow will use in the JSON payload that it sends to your web server. 7. Click Create version and choose minor or major version. 8. To see and test the extension (and changes) in the Flow app, you next need to Publish the extension draft.
2. Configure your web server
Anchor link to section titled "2. Configure your web server"After you create the action in the Partner Dashboard, you need to add a service to your web server to listen for the JSON payload that Shopify Flow sends when the action runs.
HMAC header
Anchor link to section titled "HMAC header"For security reasons, your web service should enforce a hash-based message authentication (HMAC) header verification that uses the client secret that you created when you configured your app.
The name of the HMAC header is x-shopify-hmac-sha256
. If you are using a Ruby-based web framework, then the name of the header is http-x-shopify-hmac-sha256
.
How verification works
Anchor link to section titled "How verification works"When the action runs in a workflow, Shopify Flow posts the contents (JSON payload and the HMAC header) of the action to the URL that you entered when you created the action in the Partner Dashboard. When your web server receives the POST request, it needs to verify the HMAC header (x-shopify-hmac-sha256
, or http-x-shopify-hmac-sha256
for Ruby-based web frameworks) against the JSON payload and your app's API secret. The HMAC verification works the same as webhooks.
Your web server also needs to verify that the action_definition_id
that's sent in the payload matches the ID of an action that you created.
After you've verified the HMAC header, you can process the contents of the payload. For example, you could log the contents of the payload to your web server's console.
3. Test the action
Anchor link to section titled "3. Test the action"After you've created an action in the Partner Dashboard and added support for it in your web server, you can test the action in Shopify Flow on your development store.
In your development store, create a workflow that uses the action. For example, add the Weather changes trigger that you created in the Triggers guide and this action to a workflow.
Trigger the workflow. For example, in your web server, run the event that sends the trigger information to Shopify Flow.
When the workflow completes, your web server will have sent the weather information to Shopify Flow because of the trigger. Shopify Flow will have sent this weather information to a web server that will log the information to its console because of the action.
- Familiarize yourself with Shopify Flow and learn about building connectors.
- Connect your app to Shopify Flow so that events that occur in your app can trigger workflows.
- Learn how to receive webhooks from Shopify Flow about the stores that are using your triggers in enabled workflows.