Best practices for apps in the Shopify App Store
These best practices are intended to provide the best experience across the entire app lifecycle, from branding, to installation, to onboarding, functionality, and quality. For a list of all the requirements that need to be met to be eligible for the Shopify App Store, refer to the App Store requirements.
Anchor to General best practices for all appsGeneral best practices for all apps
The best practices in this section apply to all apps distributed through the Shopify App Store. Additional category-specific best practices are presented in the section below.
Anchor to 1. Prohibited and restricted app configurations1.
Some types of apps aren't permitted on the Shopify App Store and others must have their visibility set to limited visibility. See App Store requirement 1.1 for more information.
Anchor to 2. Installation and setup2.
Merchants should be able to quickly set up and start using your app. This section describes the correct flows for authentication, app install charges, and any sign-up steps (if required). These best practices make sure that you provide merchants with the guidance they need when they start learning to use your app.
Anchor to A. AuthenticationA.
Your app should immediately authorize using OAuth before any other steps occur, even if the merchant has previously installed and then uninstalled your app. See App Store requirement 2.3 for more information.
Anchor to B. PermissionsB.
Permissions are the levels of access that your app has to a merchant's store through the API. The permissions that you request are shown to the merchant on the OAuth grant page, where the merchant can either grant or decline them. See App Store requirement 3.2 for more information.
Anchor to C. Setup and merchant workflowsC.
For merchant security, your app shouldn't use pop-up windows for essential app functionality, like running OAuth or approving app charges. Avoiding the use of pop-up windows also protects your app from being compromised by pop-up blockers.
If your app adds secondary payments to orders because of post-purchase upsells or other order edits, then you consider telling merchants that orders might have multiple payments associated with them. We recommend including a note in your Shopify App Store listing and the app setup instructions to tell merchants that if they're capturing payments manually, then they might need to capture more than one payment for a single order.
See App Store requirement 2.3 for more information.
Anchor to 3. Functionality and quality3.
For your app to be successful, it should offer a consistent and positive experience for the merchants who use it. The following functionality and quality best practices apply to the core features of your app, such as its user interface, performance, and billing.
Anchor to A. User interfaceA.
By offering a great user interface, you can make it easier for merchants to use your app to grow their businesses. See the App Design Guidelines to learn more about how to design and build your app's user interface. Additionally, see the Functionality section of the App Store requirements to understand what specific conditions must be met for your app to be eligible for the Shopify App Store.
Anchor to B. BillingB.
Shopify offers managed pricing as well as an API-based billing system to support different types of app charges. It bills merchants through the same system that's used for their Shopify subscription, and makes it easier for them to keep track of their payments.
Your app should allow merchants to upgrade and downgrade their pricing plan without having to contact your support team or having to reinstall the app. This includes ensuring that the charges are successfully processed in the application charge history page in the merchant admin.
Enterprise-level pricing plans should be referenced in the Description of additional charges section of the pricing section of the app's listing.
See App Store requirement 1.2 for more information.
Anchor to C. State of the appC.
Make sure your app is compliant with the latest Google Chrome cookie behavior and compatible with the SameSite cookie attribute.
Make sure your app is compliant with the latest Google Chrome cookie behavior and compatible with the SameSite cookie attribute.
Merchants are busy, and every minute matters when running their businesses. By making sure that your app performs well, you can help merchants achieve their goals faster and spend more time on the problems that need their attention the most.
Apps that no longer reflect the original core functionality submitted to the App Store will be re-evaluated and will need to be resubmitted for a full App review.
See App Store requirement 2.1 for more information.
Anchor to 4. App performance4.
For merchants to be successful, their online stores should have best-in-class speed and user experience. Apps can easily slow down performance, and we require apps to keep performance top-of-mind while helping merchants, to follow our performance requirements and best practices, and to test that their products continue to meet our minimum requirements for speed.
For best practices and recommendations on app performance, refer to our app performance recommendations.
For best practices and recommendations on app performance, refer to our app performance recommendations.
Anchor to A. Performance scoreA.
Your app shouldn't reduce Lighthouse performance scores by more than 10 points. Test your app's impact on Lighthouse performance scores using the steps outlined in Testing storefront performance.
Anchor to B. Testing methodologyB.
For apps that affect storefronts directly, Shopify tests the app's effect on store performance by measuring the Lighthouse score before and after the app is installed. We calculate a weighted average of score from the following pages:
| Page | Weight |
|---|---|
| Home | 17% |
| Product details | 40% |
| Collection | 43% |
The difference in the score before and after the app is installed and configured on the above pages indicates whether the app improves or worsens store performance. Your app should consistently demonstrate low or no negative impact on the performance of real merchant stores over time.
Note: Lighthouse scores can vary between runs. Consider running these tests frequently during your development, and averaging your scores across a few consecutive Lighthouse tests before submission.
Note: Lighthouse scores can vary between runs. Consider running these tests frequently during your development, and averaging your scores across a few consecutive Lighthouse tests before submission.
Anchor to 5. App listing5.
Your app listing is often your biggest marketing tool—an effective listing helps merchants understand how it can help them run their business. Make sure your listing is clear, includes pricing, and showcases your app's benefits.
To create a listing, select Shopify App Store as the distribution method. All approved public apps have a listing on the Shopify App Store, regardless of whether you choose to make it full or limited visibility
See App Store requirements section 4 for more information.
Anchor to Example app listingExample app listing
The following image shows an example app listing, and shows where some of the fields in the app submission form are used in the app listing.
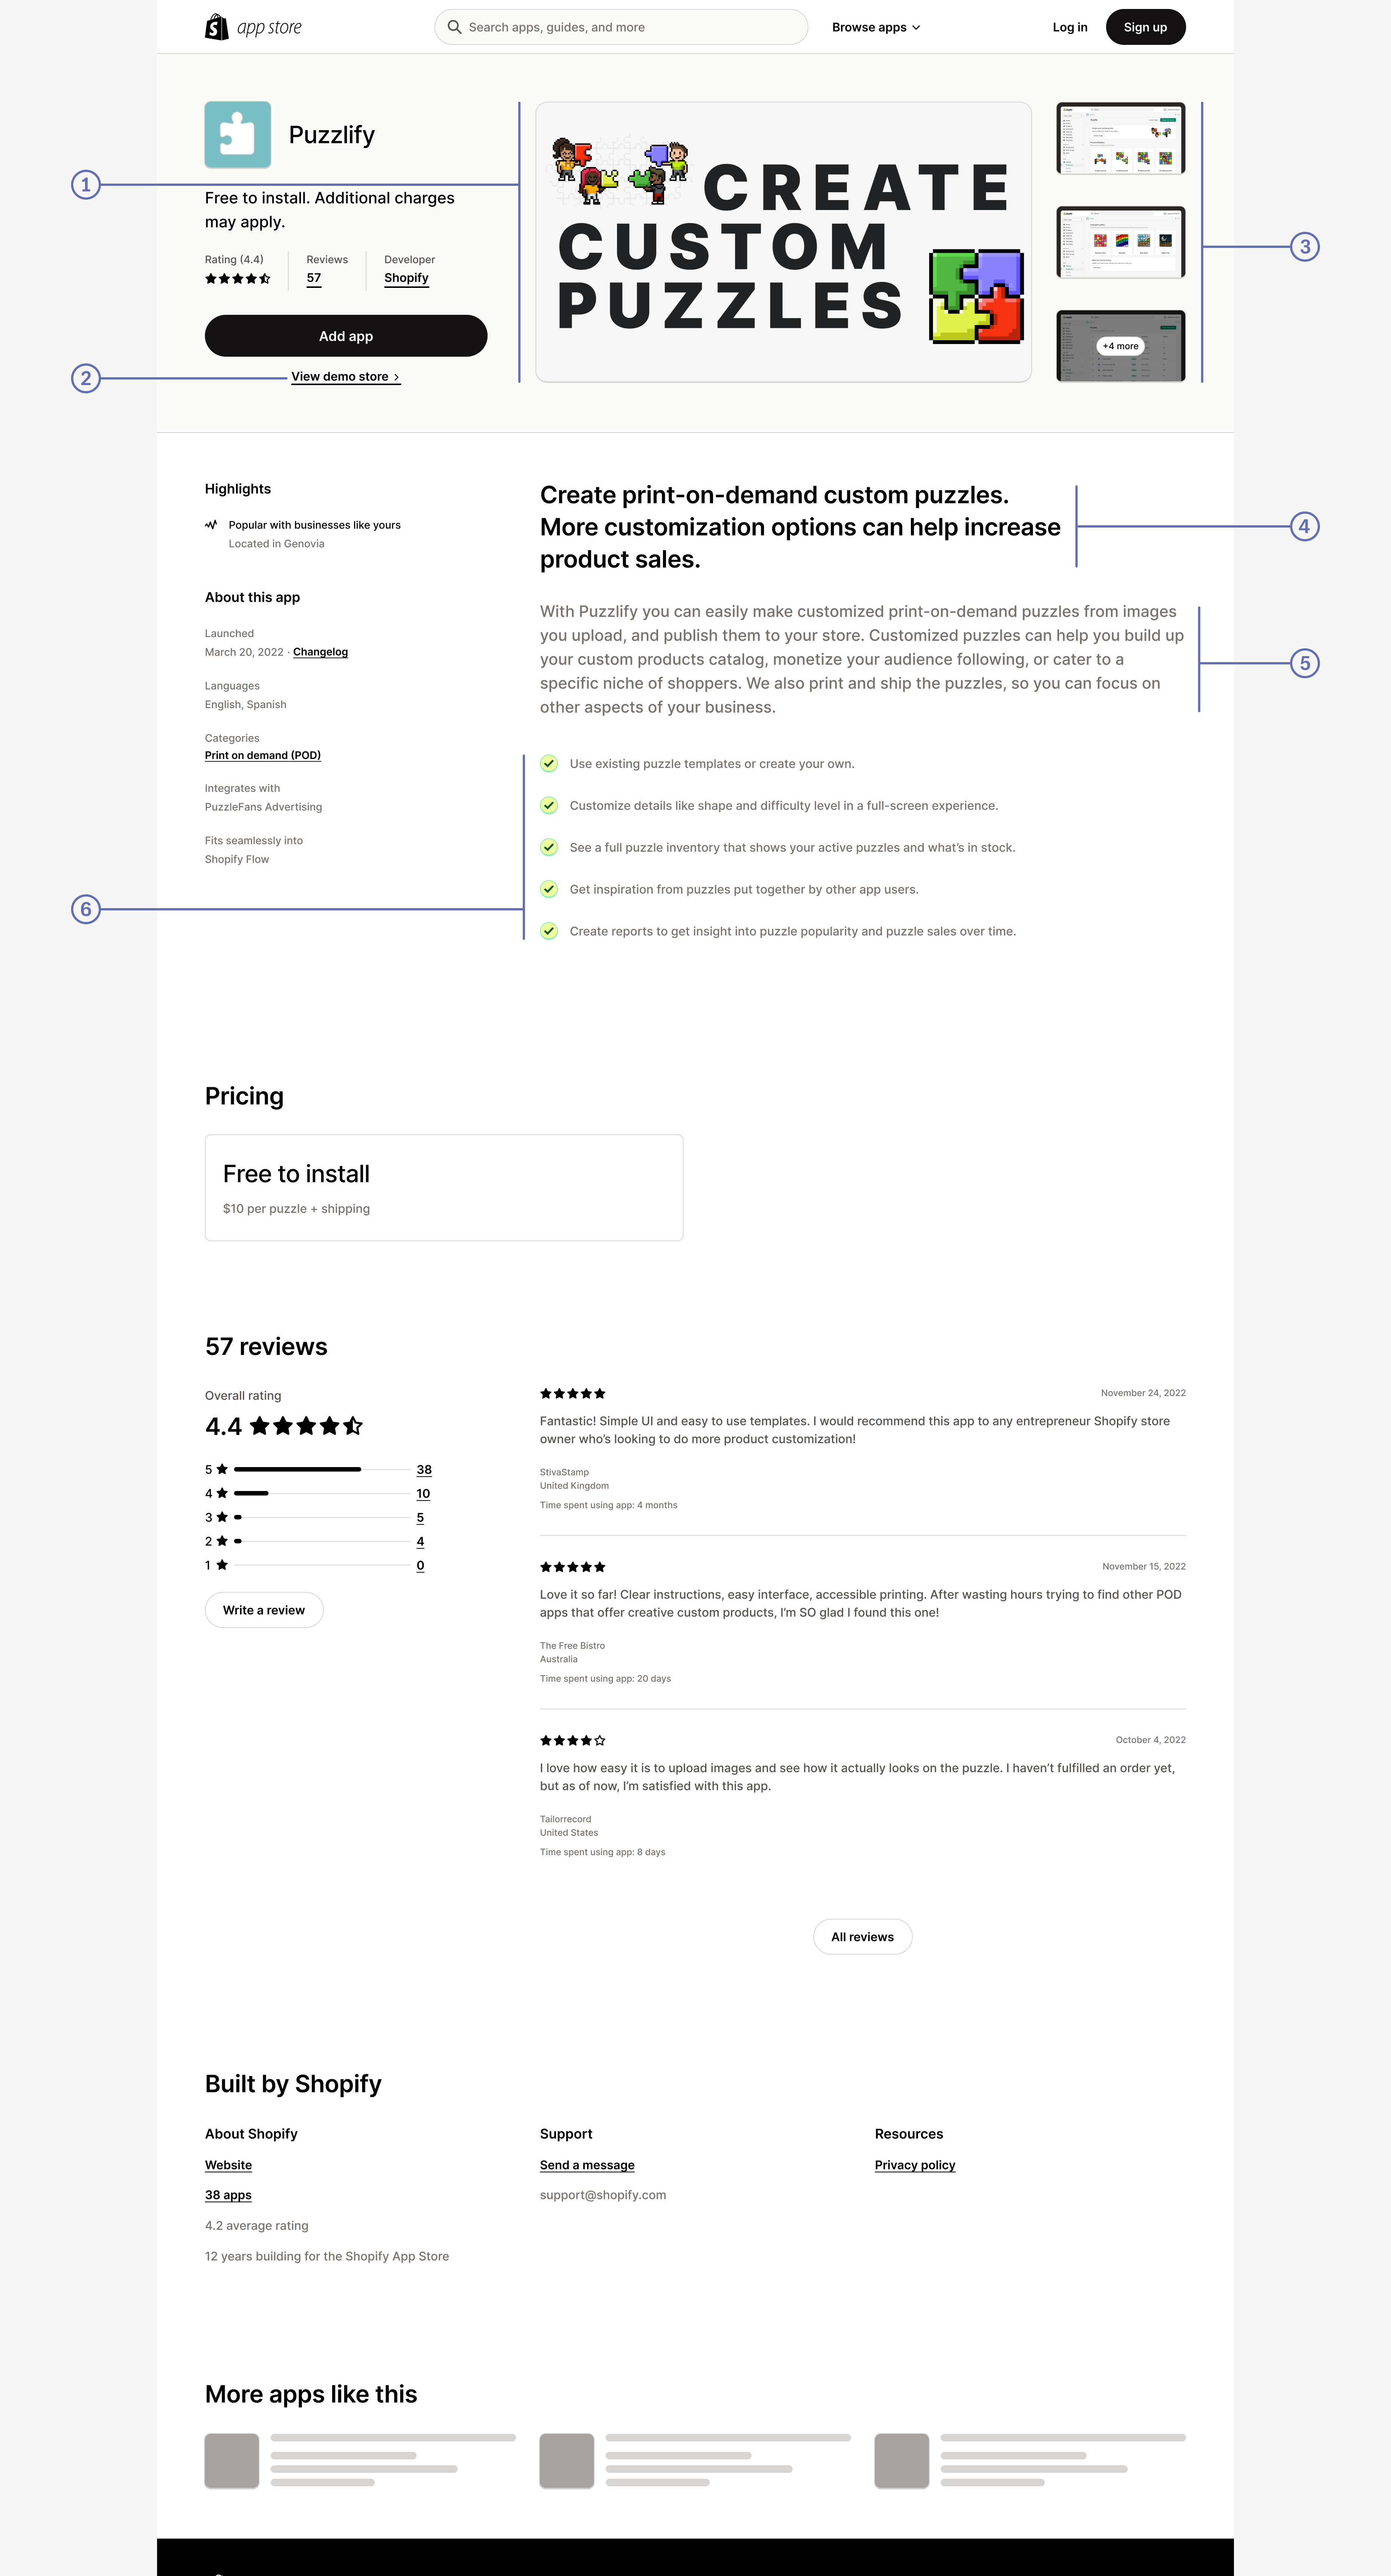
| 1. | Feature media |
|---|---|
| 2. | Demo store URL |
| 3. | Screenshots |
| 4. | App introduction |
| 5. | App details |
| 6. | Feature list |
| 7. | Integrations |
Anchor to A. Branding your appA.
Your app name should be unique and start with your brand name (not a generic descriptor). Lead with your distinctive brand to differentiate from similar apps. For example, "QTeck - Announcement Bar" rather than "Announcement Bar - QTeck". Keep names to 30 characters or fewer. Your app name in the TOML configuration should align with your App Store listing name.
For your app icon, use bold colors and simple, recognizable patterns. Avoid text, screenshots, and Shopify trademarks. Keep corners square (they're automatically rounded) and include padding so your logo doesn't touch the edges. Use JPEG or PNG format at 1200px by 1200px.
See App Store requirement 4.1 for more information.
Anchor to B. App store listing contentB.
Anchor to 1. Feature media1.
A short video (2-3 minutes) is the best way to showcase your app's impact. Keep it promotional rather than instructional and limit screencasts to 25% of the video. If you don't have a video, use a static image that conveys your app's benefit or unique value.
When creating feature images (1600px by 900px, 16:9), keep them simple with one focal point, use solid backgrounds with good contrast (4.5:1 ratio recommended), and always include alt text. Don't use Shopify logos or repeat your app card subtitle in the image.
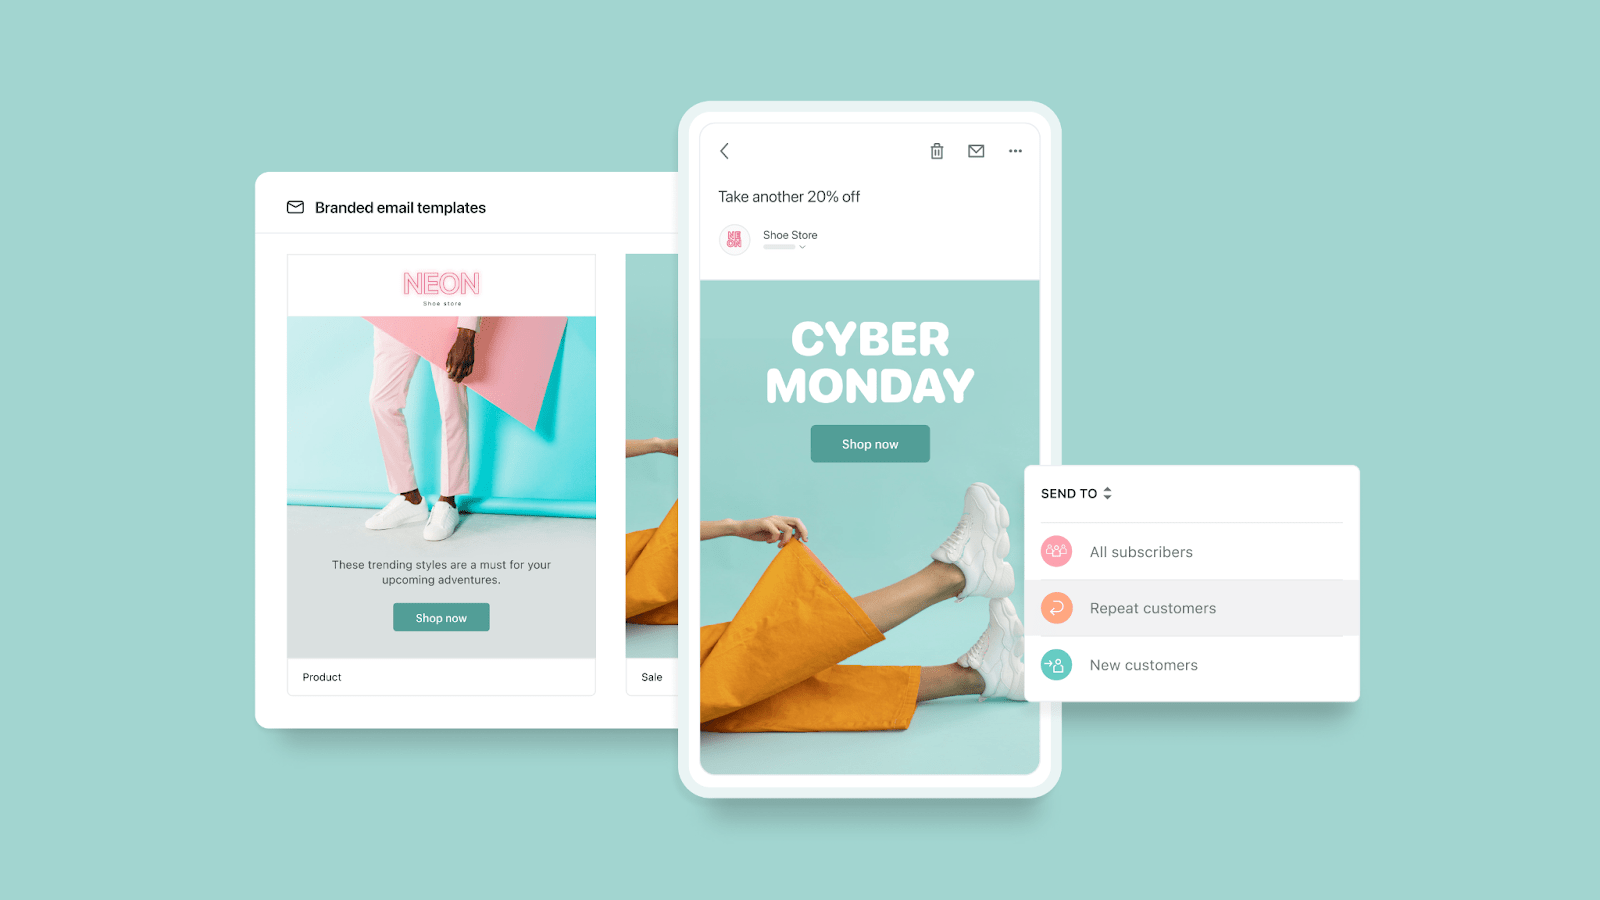
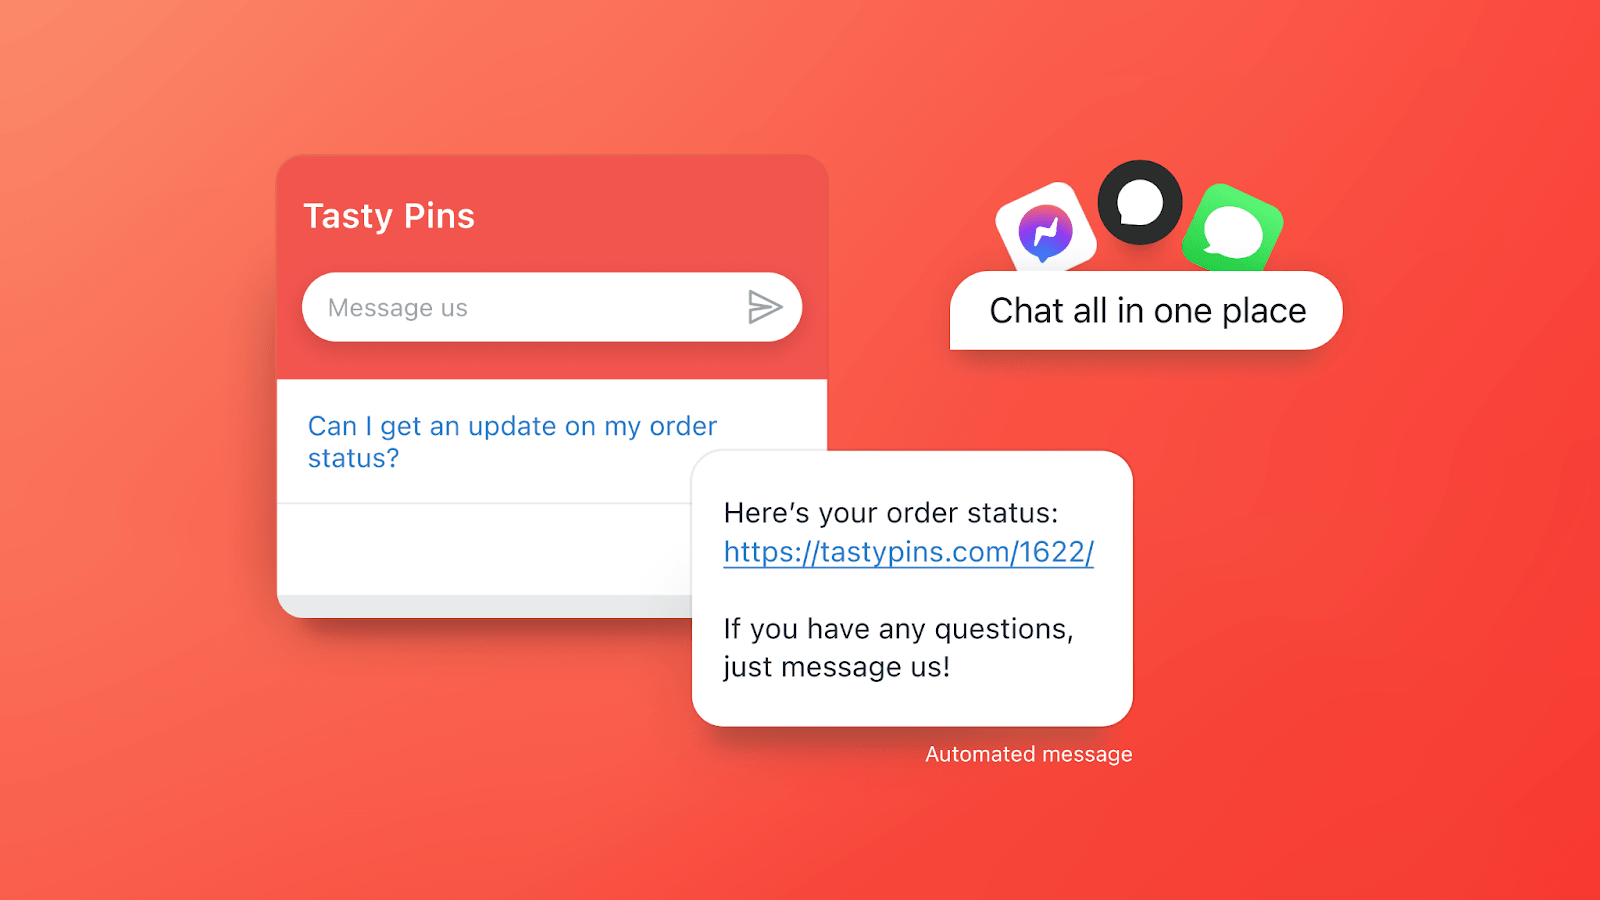
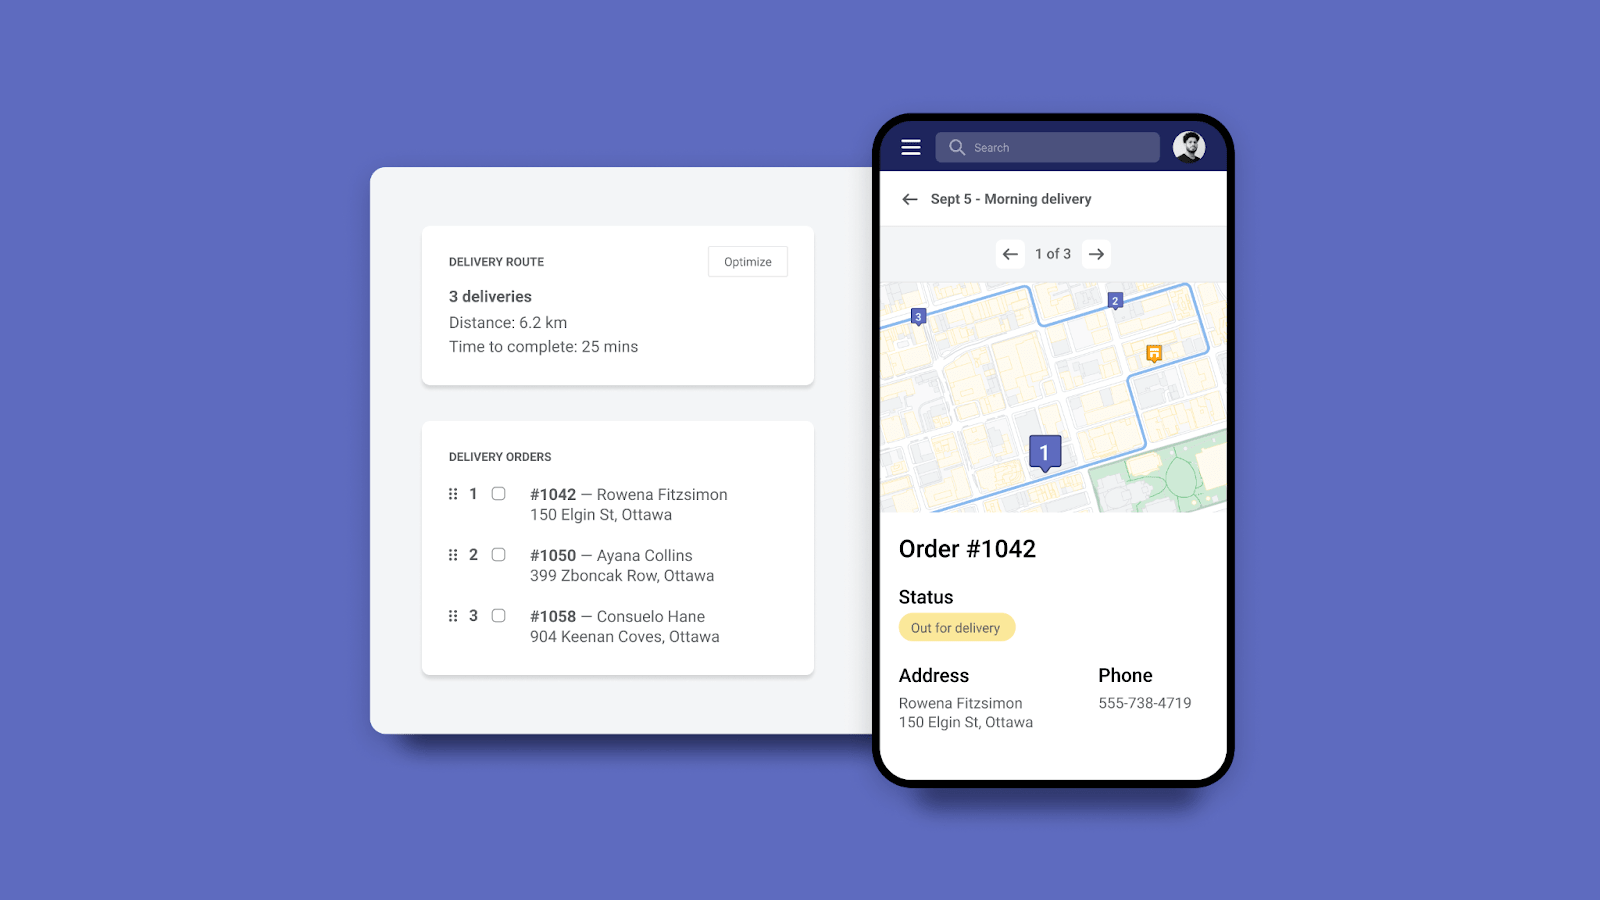
Here are some examples of feature images:
Shopify Email
Shopify Inbox
Shopify Local Delivery
Anchor to 2. Demo store URL2.
Provide a link to a development store that showcases your app. Link directly to the page that best demonstrates your app's functionality and add contextual instructions to guide merchants through the experience. A thoughtfully designed demo helps merchants visualize your app's value.
Anchor to 3. Screenshots3.
Screenshots should be 1600px by 900px (16:9). Include 3-6 desktop screenshots, including at least one of your app's UI. Ensure images are clear and focused on your app's functionality. Crop out browser chrome and sensitive information. Provide alt text, avoid PII, and don't include pricing, reviews, or outcome guarantees. If your app is mobile-responsive or works with POS, include screenshots showing those experiences.
Anchor to 4. App introduction4.
Your app introduction (100 characters) should clearly highlight the benefits merchants can expect. Tie your unique offering to measurable business outcomes. Avoid keyword stuffing, data claims, and incomplete sentences.
| Examples | Reason |
|---|---|
| Show specific benefits that drive value for merchants. Avoid generic marketing language. |
| Tie your unique app offering to a measurable business outcome. |
| Show a clear merchant benefit and value proposition. Avoid unsubstantiated claims, keyword stuffing, and incomplete sentences. |
Anchor to 5. App details5.
In your app details (500 characters), describe functional elements and what makes your app unique. Avoid excessive marketing language, keyword stuffing, and outcome guarantees. Keep support info, links, and testimonials in their designated fields.
Anchor to 6. Feature list6.
Describe the functionality, not the technical mechanics. Keep features short and scannable (up to 80 characters per feature)—focus on what merchants care about, not how it's built.
| Examples | Reason |
|---|---|
| Describe functionality that is meaningful to merchants. Avoid focusing on the technical aspects of a feature. |
| Be concise and informative. Avoid including feature mechanics that aren't relevant to merchants. |
| Describe a specific, unique feature. Avoid keyword stuffing and incomplete sentences. |
Anchor to 7. Integrations7.
List up to six integrations that merchants will be most interested in. Don't include Shopify itself, other shopping carts (unless you provide synchronization), or other Shopify apps (unless you directly integrate with them).
Anchor to C. PricingC.
Choose your primary billing method (Free to install, Recurring charge, or One-time payment) and provide clear pricing information in the designated section only. If you have paid plans, consider offering a free trial (we recommend 14 days). Plans display from lowest to highest price automatically.
For apps with free and paid plans, select Recurring charge and mark one plan as Free—this shows "Free plan available" in search results.
See App Store requirement 4.2 for more information.
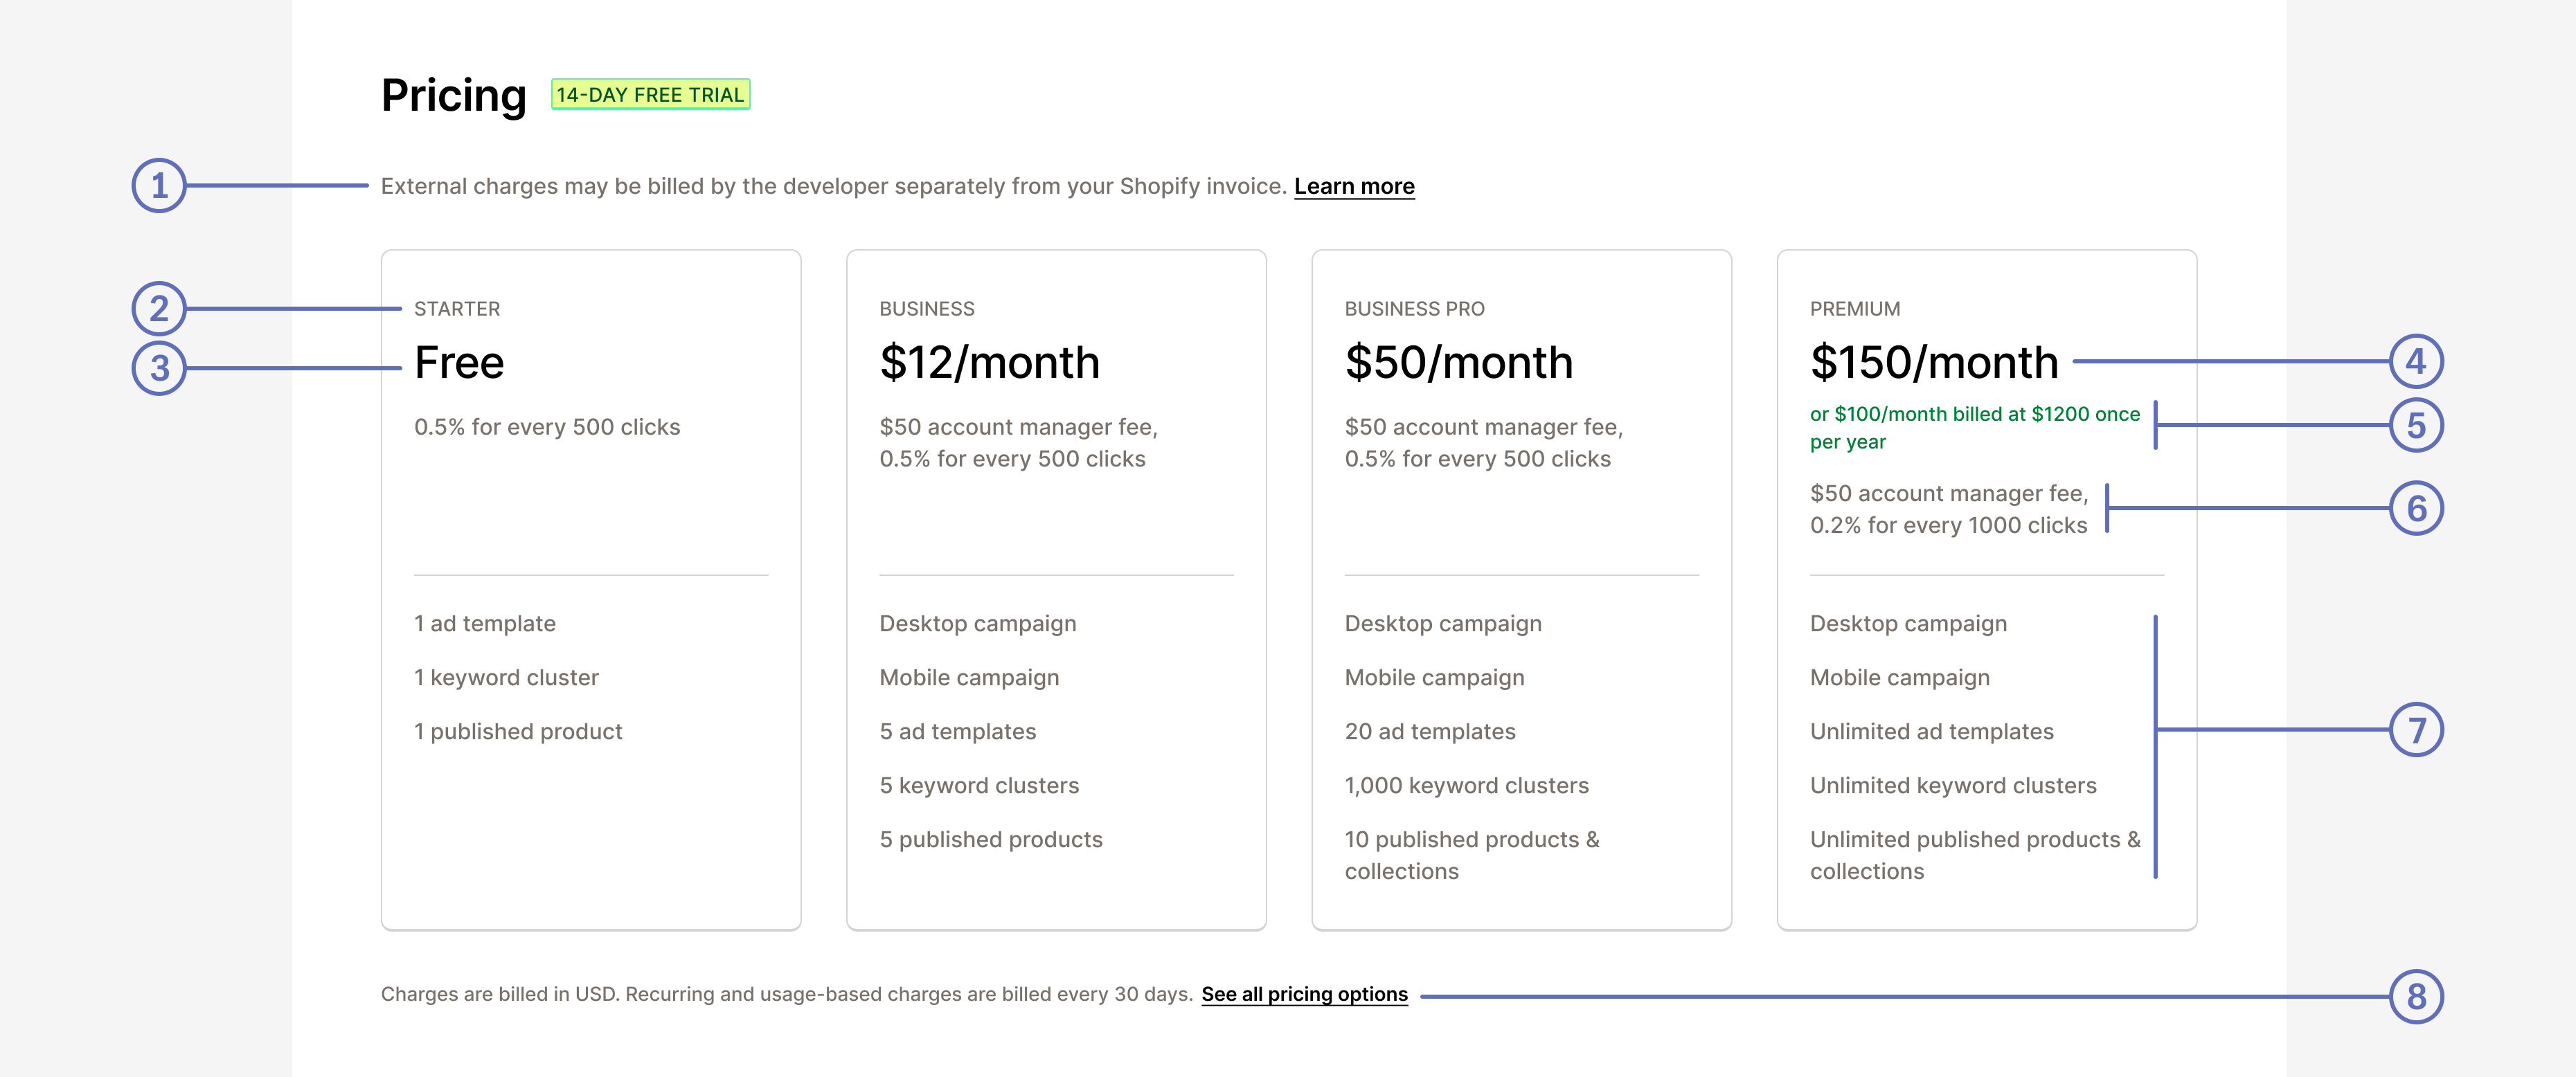
Here's an example of how pricing details appear in your app listing:
Desktop view
Mobile view
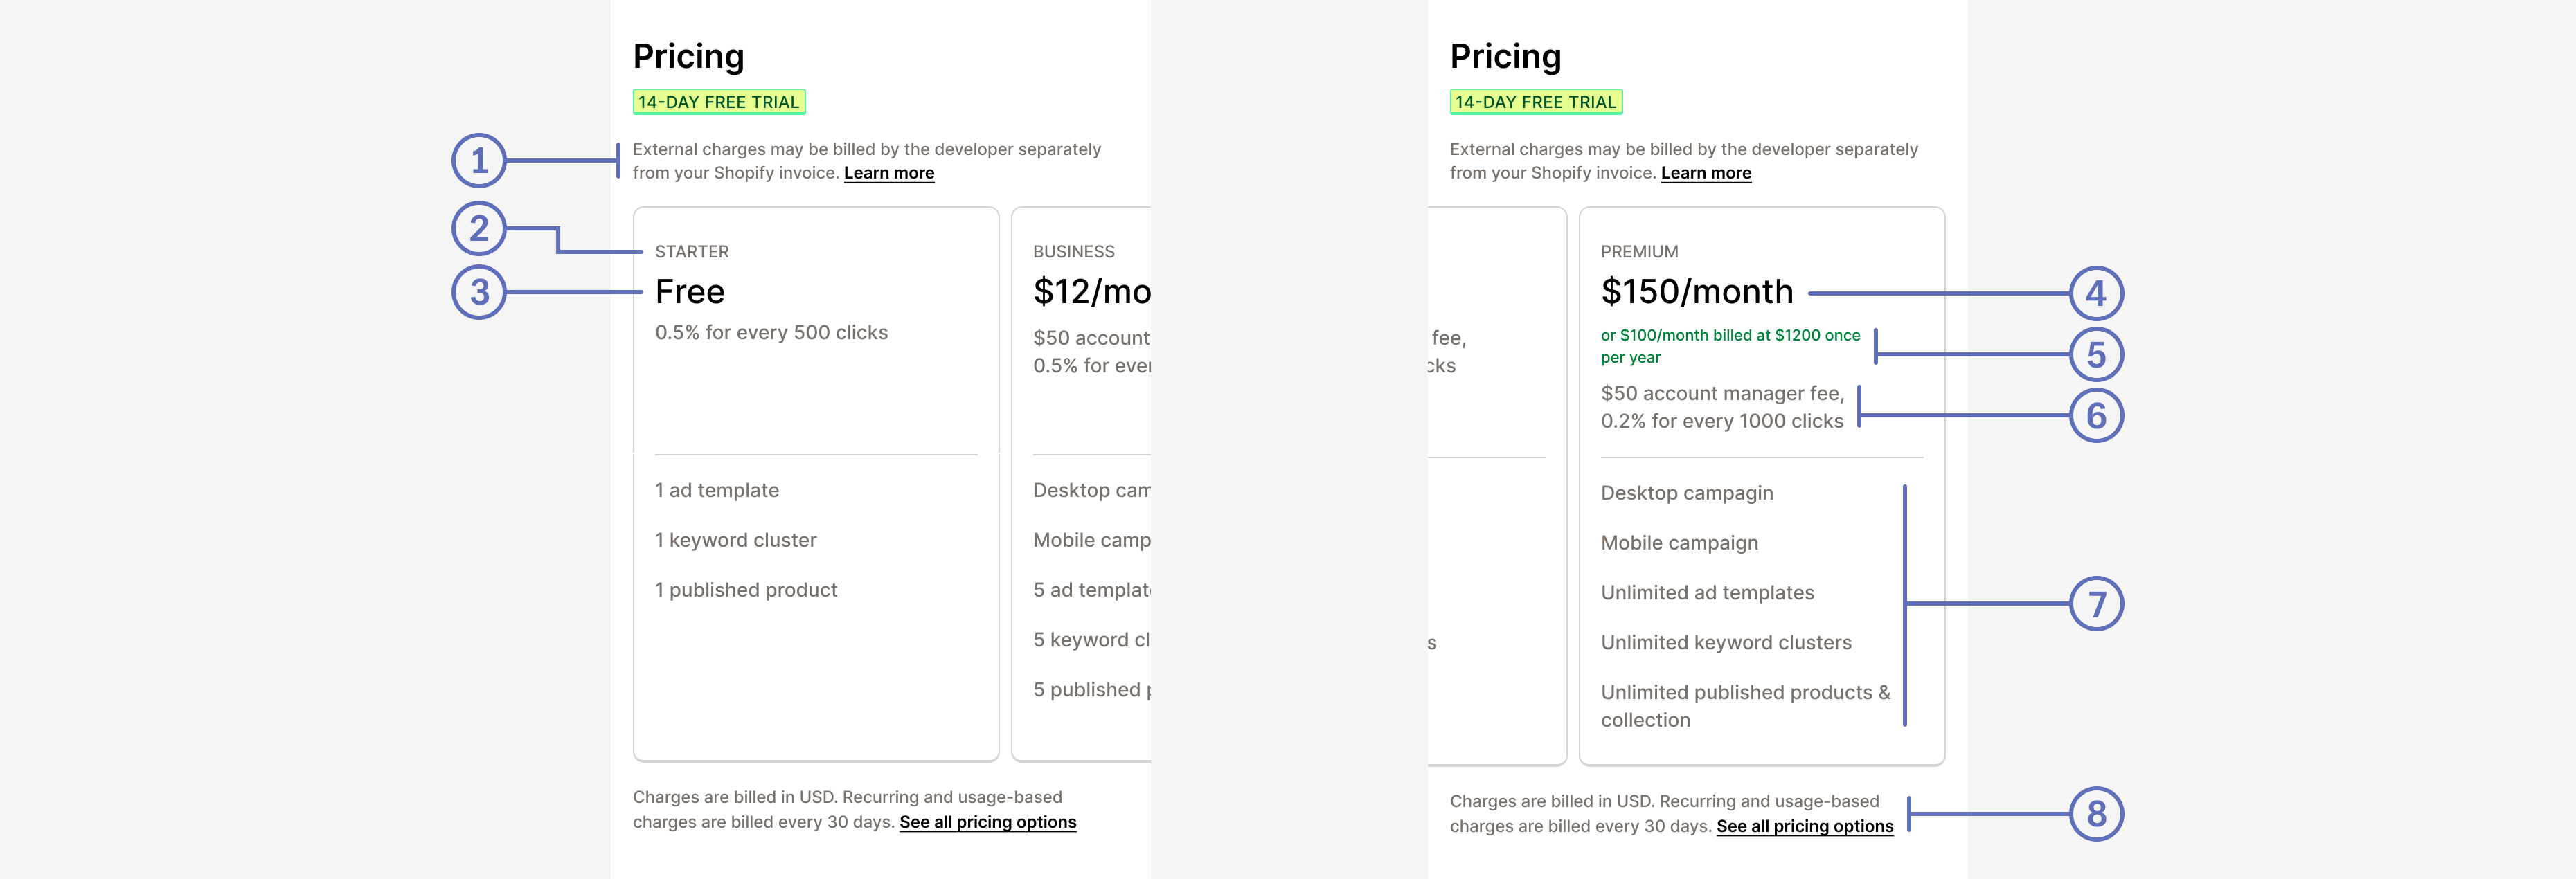
| 1. | A link to a page that describes any charges that are billed outside of Shopify's Billing API. |
|---|---|
| 2. | The name of each pricing plan. |
| 3. | A free monthly plan. |
| 4. | The paid monthly plan price. |
| 5. | The discounted yearly price for a monthly plan. |
| 6. | A description of any additional charges for this plan. |
| 7. | A list of features for this plan. |
| 8. | A link to a page that describes the app's pricing in detail. |
Anchor to D. Translate your app listingD.
Translated listings help your app reach a wider audience—they convert up to 4x better in non-English markets. List all languages your app's UI supports in your app store listing. To learn more about app translation, refer to Internationalization.
English listings set as primary are automatically translated to:
- Brazilian Portuguese
- Danish
- Dutch
- French
- German
- Simplified Chinese
- Spanish
- Swedish
You can also add your own custom translations in the Partner Dashboard.
Automated translation covers: App card subtitle, App introduction, App details, Features, Pricing details, Search terms, and image alt text. Adding a custom translation overwrites the automated one for that language.
Automated translation covers: App card subtitle, App introduction, App details, Features, Pricing details, Search terms, and image alt text. Adding a custom translation overwrites the automated one for that language.
Adding your own translated listing for an automatically translated language overwrites and disables automatic translation for that language. Deleting your translated listing resumes automated translation for that language.
To add a translated listing, go to Apps > your app > Distribution > Manage listing > Add translated listing. To delete a custom translation (which re-enables automation), use More actions > Delete listing.
Anchor to E. App discoveryE.
Choose accurate categories and tags that reflect your app's core functionality—this impacts discoverability. You can select up to 25 structured features per category to help merchants compare relevant app features.
If your app capabilities change and you want to change how your app is categorized, then you can submit an appeal to change the app categorization by using the link in the app submission form. After the Shopify app review team completes their review, they'll send a response, whether it's approved or rejected.
Include a privacy policy (required) and consider adding other helpful links to your developer website such as FAQ page, changelog, support portal, tutorial, and additional documentation. These resources help merchants understand and get the most value from your app. Link to dedicated pages rather than promotional landing pages or cloud documents.
Your app card subtitle should highlight benefits to merchants rather than just describing functions. For search terms, enter up to five relevant terms using complete words (not partial) and limit to one idea per term—for example, "email marketing" works, but "email marketing for leads" doesn't.
| Examples | Reason |
|---|---|
| Highlight the benefit to merchants instead of the function. Avoid incomplete sentences. |
| Highlight the benefit to merchants instead of the function. |
| Highlight the benefit to merchants instead of the name of the feature. |
Optimize your title tag and meta description for search engines. Follow Google's title tag best practices and write effective meta descriptions to improve click-through rates from search results.

Anchor to F. Merchant install eligibilityF.
Set install eligibility criteria in the app submission form to reduce uninstalls and negative reviews from ineligible merchants. Specify which sales channels your app needs (Online Store or POS) and geography criteria (country, shipping, currency) to target the right merchants. If a merchant changes their store settings after installation, use endpoints and webhooks to detect changes and notify them.
See App Store requirement 4.3 for more information.
Anchor to G. App review preparationG.
Provide clear instructions and a complete screencast showing your app's setup process and functionality. If your app integrates with third-party platforms, include valid test credentials that grant full access. Make screencasts in English or with English subtitles, and demonstrate the expected outcome for each test case.
See App Store requirement 4.5 for more information.
Anchor to 6. Security and merchant risk6.
Before you submit your app, make sure it's secure so the merchants who use it won't be at risk. See App Store requirements section 3 for more information.
Anchor to 7. Data and user privacy7.
Merchants trust you with their customers' sensitive data. Proper data handling protects merchants from privacy violations, legal liability, and loss of customer trust. Include a privacy policy in your listing to build transparency and confidence with merchants.
See App Store requirements section 3 for more information.
Your app should use supported APIs only—apps using APIs that will be deprecated within 90 days can't be submitted. Review API versioning policies for details.
Your app should use supported APIs only—apps using APIs that will be deprecated within 90 days can't be submitted. Review API versioning policies for details.
Anchor to 8. Support8.
Strong support helps merchants succeed with your app and reduces negative reviews from frustrated users. Provide clear, Shopify-specific instructions in your help documentation and in-app context so merchants can quickly resolve issues themselves. Refer to Polaris Help documentation guidelines for writing effective support content. Keep your emergency developer contact information up to date in your Partner Dashboard.
See App Store requirement 4.5 for more information.
Anchor to Category-specific best practicesCategory-specific best practices
Certain app types have unique impacts on merchant operations and require different APIs, extensions, and implementations. These category-specific best practices ensure these apps properly serve their use cases. Note that some apps may fall into multiple categories. For example, an app could be both a product sourcing and online store app.
Anchor to 9. Online store9.
Online store apps help merchants customize their storefront experience. Proper implementation ensures your app integrates seamlessly without breaking themes or requiring manual code changes.
Use theme app extensions to modify merchant themes—avoid requiring manual code changes. For vintage theme support, provide clear instructions for manual integration. Use app proxies to forward requests and display data.
Ensure your app works properly in both the Theme Editor and theme editor environment, and provide detailed setup instructions with deep links. Keep app branding minimal—use standard attribution (24x24 pixels) unless customers directly interact with branded elements as part of their experience (like payment methods or loyalty programs). Let merchants preview edits before publishing storefront changes.
Anchor to App Name BrandingApp Name Branding
App Name Branding in storefront visual components is permitted only in the following cases:
-
Your app may use App Name Branding in theme extensions only if one or both criteria are met:
- Customers directly interact with the custom branding elements as a key aspect of their buying experience, for example as part of a payment method or loyalty program.
- Removing the custom branding elements would cause confusion or harm to customers.
-
If apps want to use App Name Branding but do not meet both criteria above, the app must use the standard app attribution pattern. Regardless, no app is permitted to do the following:
- Requesting app reviews or ratings
- Promoting other apps or services
App Name Branding includes:
- Company or app logos, icons, branded watermarks, visual identifiers, or other branded imagery.
- Company or app name displayed as text in any form, including plain text, branded fonts, or stylized lettering.
- Custom design elements that contain the name or logo of the company or app.
Standard app attribution: Limited to a 24x24 pixel width and height on any image or text.
See App Store requirement 5.1 for more information.
Anchor to 10. Apps rendered in the Shopify admin10.
Apps rendered in the Shopify admin provide a seamless experience by integrating directly into the admin and POS, helping merchants work efficiently without switching contexts.
Use Shopify App Bridge to ensure OAuth redirects to your app, and provide a consistent experience by integrating off-platform features into the Shopify admin. Use session tokens for authentication and avoid third-party cookies or local storage, as they may not work in all browsers. Ensure your app functions in Chrome's incognito mode.
If using max modal (full screen mode), launch it only from merchant interactions (not from the navigation menu) and use it for complex editors or workflows where it improves the user experience. For POS apps, ensure all POS actions are complete and your UI is accessible from the POS Apps Admin Dashboard.
See App Store requirement 2.2 for more information.
Anchor to 11. Product sourcing11.
Product sourcing apps help merchants discover and sell products from suppliers. Proper payment handling and fulfillment workflows protect both you and merchants from fraud and financial risk.
Use a PCI-compliant gateway for goods sold to merchants, but charge other app costs through the Billing API. Don't automatically fulfill orders in pending payment state—this protects you from fraud risk. Add cost of goods to the Cost field in the merchant's product page, and avoid selling high-risk products that violate Shopify's Acceptable Use Policy. Use the fulfillmentOrderSubmitFulfillmentRequest mutation for fulfillment requests.
See App Store requirement 5.5 for more information.
Anchor to 12. Mobile app builders12.
Mobile app builders empower merchants to create mobile apps for their stores. Security is critical—improper API handling exposes merchants to data breaches and compromised customer information.
Convert your mobile app builder into a Sales Channel to enable checkout creation. Provide either a customizable theme builder or preset themes, and include detailed instructions for creating developer accounts and submitting to the Apple App Store or Google Play. Apps built by your builder should not make direct requests to the authenticated GraphQL Admin API—store client secrets and access tokens on a secure web server, not on mobile devices.
See App Store requirement 5.9 for more information.
Anchor to 13. Sales channels13.
Sales channels help merchants expand their reach by publishing products to additional platforms. A well-built sales channel provides clear account management, accurate product syncing, and reliable checkout flows.
Build your sales channel using Polaris components and cart permalinks that take customers directly to Shopify's checkout. After OAuth installation, redirect merchants to the account connection component and allow them to connect and disconnect their account. Use banner components to communicate approval status.
In your publishing section, show the number of published products with links to the bulk editor, and use the GraphQL Admin API products query to retrieve products. Communicate product issues using ResourceFeedback and banner components. Include a help footer on every page linking to your support resources.
For sales attribution, use a storefront access token. Refer to Building Shopify channels for the complete lifecycle diagram.
See App Store requirement 5.7 for more information.
Anchor to 14. Purchase option apps14.
Purchase option apps let merchants offer subscriptions, pre-orders, and other flexible buying options. Clear pricing transparency and functional customer portals help reduce cancellations and support requests.
Storefront implementation: Ensure your customer flow works properly on desktop and mobile across all supported browsers. Automate theme modifications and support multi-currency with correct currency and price rounding rules. Assign the correct purchase option category for each selling plan.
Display pricing clearly and show when customers will be charged. Use standalone widgets following the subscription UX guidelines and deferred purchase option UX guidelines. In cart pages, display the selling plan name—but check if the theme already includes it first.
Shopify Theme Store requires themes to display the selling plan name in the cart. Check if selling_plan.name already exists in the theme's cart.liquid file before adding it.
Shopify Theme Store requires themes to display the selling plan name in the cart. Check if selling_plan.name already exists in the theme's cart.liquid file before adding it.
Customer portal: Provide a customer portal accessible from the order status page and post-purchase emails. The portal should display all subscriptions with details (products, delivery frequency, price, schedule) and let customers cancel subscriptions or modify payment methods.
Shopify admin integration: Use app extensions on product pages in the Shopify admin, and ensure changes sync between the admin and your app. Include direct links to orders and customers in the admin.
See App Store requirement 5.4 for more information.
Anchor to 15. Donation distribution apps15.
Donation apps help merchants support charitable causes. Transparency about charitable status and fund distribution builds trust with both merchants and their customers.
Use the Billing API or a PCI-compliant gateway for donations. Provide proof of charitable status in your UI and show merchants proof that funds reach registered charities (not tax receipts). Collect customer donations only through Shopify checkout using Theme App Extensions or Checkout UI Extensions, and include instructions for hiding add-to-cart buttons on donation products. Clearly indicate operating costs in your UI and listing.
See App Store requirement 5.10 for more information.
Anchor to 16. Payments apps16.
Payments apps process financial transactions for merchants. Proper implementation ensures secure payment handling, protects merchants from fraud, and maintains checkout performance.
General practices: Your payments app should meet the minimum product requirements and use only the Payments Apps API. Submit screencasts for all supported browsers showing your payment flow. Allow buyers to cancel payments and redirect properly between checkout, your payment flow, and the order confirmation page. Present identical payment information to what's shown at checkout, and don't upsell products in the payment flow.
Naming and UI: Name your payments app using your legal business name without marketing text—merchants discover payment apps by the payment methods offered, not by name. If using checkout UI extensions, avoid banners, logos, or graphics as decorative elements, and use only permitted targets.
Testing: Provide a test store, credentials, payment/refund instructions, and descriptions of specific scenarios (installments, 3D Secure). Refer to Prohibited actions for a complete list of restrictions.
Cryptocurrency payments apps must be accepted into the blockchain app program—contact Partner Support to apply. Implement KYC requirements, transaction monitoring, sanctions screenings, and wallet risk assessments. Use IP blocking for restricted jurisdictions and monitor regulatory guidance to avoid supporting tokens that constitute securities.
See App Store requirement 5.2 for more information.
Anchor to 17. Post Purchase apps17.
Post-purchase apps help merchants increase order value through upsells after checkout. Transparent pricing and clear buyer consent protect merchants from chargebacks and customer complaints.
Redirect customers to the order confirmation page after they respond to post-purchase requests. Limit consecutive requests to 3 and ensure customers can accept or decline offers. Make upsell offers transparent with accurate pricing that dynamically updates when customers adjust quantity or variants. Display the same product price as in the merchant's store, and for limited-time offer details, clearly disclose them. Don't display order tracking, status functionality, or third-party promotions.
See App Store requirement 5.8 for more information.
Anchor to 18. Checkout apps18.
Checkout apps enable merchants to customize the checkout experience. Proper implementation maintains checkout performance and protects buyers from deceptive practices that could damage merchant reputation.
Checkout apps and extensions have design requirements that apply to custom apps as well as public apps. Be sure that your app meets all requirements for its functionality and distribution type.
Checkout apps and extensions have design requirements that apply to custom apps as well as public apps. Be sure that your app meets all requirements for its functionality and distribution type.
Use only documented APIs for customizing checkout. Don't request payment information, add countdown timers, or collect information already captured by standard checkout fields. For network access, keep response times under one second and render skeleton components initially to avoid blocking checkout. Extensions should be feature-complete, provide novel functionality, and avoid self-promotion.
Anchor to Design guidelinesDesign guidelines
All apps that extend Shopify checkout—both public and custom—should follow these design guidelines. These guidelines ensure buyers receive the lowest checkout total by default, that all additional charges are clearly disclosed, and buyers give explicit consent to any optional charges.
Avoid deceptive "dark patterns" that damage buyer trust—they deceive buyers and damage trust in merchants, Shopify, and the entire commerce ecosystem. The following examples demonstrate key principles you can apply in your own designs.
See App Store requirement 5.6 for more information.
Anchor to Optional charges must be off by defaultOptional charges must be off by default
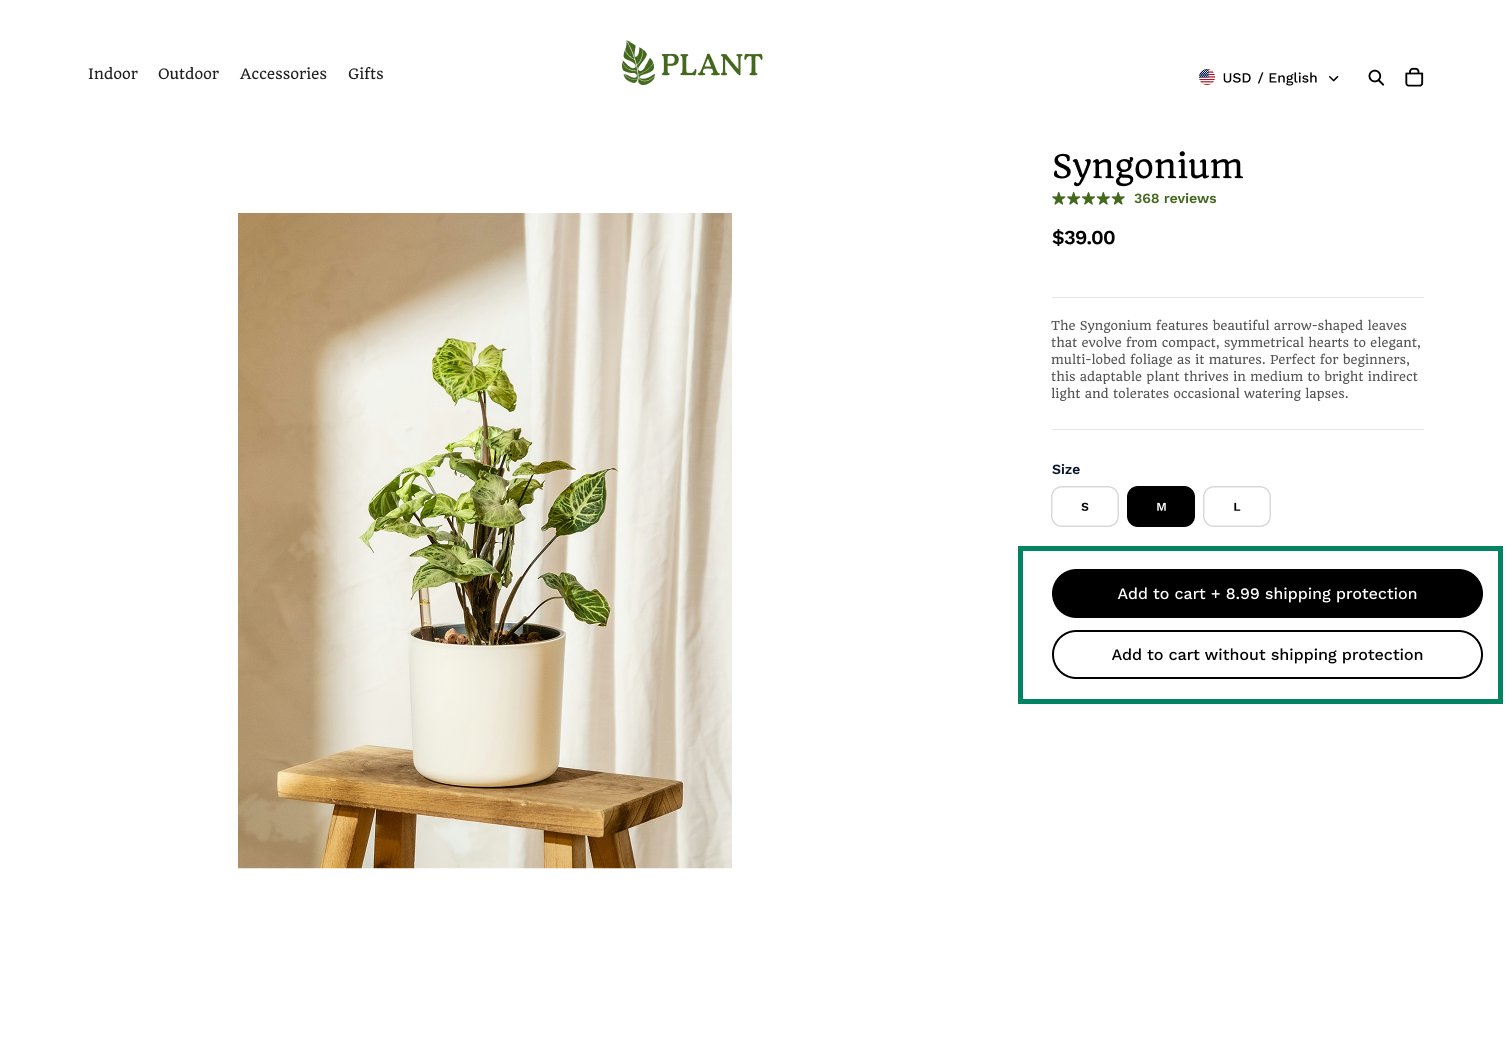
If your app adds optional charges to the storefront or checkout, those charges should be turned off by default. The following example shows an app extension that adds a premium shipping option at checkout.
This design is acceptable because buyers can clearly see the optional charge and actively choose to opt in by checking a box:

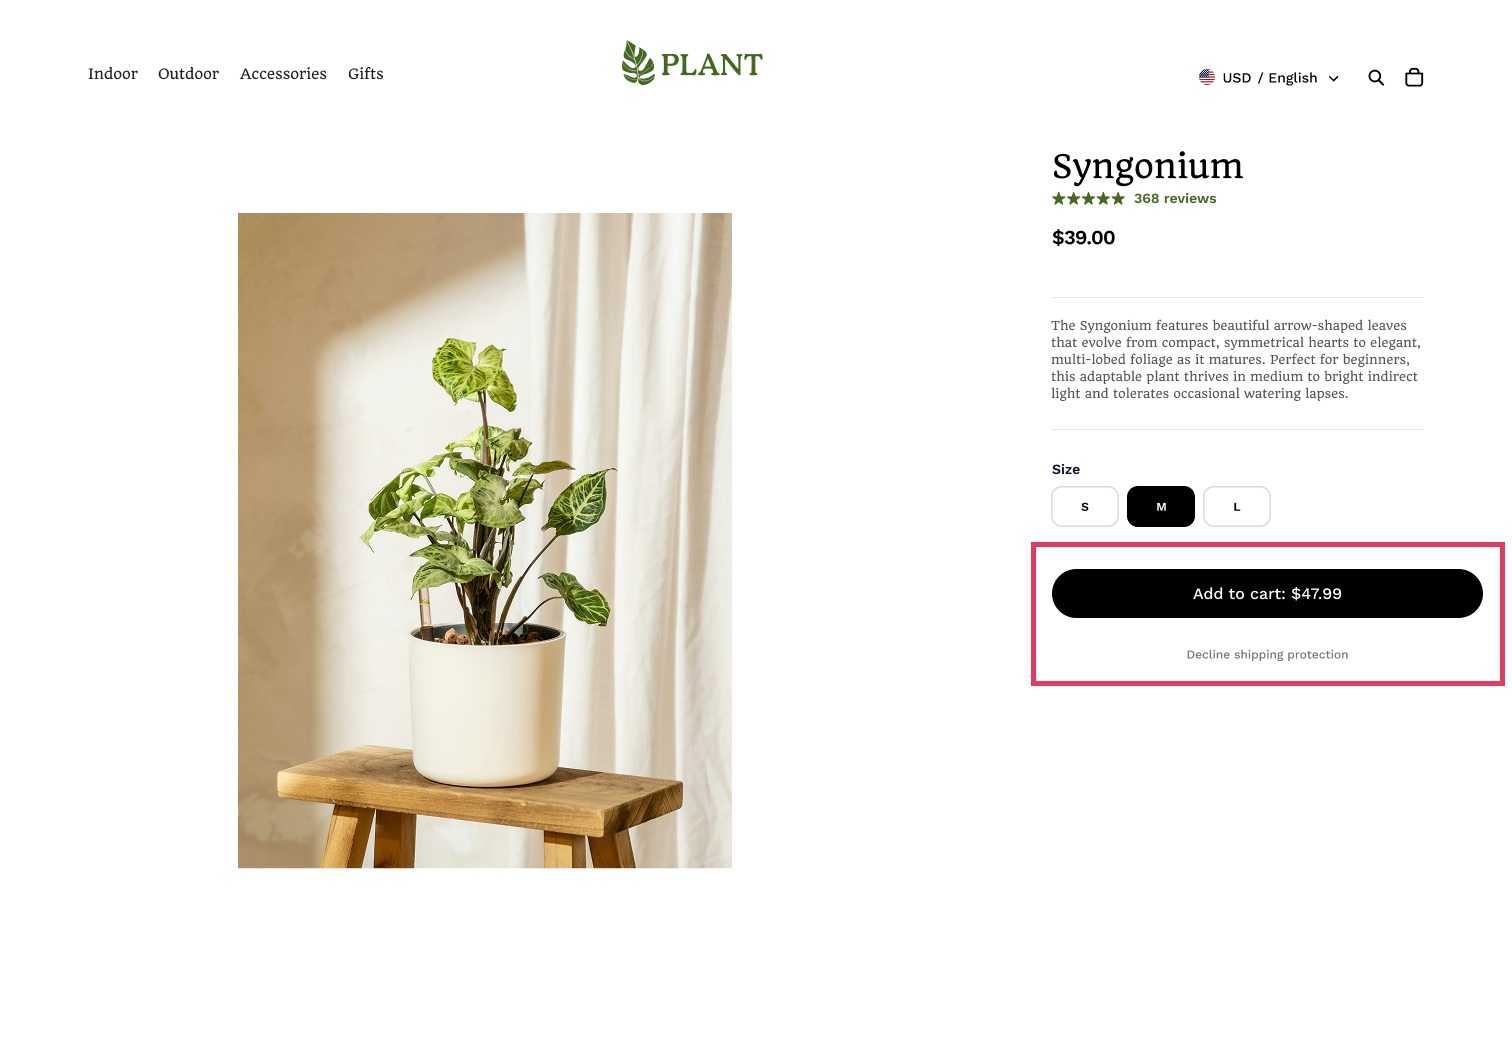
However, this design pattern is unacceptable because it automatically adds an optional item to the cart, tries to hide the charge by calling it a "gift," and forces buyers to opt out:

Anchor to Optional charges must be clearly disclosed and itemizedOptional charges must be clearly disclosed and itemized
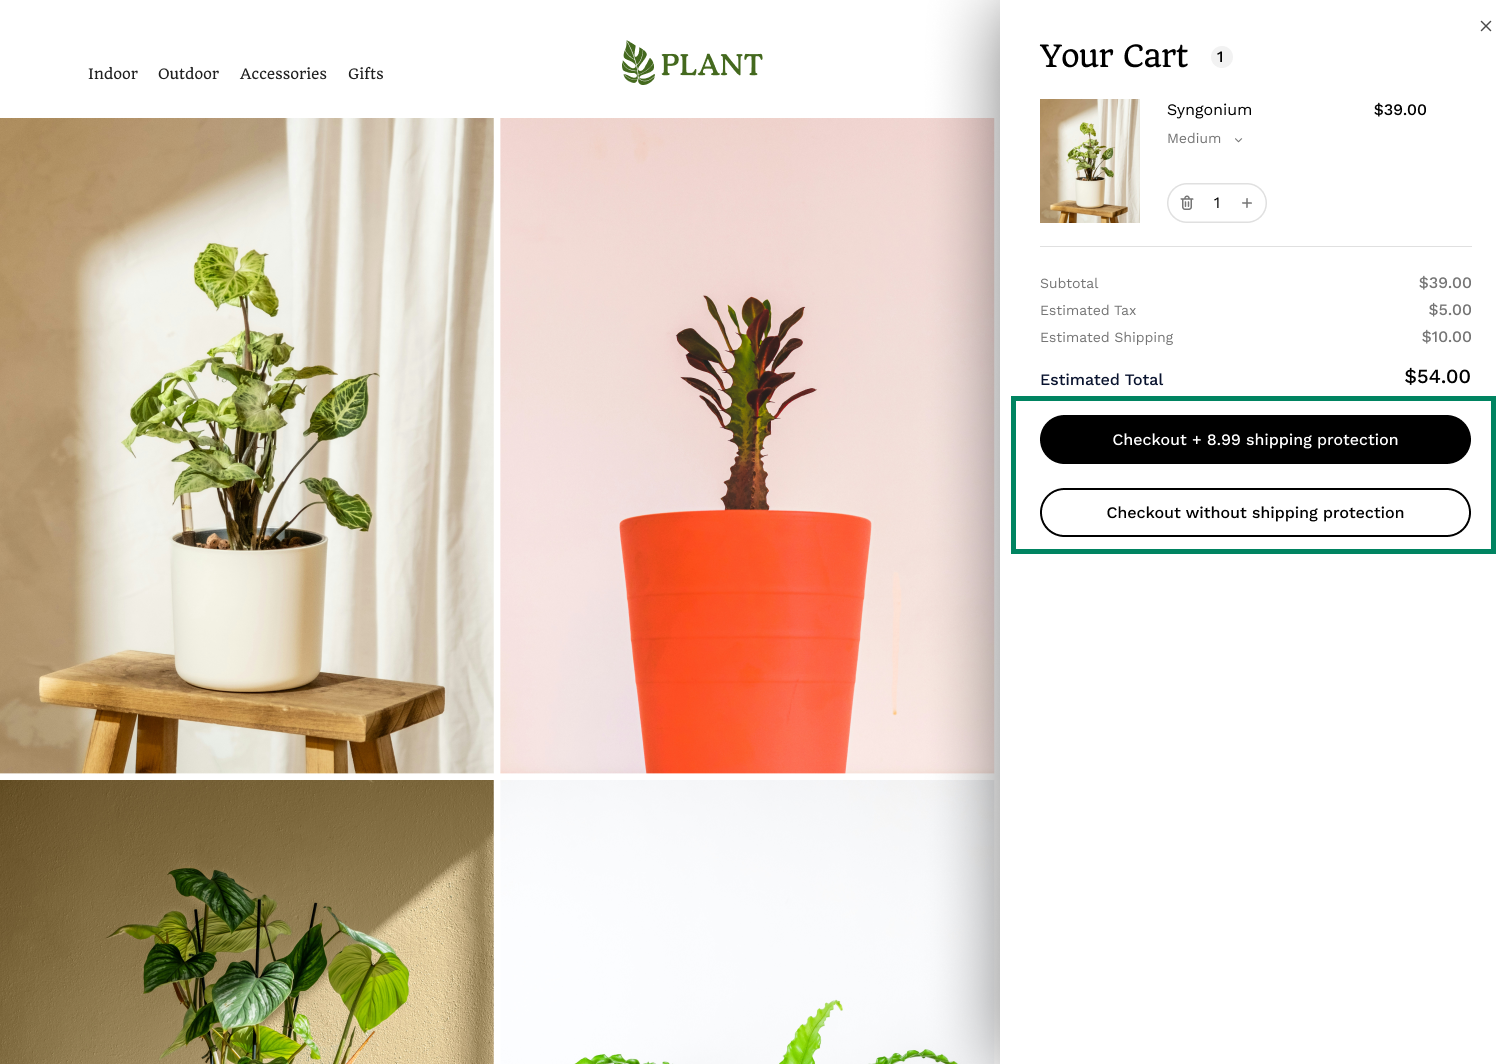
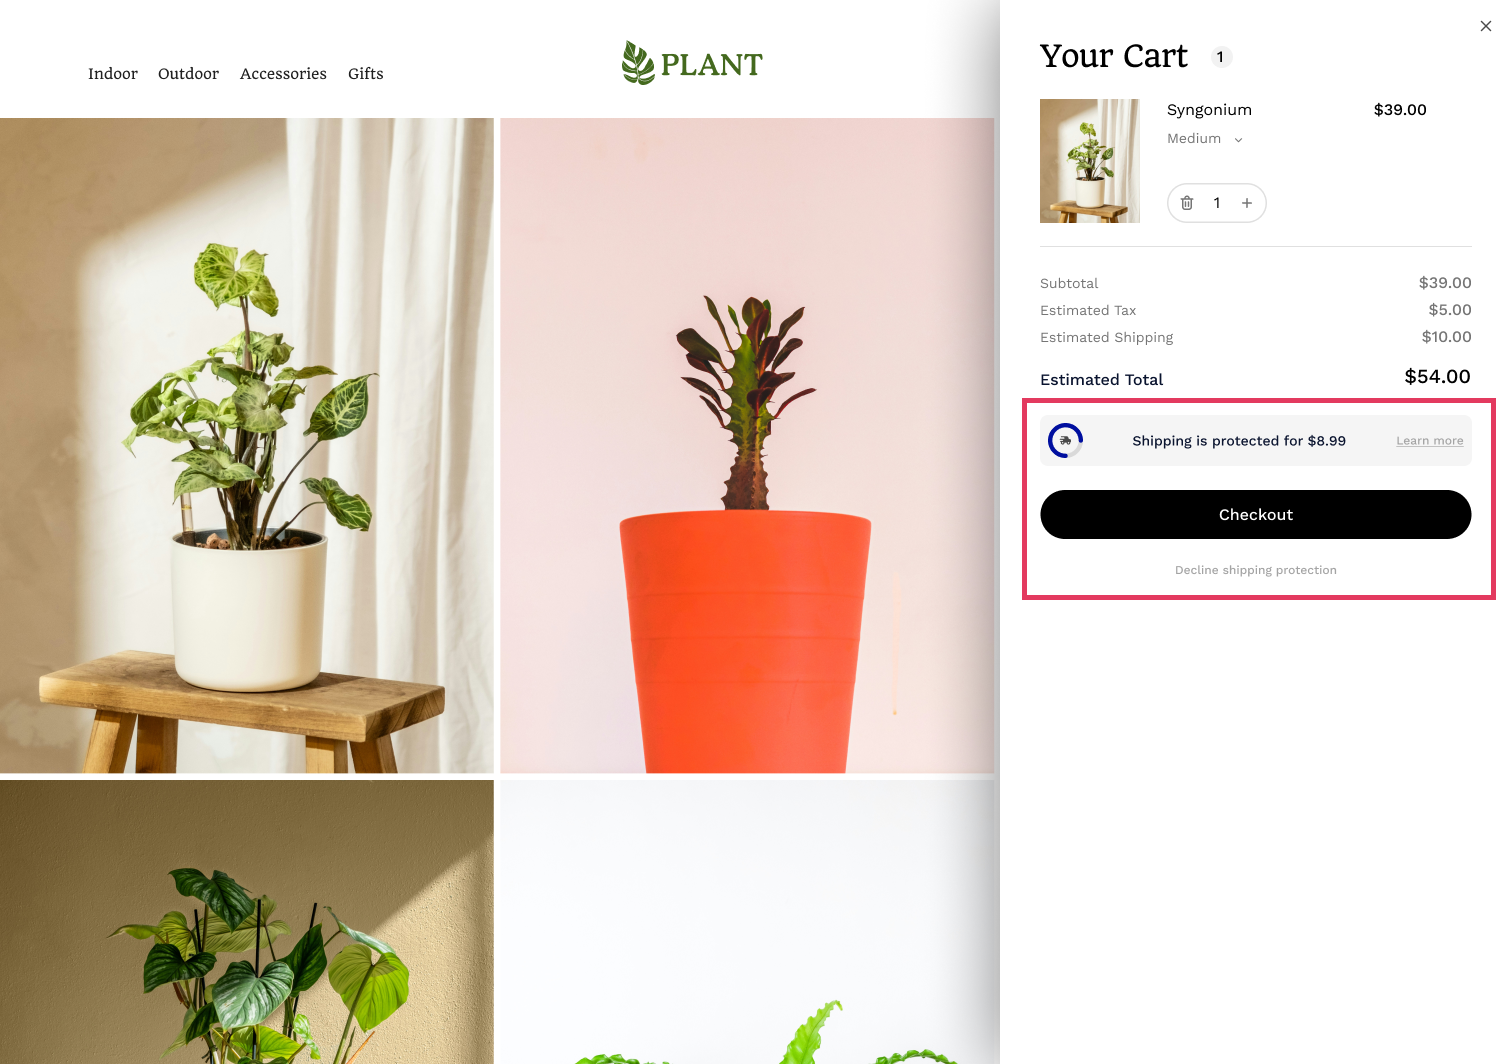
If your app adds optional charges to the storefront or checkout, those charges should be itemized so buyers can clearly see them. Simply showing a higher total checkout price isn't enough disclosure. Make sure all optional charges are clearly itemized on the storefront, in the cart, and at checkout.
For example, this cart drawer shows two checkout buttons: one with an optional shipping protection fee and one without. This design is acceptable because the optional fee is clearly itemized and buyers can easily see the additional cost and choose whether to pay it:
However, the following example is unacceptable. While the optional charge is disclosed, it's unclear which checkout button adds the fee and whether the shipping protection fee is already included in the cart total or will be added later at checkout:
This standard applies throughout the storefront, cart, and checkout. For example, this product page has two Add to Cart buttons—one clearly shows an optional extra charge. This pattern is acceptable:
This product page is unacceptable because the primary Add to Cart button hides an extra charge within the quoted total price and obscures the option to add the product at its actual display price:
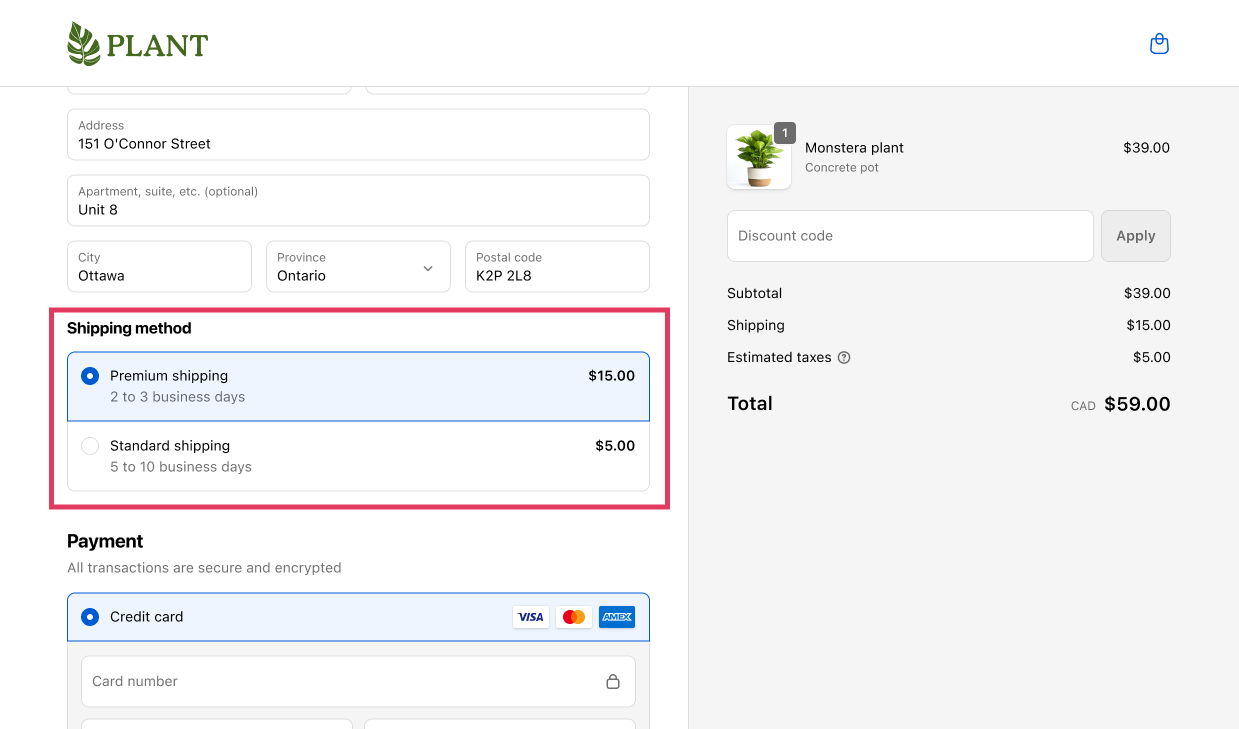
Anchor to Shipping must default to the lowest-priced optionShipping must default to the lowest-priced option
When multiple shipping options are available at different prices, the cheapest option must be selected by default.
This example is unacceptable because it places the most expensive shipping option first and makes it the default:
Anchor to 19. Blockchain apps19.
Blockchain apps enable merchants to sell NFTs and use tokengating. Proper data privacy and regulatory compliance protect merchants from legal risks and regulatory violations.
Ensure no personal data is written or stored on-chain. Support only primary NFT sales on Shopify—secondary sales should occur on third-party platforms. Don't facilitate NFTs that could be classified as securities or have transferrable royalties.
Royalties should never be dispersed to buyers or recipients of NFTs.
Royalties should never be dispersed to buyers or recipients of NFTs.
NFT distribution apps should identify NFT variants by populating product metafields and write blockchain transaction IDs to fulfillment tracking fields. Provide wallet acquisition options for customers and ensure they can receive full self-custody without post-purchase fees (unless using permissioned blockchains—disclose this before purchase). Block NFT features while Shopify Payments is active until shops are approved using the NFT Sales Eligibility API.
Tokengating apps should identify gated orders using order metafields and gated products using product metafields.
See App Store requirement 5.11 for more information.
Anchor to Next stepsNext steps
- Review the App Store requirements - Review the App Store requirements before submitting your app for review.
- Prepare your app before submitting - Learn our recommended best practices for preparing and testing your app before submitting it for review.