Build web pixels
Pixels are JavaScript code snippets that run on the online store and collect behavioral data for marketing campaign optimization and analytics. You can create a web pixel extension to subscribe your app to events that are emitted by Shopify.
Anchor to What you'll learnWhat you'll learn
In this tutorial, you'll learn how to do the following tasks:
- Create a web pixel extension.
- Configure your web pixel extension to subscribe to all events emitted by Shopify.
- Activate and test your web pixel extension.
- Deploy your web pixel extension to Shopify.
Anchor to RequirementsRequirements
- You're a user with app development permissions and have created a dev store.
- You've created an app using Shopify CLI. If you previously installed Shopify CLI, then make sure you're using the latest version.
- Your app can make authenticated requests to the GraphQL Admin API.
- Your app has the
write_pixelsandread_customer_eventsaccess scopes. Learn how to configure your access scopes using Shopify CLI.
Anchor to Step 1: Create a web pixel extensionStep 1: Create a web pixel extension
To create a web pixel extension, you can use Shopify CLI to generate a starter extension.
-
Navigate to your app directory:
Terminal
cd <directory> -
Run the following command to create a new web pixel extension:
Terminal
shopify app generate extension --template web_pixel --name my-web-pixel -
Choose the language that you want to use:
Terminal
? What would you like to work in?> (1) JavaScript(2) TypeScriptAfter the generation process has completed, a new folder is created in your app directory named
extensions. This folder contains all of the code for your web pixel extension.
Anchor to Step 2: Define your web pixel settingsStep 2: Define your web pixel settings
Your web pixel needs to be configured for each store so it can properly track and associate data. The settings for your web pixel can be found at extensions/<your_extension_name>/shopify.extension.toml.
Inside of shopify.extension.toml, you can define fields that can be used by your web pixel.
In addition, configure privacy settings to integrate your pixel with cookie banner and data sale opt out features used to help comply with privacy regulations.
To integrate with the cookie banner, use the latest version of Shopify CLI and configure the purposes required to run your pixel:
analytics: Your pixel is used to collect information about how customers interact with the site.marketing: Your pixel is used to provide ads and marketing communications based on customer interests.preferences: Your pixel is used to persist customer preferences and personalize the customer experience.
To configure a pixel to run without requiring consent (strictly necessary / essential), set the above purposes to false.
To integrate with the data sale opt out feature, configure sale of data:
sale_of_data: Your pixel is used for data sale / sharing.
The following example shows the shopify.extension.toml file with a description of each property, as well as a privacy settings configuration that indicates the pixel required analytics, marketing and sale_of_data permissions to run:
shopify.extension.toml
| Property | Description |
|---|---|
typerequired | The type of extension. For web pixel extensions, this value is always web_pixel_extension. |
namerequired | The name of the web pixel app extension. |
uidrequired | The user identifier for the web pixel app extension. See common extension properties for more information. |
runtime_contextrequired | The context that the web pixel extension is running in. This value must be set to strict. |
customer_privacy | Configure privacy settings definition. If not provided, then it defaults to marketing: true, analytics: true, and sale_of_data: "enabled". All four privacy purposes need to be explicitly declared if you want to override the default. |
customer_privacy.analyticsrequired | A true or false declaration that your pixel requires analytics permissions to run. |
customer_privacy.marketingrequired | A true or false declaration that your pixel requires marketing permissions to run. |
customer_privacy.preferencesrequired | A true or false declaration that your pixel requires preferences permissions to run. |
customer_privacy.sale_of_datarequired | A string enum declaration that your pixel requires sale_of_data permissions to run. - enabled: Pixel qualifies as data sale and won't fire if customers opt out of data sale/sharing - disabled: Pixel doesn't qualify as data sale/sharing and will fire when customers opt out of data sale/sharing - ldu: Pixel qualifies as data sale / sharing, but implements a limited data use setting so that it will fire when customers opt out of data sale / sharing. |
settingsrequired | Denotes the data type of the settings definition. A type property with the value object must be provided for this section. |
settings.fieldsrequired | Denotes the acceptable metafields for your settings definition. Requires a name and type field. An optional description and validations field can also be provided. |
By default, your shopify.extension.toml file is generated with a field named accountID and privacy settings configuration of analytics, marketing and sale_of_data, as shown in the following example:
shopify.extension.toml
Each of the fields that you define within your settings has a name, description, and type. The only type that is supported for web pixel is single_line_text_field. Validations can be provided as an optional parameter and can be used to define any constraints on a field's value. In the above example, there is a single validation to ensure that the value provided is at minimum length of 1. Further information on validation options can be found on the metafields validation page.
With the settings defined, you can now set up subscriptions to events that are emitted.
Anchor to Step 3: Subscribe to eventsStep 3: Subscribe to events
Event subscription allows your app to listen for events that are emitted by Shopify and other developers. You can define a specific event to subscribe to or you can subscribe to all events using analytics.subscribe.
You can add an event subscription to your app using the extensions/<your_extension_name>/src/index.js file. When you run the generate extension command to create the extension, a set of basic sample code is created in this file.
You can add code to enable subscription to any target events. For example, you can add the following code that subscribes to all events:
extensions/<your_extension_name>/src/index.js
With this code added, the web pixel is now set to listen to all events that are emitted. Refer to the Web pixel extension API for additional APIs to support other functions or to subscribe to individual events.
Anchor to Step 4: Update your app access scopesStep 4: Update your app access scopes
Before you can activate a web pixel extension, you must request the following access scopes to invoke web pixel mutations in the GraphQL Admin API:
write_pixels: Used to write the web pixel merchant settingsread_customer_events: Used to gain access to customer events
-
In
shopify.app.tomlin the root of your app, add thewrite_pixelsandread_customer_eventsaccess scopes:shopify.app.toml
[access_scopes]# Learn more at https://shopify.dev/docs/apps/structure/configuration#access_scopesscopes = "write_pixels,read_customer_events" -
Save your configuration file. If
app devis running, the scope changes will be applied automatically. If not, start the command to connect the extension to a dev store:Terminal
shopify app devNoteConnecting the extension to the store is the first step in testing your web pixel extension. However, the web pixel isn't created and configured in the dev store, and isn't subscribed to customer events, until you run a mutation to create the web pixel.
Note:Connecting the extension to the store is the first step in testing your web pixel extension. However, the web pixel isn't created and configured in the dev store, and isn't subscribed to customer events, until you run a mutation to create the web pixel.
-
In your dev store, go to Settings > Customer events.
The name of your app appears in the App pixels list with the Disconnected status. You'll connect your app and activate the web pixel extension in the next step.
Anchor to Step 5: Activate a web pixel extensionStep 5: Activate a web pixel extension
To activate a web pixel extension, you must create a web pixel record on the store where you installed your app. You can do this using the webPixelCreate mutation. When this mutation is called, Shopify validates against the settings definition that you defined in shopify.extension.toml. If the settings input field doesn't match the schema that you defined, then the mutation will fail.
The simplest way to execute GraphQL queries if you're developing an app is to use the local GraphiQL instance that the CLI provides.
The simplest way to execute GraphQL queries if you're developing an app is to use the local GraphiQL instance that the CLI provides.
-
Execute the following mutation from within your app:
POST https://{shop}.myshopify.com/api/{api_version}/graphql.json
GraphQL mutation
mutation {# This mutation creates a web pixel, and sets the `accountID` declared in `shopify.extension.toml` to the value `123`.webPixelCreate(webPixel: { settings: "{\"accountID\":\"123\"}" }) {userErrors {codefieldmessage}webPixel {settingsid}}}JSON response
{"data": {"webPixelCreate": {"userErrors": [],"webPixel": {"settings": "{\"accountID\":\"123\"}","id": "gid://shopify/WebPixel/1"}}},"extensions": {"cost": {"requestedQueryCost": 10,"actualQueryCost": 10,"throttleStatus": {"maximumAvailable": 1000,"currentlyAvailable": 990,"restoreRate": 50}}}} -
In your dev store, go to Settings > Customer events.
The name of your app should appear in the App pixels list with the Connected status.
Anchor to Step 6: Test the web pixel settingsStep 6: Test the web pixel settings
You can test that the web pixel is configured and subscribed to all events emitted on the dev store by completing the following steps:
-
With the server running, open your dev store.
-
Right-click anywhere on the page and select Inspect.
-
Click Console.
The
accountIDis logged in the console: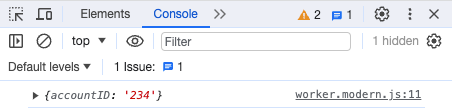
Anchor to Step 7: Deploy your extensionStep 7: Deploy your extension
When you're ready to release your changes to users, you can create and release an app version. An app version is a snapshot of your app configuration and all extensions.
-
Navigate to your app directory.
-
Run the following command.
Optionally, you can provide a name or message for the version using the
--versionand--messageflags.Terminal
shopify app deploy
Releasing an app version replaces the current active version that's served to stores that have your app installed. It might take several minutes for app users to be upgraded to the new version.
If you want to create a version, but avoid releasing it to users, then run the deploy command with a --no-release flag.
You can release the unreleased app version using Shopify CLI's release command, or through the Dev Dashboard.
If you want to create a version, but avoid releasing it to users, then run the deploy command with a --no-release flag.
You can release the unreleased app version using Shopify CLI's release command, or through the Dev Dashboard.
Anchor to Next stepsNext steps
- Consult the customer events reference to learn about the ways of tracking and sending events with web pixels.
- Explore the web pixel extension API to learn about the sandboxing modes for web pixels, and the API references that are available for the sandbox.