Getting started with POS UI extensions
This tutorial shows you how to create a simple Shopify app using only POS UI extensions. This type of app is called an extension-only app, where all of your code runs in the extension on the merchant's device. To learn more about extension-only apps, and about apps that use code hosted on a server, see Extension-only and server-hosted apps.
The app you'll build displays a tile on the POS app home screen. When users tap the tile, the app shows a modal with a message displaying the name of the store.
Anchor to What you'll learnWhat you'll learn
In this tutorial, you'll learn how to do the following tasks:
- Scaffold an extension for a Shopify POS extension-only app using Shopify CLI.
- Add some basic functionality to the scaffolded extension.
- Test your app in Shopify POS.
Anchor to RequirementsRequirements
- Create a partner account.
- Create a dev store.
- Install the latest version of Shopify CLI.
- Install the Shopify POS app on your Android or iOS device.
Anchor to Step 1: (Optional) Set up the Shopify AI ToolkitStep 1: (Optional) Set up the Shopify AI Toolkit
Install the Shopify AI Toolkit to connect your AI coding assistant to Shopify's docs, APIs, and CLI. Your assistant gets the Shopify context it needs to answer questions, write code, and run commands more reliably.
Claude Code
In your terminal, run claude plugin install:
Terminal
Codex
In your terminal, run codex plugin add:
Terminal
Antigravity CLI
In your terminal, install the Shopify plugin:
Terminal
Cursor
In Cursor Chat, add the Shopify plugin:
Cursor Chat
Hermes
In your terminal, download the install script and run it:
Terminal
VS Code
-
Ensure the Agent plugins preview is enabled in your VS Code settings.
-
Open the Command Palette (
Cmd+Shift+Pon macOS,Ctrl+Shift+Pon Windows/Linux) and run:VS Code: Command Palette
Chat: Install Plugin From Source -
When prompted, enter the repository URL:
VS Code: Plugin source URL
https://github.com/Shopify/shopify-ai-toolkit
In your terminal, run claude plugin install:
Terminal
Anchor to Step 2: Scaffold an extension-only appStep 2: Scaffold an extension-only app
Create a framework for building an extension-only app using Shopify CLI. Run the following command in your project directory:
Terminal
Shopify CLI will present you with a series of prompts. Respond to the prompts as follows:
- Get started building your app: Choose
Build an extension-only app. - Which organization is this work for: Choose the organization linked to your dev store.
- Create this project as a new app on Shopify: Choose
Yes, create it as a new app. - App name: Enter
my-pos-extension-app.
When you run shopify app init for an extension-only app, Shopify CLI creates an app containing just configuration files and an empty folder for your extension code. This empty app doesn't do anything, but it's needed to attach your extension to.
Anchor to Step 3: Scaffold a POS UI extensionStep 3: Scaffold a POS UI extension
Create a POS UI extension for your app using Shopify CLI by running the following commands in your project directory:
Terminal
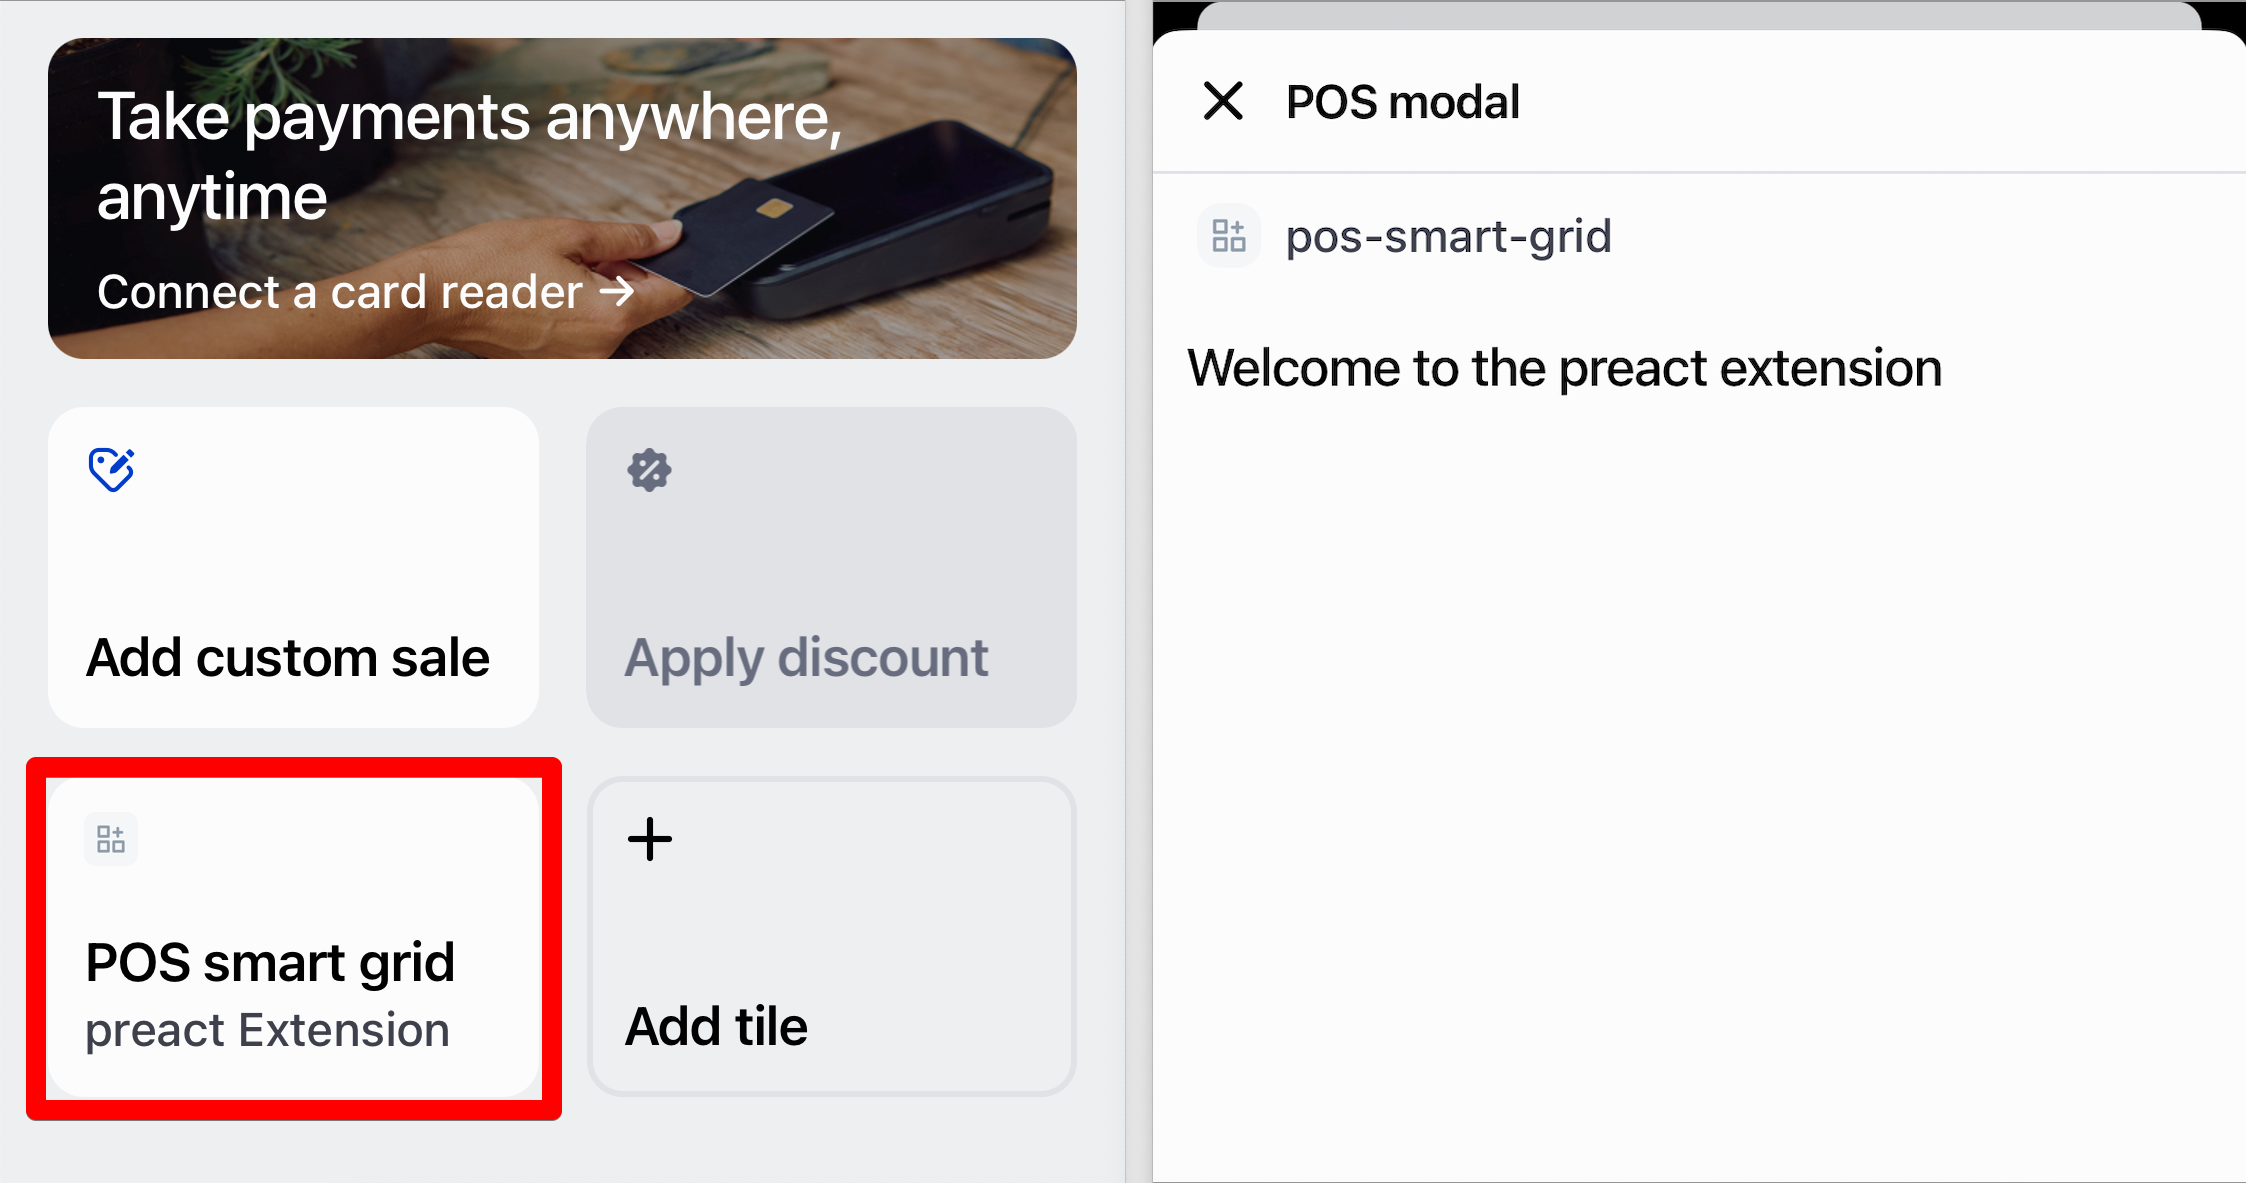
When prompted to choose the type of extension, select POS smart grid. For the extension name, select the default name (pos-smart-grid).
Running this command creates the basic code and configuration files for an app that displays a tile on the POS app's smart grid. This code includes the following files:
shopify.extension.toml: The configuration file that defines your extension's targets and their corresponding code modules.Tile.jsx: Contains the code for the tile that the app creates on the POS smart grid. It renders the tile UI element and contains anonClickfunction to launch a modal when a user taps it.Modal.jsx: Contains code for the modal that launches when the tile is tapped. It renders the modal and displays the message "Welcome to the Preact extension."
To learn more about targets and UI components, see Apps in POS and the POS UI extensions reference.
Anchor to Step 4: Connect the Shopify app and the extension to your dev storeStep 4: Connect the Shopify app and the extension to your dev store
Before you can install the extension on your mobile device, you need to connect the Shopify app and the extension you created to your dev store.
-
From your app's root directory (
my-pos-extension-app), run the following command to start a local development server:Terminal
shopify app devThis command connects your local extension to your dev store and creates a Cloudflare tunnel to serve the extension.
-
When you see the message
Ready, watching for changes in your app, open the Dev Console on your dev store by pressingpon your keyboard.
Anchor to Step 5: Install the extension on your mobile deviceStep 5: Install the extension on your mobile device
Install the extension in the POS app so you can test as you update your code.
-
On your mobile device, make sure you're logged into your dev store in the Shopify POS app.
-
In the Dev Console on your dev store, click on the Mobile preview link to view a QR code for previewing your extension in POS.
-
Scan the QR code with your device and tap the link to open the Shopify POS app.
The POS app on your device fetches your extension code from the Cloudflare tunnel URL and runs it inside the app. You should now see a new tile on the smart grid labeled POS smart grid. Tapping this tile opens a modal titled POS modal with the text “Welcome to the Preact extension.”
Anchor to Step 6: Update the smart-grid tile codeStep 6: Update the smart-grid tile code
When you created your extension, Shopify CLI added some placeholder code to a Tile.jsx file to render the smart-grid tile.
Update this code to change the headings on the tile:
-
Open the
Tile.jsxfile in your app'sextensions/pos-smart-grid/srcdirectory. -
Replace the existing code with the code shown below.
Tile.jsx code
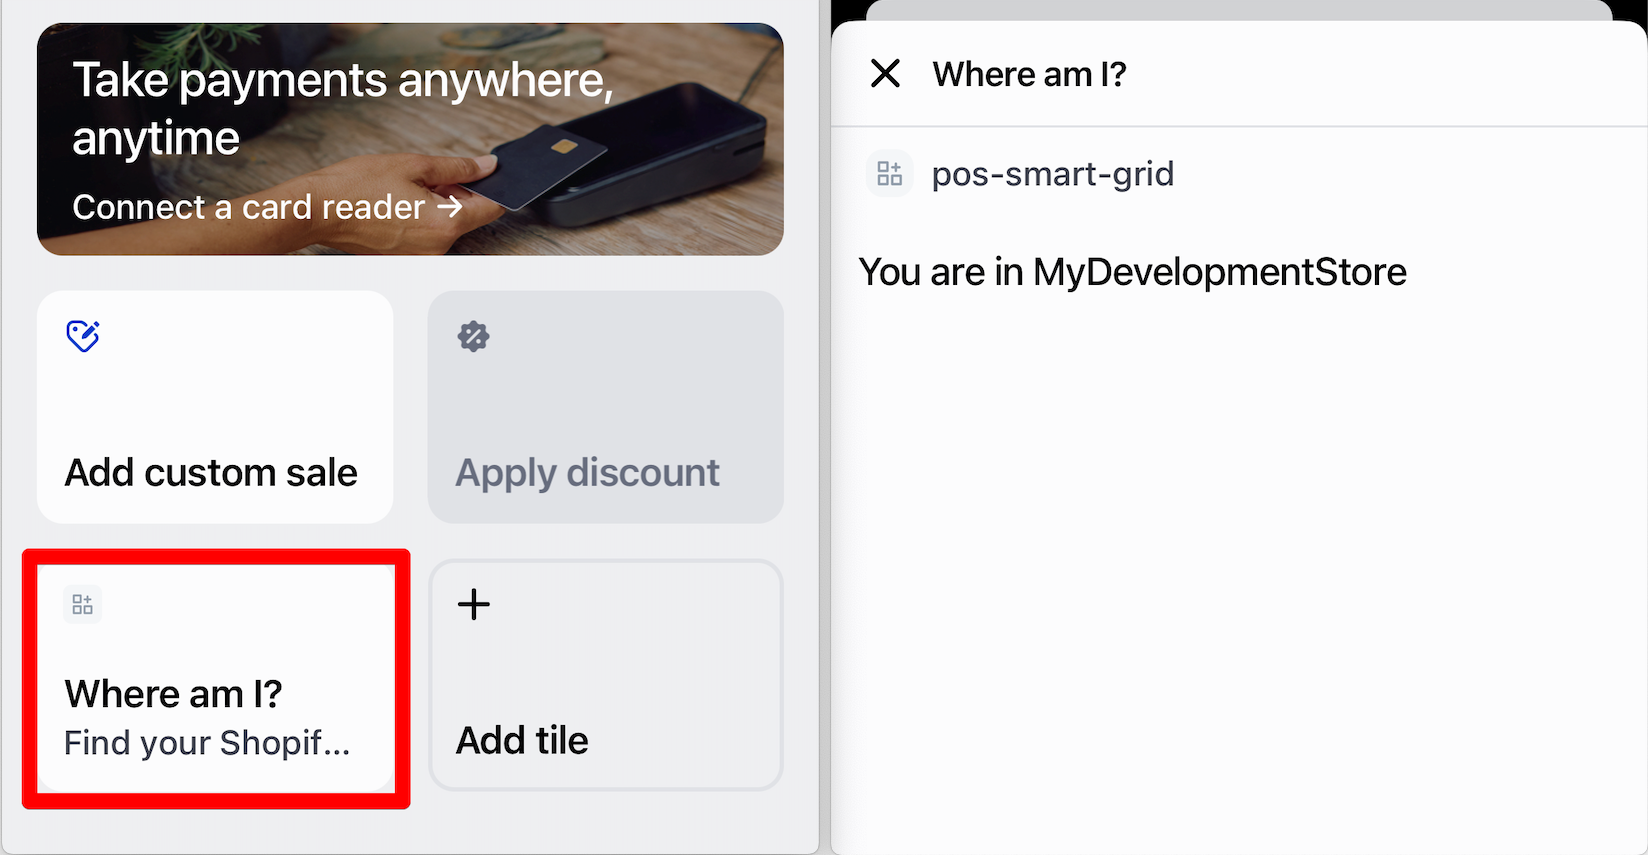
import {render} from 'preact';export default async () => {render(<Extension />, document.body);}function Extension() {return (<s-tileheading="Where am I?"subheading="Find your Shopify store"onClick={() => shopify.action.presentModal()}/>);}This new code changes the heading and subheading of the tile from their default values.
-
Look at the tile on your device. You should see that the heading and subheadings have been updated to read "Where am I?" and "Find your Shopify store."
If you experience issues updating or loading the extension, see the Troubleshooting section.
Anchor to Step 7: Update the modal codeStep 7: Update the modal code
When you created your extension, Shopify CLI added some placeholder code to a Modal.jsx file to render a modal when the tile is tapped. This code displays the message "Welcome to the preact extension" that you saw when you opened the modal in Step 5.
Update this code to retrieve the name of your dev store using the GraphQL Admin API and display it in the modal:
-
Open the
Modal.jsxfile in your app'sextensions/pos-smart-grid/srcdirectory. -
Replace the existing code with the following.
Modal.jsx code
import {render} from 'preact';// Import hooks for state managementimport {useState, useEffect} from 'preact/hooks';export default async () => {render(<Extension />, document.body);};function Extension() {// Set up states to track loading status of storenameconst [isLoading, setIsLoading] = useState(true);const [storeName, setStoreName] = useState('');// useEffect runs when the component mounts (modal opens)useEffect(() => {async function fetchStoreName() {try {// Define the GraphQL query to fetch the storenameconst requestBody = {query: `query {shop {name}}`};// Make a POST request to the GraphQL Admin APIconst response = await fetch('shopify:admin/api/graphql.json', {method: 'POST',headers: {'Content-Type': 'application/json',},body: JSON.stringify(requestBody)});const data = await response.json();// Extract the storename from the GraphQL response structuresetStoreName(data.data.shop.name);} catch (error) {// If the API call fails, log the error and show a fallback messageconsole.error('Failed to fetch store name:', error);setStoreName('Unknown');} finally {// Set loading to false whether the request succeeded or failedsetIsLoading(false);}}// Call the function to fetch the store namefetchStoreName();}, []);return (<s-page heading='Where am I?'><s-scroll-box><s-box padding="small"><s-text>{isLoading ? 'Fetching store name...' : `You are in ${storeName}`}</s-text></s-box></s-scroll-box></s-page>);}
This new code does the following to fetch your store's name from the GraphQL Admin API and display it in the modal:
- Imports hooks for state management.
- Sets up states to track whether the code is fetching data and to store the storename after it's been fetched.
- After rendering the modal component, finds the storename by directly accessing the GraphQL Admin API using
fetch(). - In the returned modal, displays "Fetching store name…" until the API call completes, then displays "You are in
${storename}".
Anchor to Step 8: Verify your changesStep 8: Verify your changes
Tap the Where am I? tile in your POS app. You should now see a modal that displays a message with your storename:
Anchor to TroubleshootingTroubleshooting
When previewing extensions from your dev store on a mobile device, you might experience the following issues:
- After installing the extension, it disappears from the POS app's home screen.
- When updating your code, changes aren't reflected in the extension on your device.
These issues can occur due to network switches (between WiFI and cellular), Cloudflare Tunnel timeouts, or other interruptions. Additionally, closing the POS app or locking and unlocking your device can cause the app to remove the extension, especially in cases like WebSocket timeouts or when the local dev server stops.
If you encounter issues while following this tutorial, adjust your device settings and reload the extension.
Anchor to Device settingsDevice settings
Change the settings on your device so that it doesn't automatically lock, and keep the POS app open after installing the extension.
Anchor to Reloading the extensionReloading the extension
Reload the extension by following these steps:
- If you can still see the extension's tile on your device, open the POS Dev Console in the POS app and tap Remove dev extensions.
- In the terminal where your development server is running, press
Control + Cto stop the server. - Run
shopify app devto restart the server: - Press
pon your keyboard to open the Developer Console. - Click View mobile to generate a new QR code.
- Scan the QR code with your device to reload the extension.
Anchor to Next stepsNext steps
- Build a discount UI extension, print UI extension, or subscription UI extension.
- Explore the POS UI extensions reference for available targets, target APIs, and web components.