Adding shop eligibility requirements
You have a basic channel app that you created. You want shops to meet specific requirements before merchants can sell products on your marketplace. You also want to provide merchants with feedback for how they can meet your marketplace requirements and start selling.
After the initial requirements check when merchants install your channel app, you want to check whether any required changes have been made. For example, if you reject a shop for not having a privacy policy, and the merchant subsequently adds one, then you should mark the shop as approved. To do so, you can subscribe to specific webhooks.
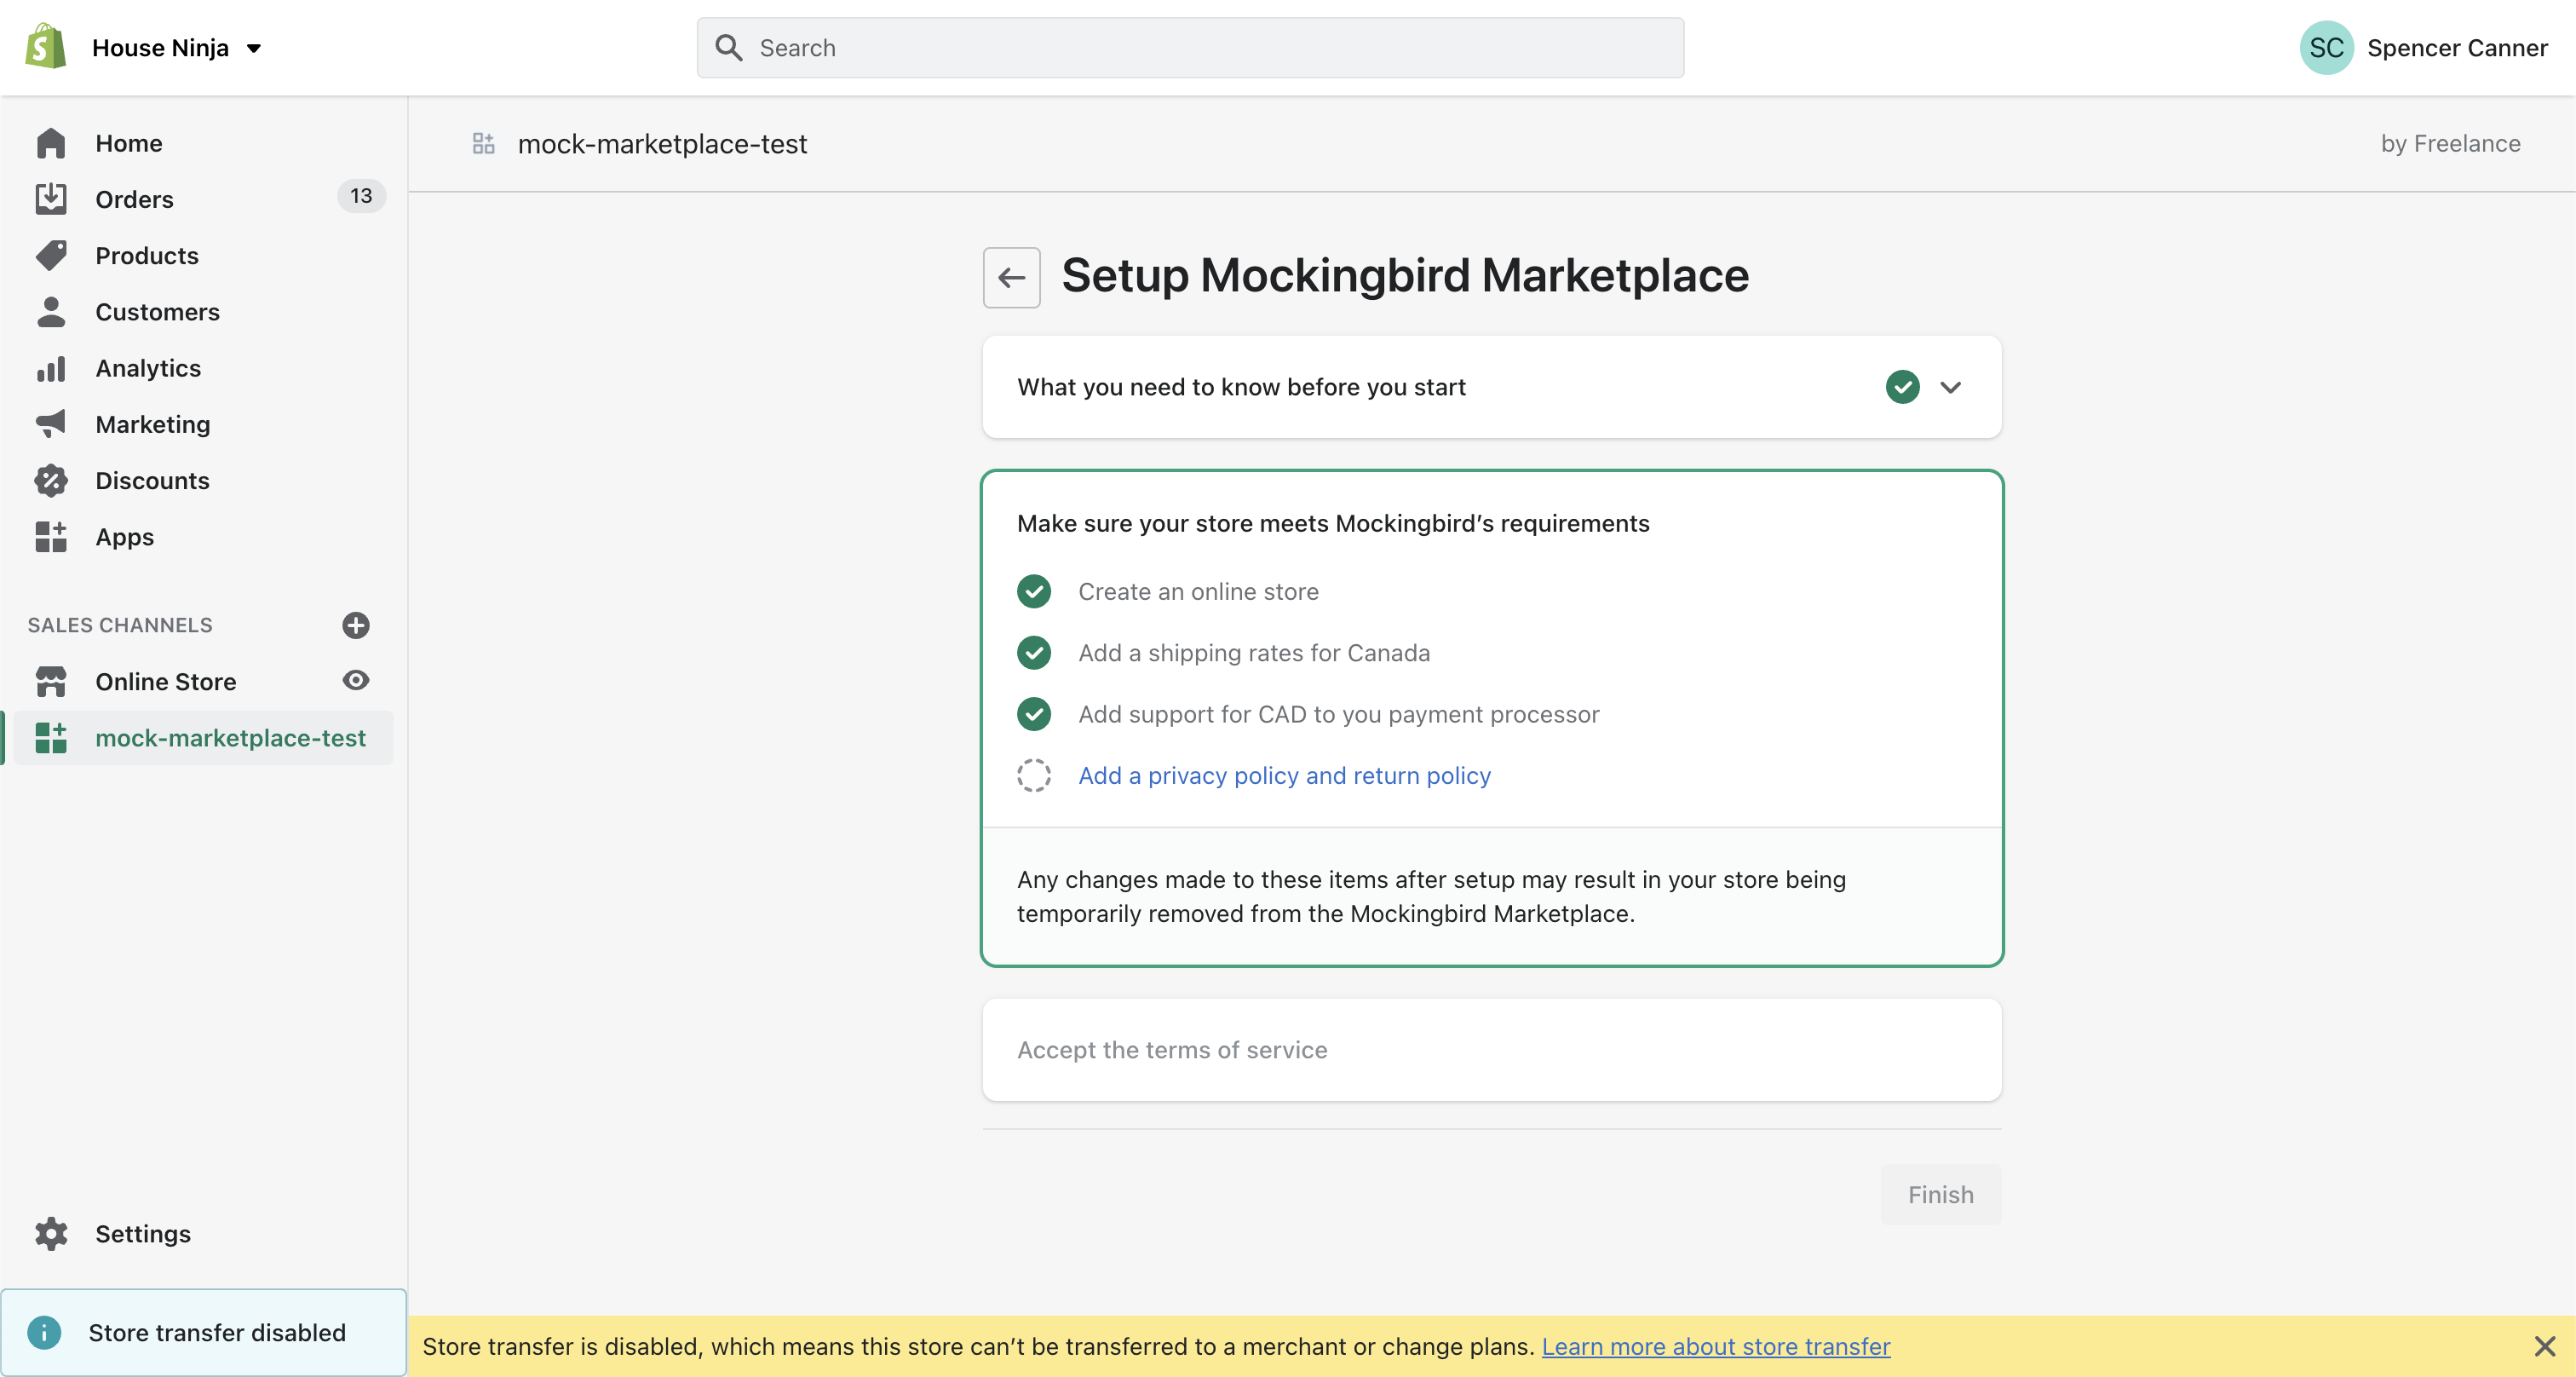
In this tutorial, you'll add the following requirement checks to your channel app:
The shop must have an online store.
The shop must ship to Canada.
The shop must support CAD.
The shop must have refund and privacy policies.
You'll also use the GraphQL Admin API's ResourceFeedback object to surface a warning banner on a merchant's homepage, indicating that the merchant doesn't meet the marketplace’s requirements.
What you'll learn
Anchor link to section titled "What you'll learn"After finishing this tutorial, you'll know how to do the following:
Add handlers to retrieve requirements data
Check and store whether a shop meets marketplace requirements
Add webhook handlers for updates to shop data regarding the requirements
Requirements
Anchor link to section titled "Requirements"- You've completed the Getting started tutorials.
Access scopes
Anchor link to section titled "Access scopes"Your channel app requires the following access scopes:
read_shippingread_legal_policieswrite_resource_feedbacks
Step 1: Add handlers to interact with the Admin API
Anchor link to section titled "Step 1: Add handlers to interact with the Admin API"After you've determined the requirements to enforce, you can create various handlers to retrieve the data from the GraphQL Admin API. You'll also add the access scopes required to query the data
In your
.envfile, add theread_shipping,read_legal_policies, andwrite_resource_feedbacksaccess scopes.Since the app is already installed on your development store, ensure that you visit the authentication URL that was logged when you ran the Shopify CLI
servecommand.In
server/handlers/rest, create a file calledget-shop-configuration.js.In
server/handlers/rest/get-shop-configuration.js, query the REST Admin API'sShopresource.The code requests the shop and presentment currencies and whether the shop has an online storefront. The return also provides other shop data that might be useful for your requirements checks.
In
server/handlers/queries, create a file calledget-shop-shipping-countries.js.In
server/handlers/queries/get-shop-shipping-countries.js, query the GraphQL Admin API'sshopfield for a list of countries that the shop ships to.In
server/handlers/queries, create a file calledget-shop-policy-types.js.In
server/handlers/queries/get-shop-policy-types.js, query the GraphQL Admin API'sShopPolicyTypeobject to retrieve a list of the shop's available policy types.In
server/handlers/rest, create a file calledpost-resource-feedback.js.In
server/handlers/rest/post-resource-feedback.js, accept an object with the resource feedback data, and send it in a POST request to theResourceFeedbackresource.Update
server/handlers/index.jsto export the new function from the handlers module.
Step 2: Add a requirements check when the channel app is installed
Anchor link to section titled "Step 2: Add a requirements check when the channel app is installed"After you've set the handlers to pull all shop data relevant to your marketplace requirements, and you've set the handler to submit resource feedback, you can add a requirements check when the merchant installs your channel app and store the shop's eligibility in your database.
Create a new sequelize migration that adds a new column to your
Shopdata model to track whether the marketplace requirements are met.The command creates a new file in your channel app's
/migrationsfolder named{TIMESTAMP}-add-shop-requirements.js.Update the migration file to add a new column to your
Shopsdata table.Add the new attribute to your
Shopdata model.Run the migration to write the changes to your database.
In
server/helpers.js, create a function that accepts all fields required for the requirements check and returns whether the shop is approved.You'll also create separate functions for the more complex checks, which will be useful when adding the checklist to your channel app's UI.
Create a function that accepts whether the requirements are met and writes resource feedback with the appropriate state and message using the handler that you created.
In
server/index.js, update the/auth/callbackhandler to get the shop details using the handlers that you created.You'll then use the helper methods that you created to write resource feedback to the shop based on whether it meets the eligibility requirements.
You'll also save whether the shop meets the requirements in your database using the
meetsRequirementsfield that you created.
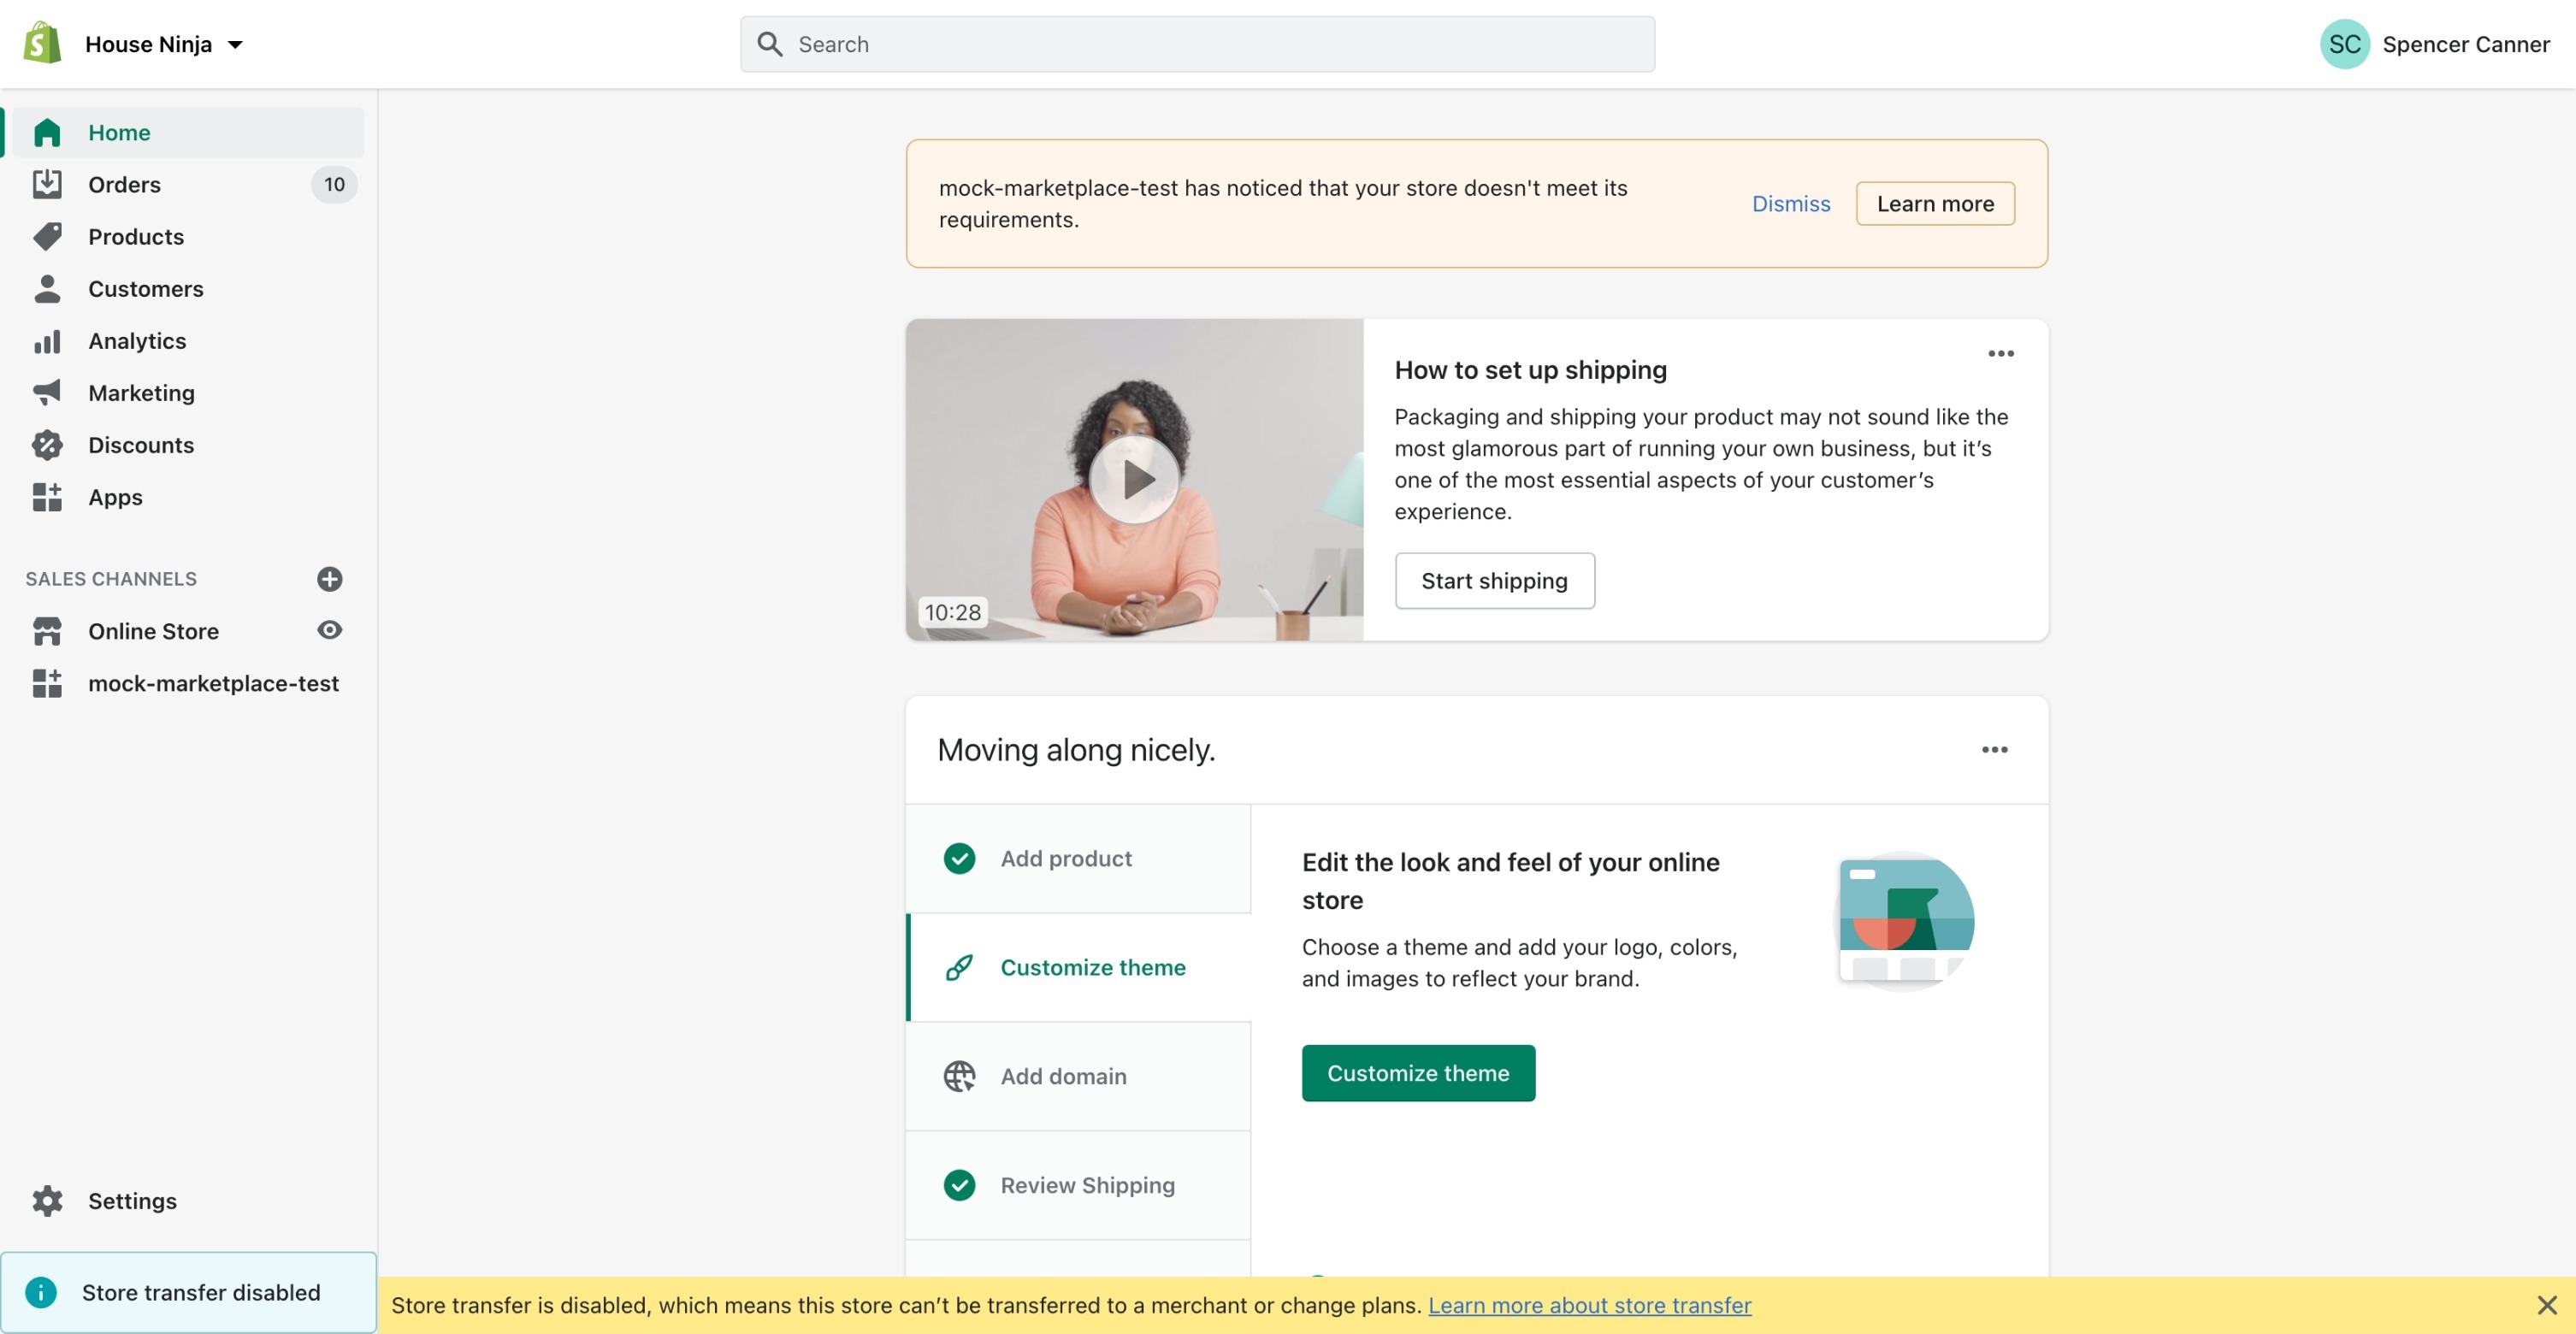
If the channel app is installed on a shop that doesn't meet the requirements, then the resource feedback banner should display on the shop’s admin homepage. In these cases, the shop shouldn't display on your marketplace homepage.
Step 3: Add shop update webhook handlers
Anchor link to section titled "Step 3: Add shop update webhook handlers"Your app is already subscribed to the SHOP_UPDATE webhook topic, to ensure that the shop name stored in your database stays in sync with the shop name that merchants have in their Shopify admin. This webhook is also triggered when merchants have either added or removed their online stores, changed their presentment currencies, or updated their shop policies. You can update the handler to also run the requirements check and write resource feedback accordingly.
In
server/handlers/webhooks/shop-update.jsupdate thehandleShopUpdatefunction to fetch the relevant data using the handlers that you created and write resource feedback.The webhook body already contains some of the information you need, so you don’t need to fetch the shop’s configuration.
You can also update whether the shop meets the requirements in your database by updating the
meetsRequirementsfield.
Step 4: Add shipping profile webhook handlers
Anchor link to section titled "Step 4: Add shipping profile webhook handlers"You also need to handle changes to the shop's shipping countries using webhooks, which will be triggered when a shop makes changes to their shipping profiles. Changes to shipping profiles can impact the shop's shipping countries.
You'll subscribe to the following profile-related webhooks:
Since there are a few webhooks, you'll create a new handler for shipping profile updates.
In the
server/handlers/webhooksfolder, create ashipping-profile.jsfile.In
server/handlers/webhooks/shipping-profile.js, export a function that will fetch the requirement-related shop data, and write the appropriate resource feedback.You'll also update whether the shop meets the requirements in your database by updating the
meetsRequirementsfield.In
server/handlers/webhooks/setup.js, register the profile webhooks and call the handler created above in the webhook’s callback function.The resource banner on the shop’s homepage should now dynamically update based on changes made to the shop’s payment, shipping, policy, and online store settings. The shop’s database field should also be updated accordingly.
Step 5: Add requirements to the channel app
Anchor link to section titled "Step 5: Add requirements to the channel app"Now that you have the handlers and helpers required to check each requirement, you can expose whether the requirements are met using your internal GraphQL API. This is necessary to build the requirements checklist.
In
server/graphql/schema.jsadd a new type that returns Boolean fields for each of the marketplace requirements.You'll also add a new field to the
Shoptype that returns the new type and a Boolean to indicate whether the shop meets requirements.Update
server/graphql/resolvers.jswith a set of resolvers for theShopconfiguration fields.You don't need to define an explicit resolver for the
meetsRequirementsfield, since it can be automatically resolved from the field of that name in the database'sShopdata model.You can use the helpers and handlers that you created to fetch the relevant data and run the requirements checks.
You can use the new fields from your internal GraphQL API to surface the requirements checklist in your channel app.
In
app/src/sections/Onboarding/componentscreate anOnboardingChecklistCard.jsxfile.In
app/src/sections/Onboarding/components/OnboardingChecklistCard.jsxcreate a component that will render anOnboardingCardcomponent that contains anOnboardingChecklistcomponent.The component should accept props to indicate whether each requirement is met and ensure each requirement redirects to the relevant section in the Shopify admin.
In
app/src/sections/Onboarding/components/index.js, export theOnboardingChecklistCardcomponent created above from thecomponentsmodule.In
app/src/sections/Onboarding/Onboarding.jsx, update theOnboardingcomponent to render theOnboardingChecklistCardcreated above.The requirements checklist should now be visible on the onboarding page.
In
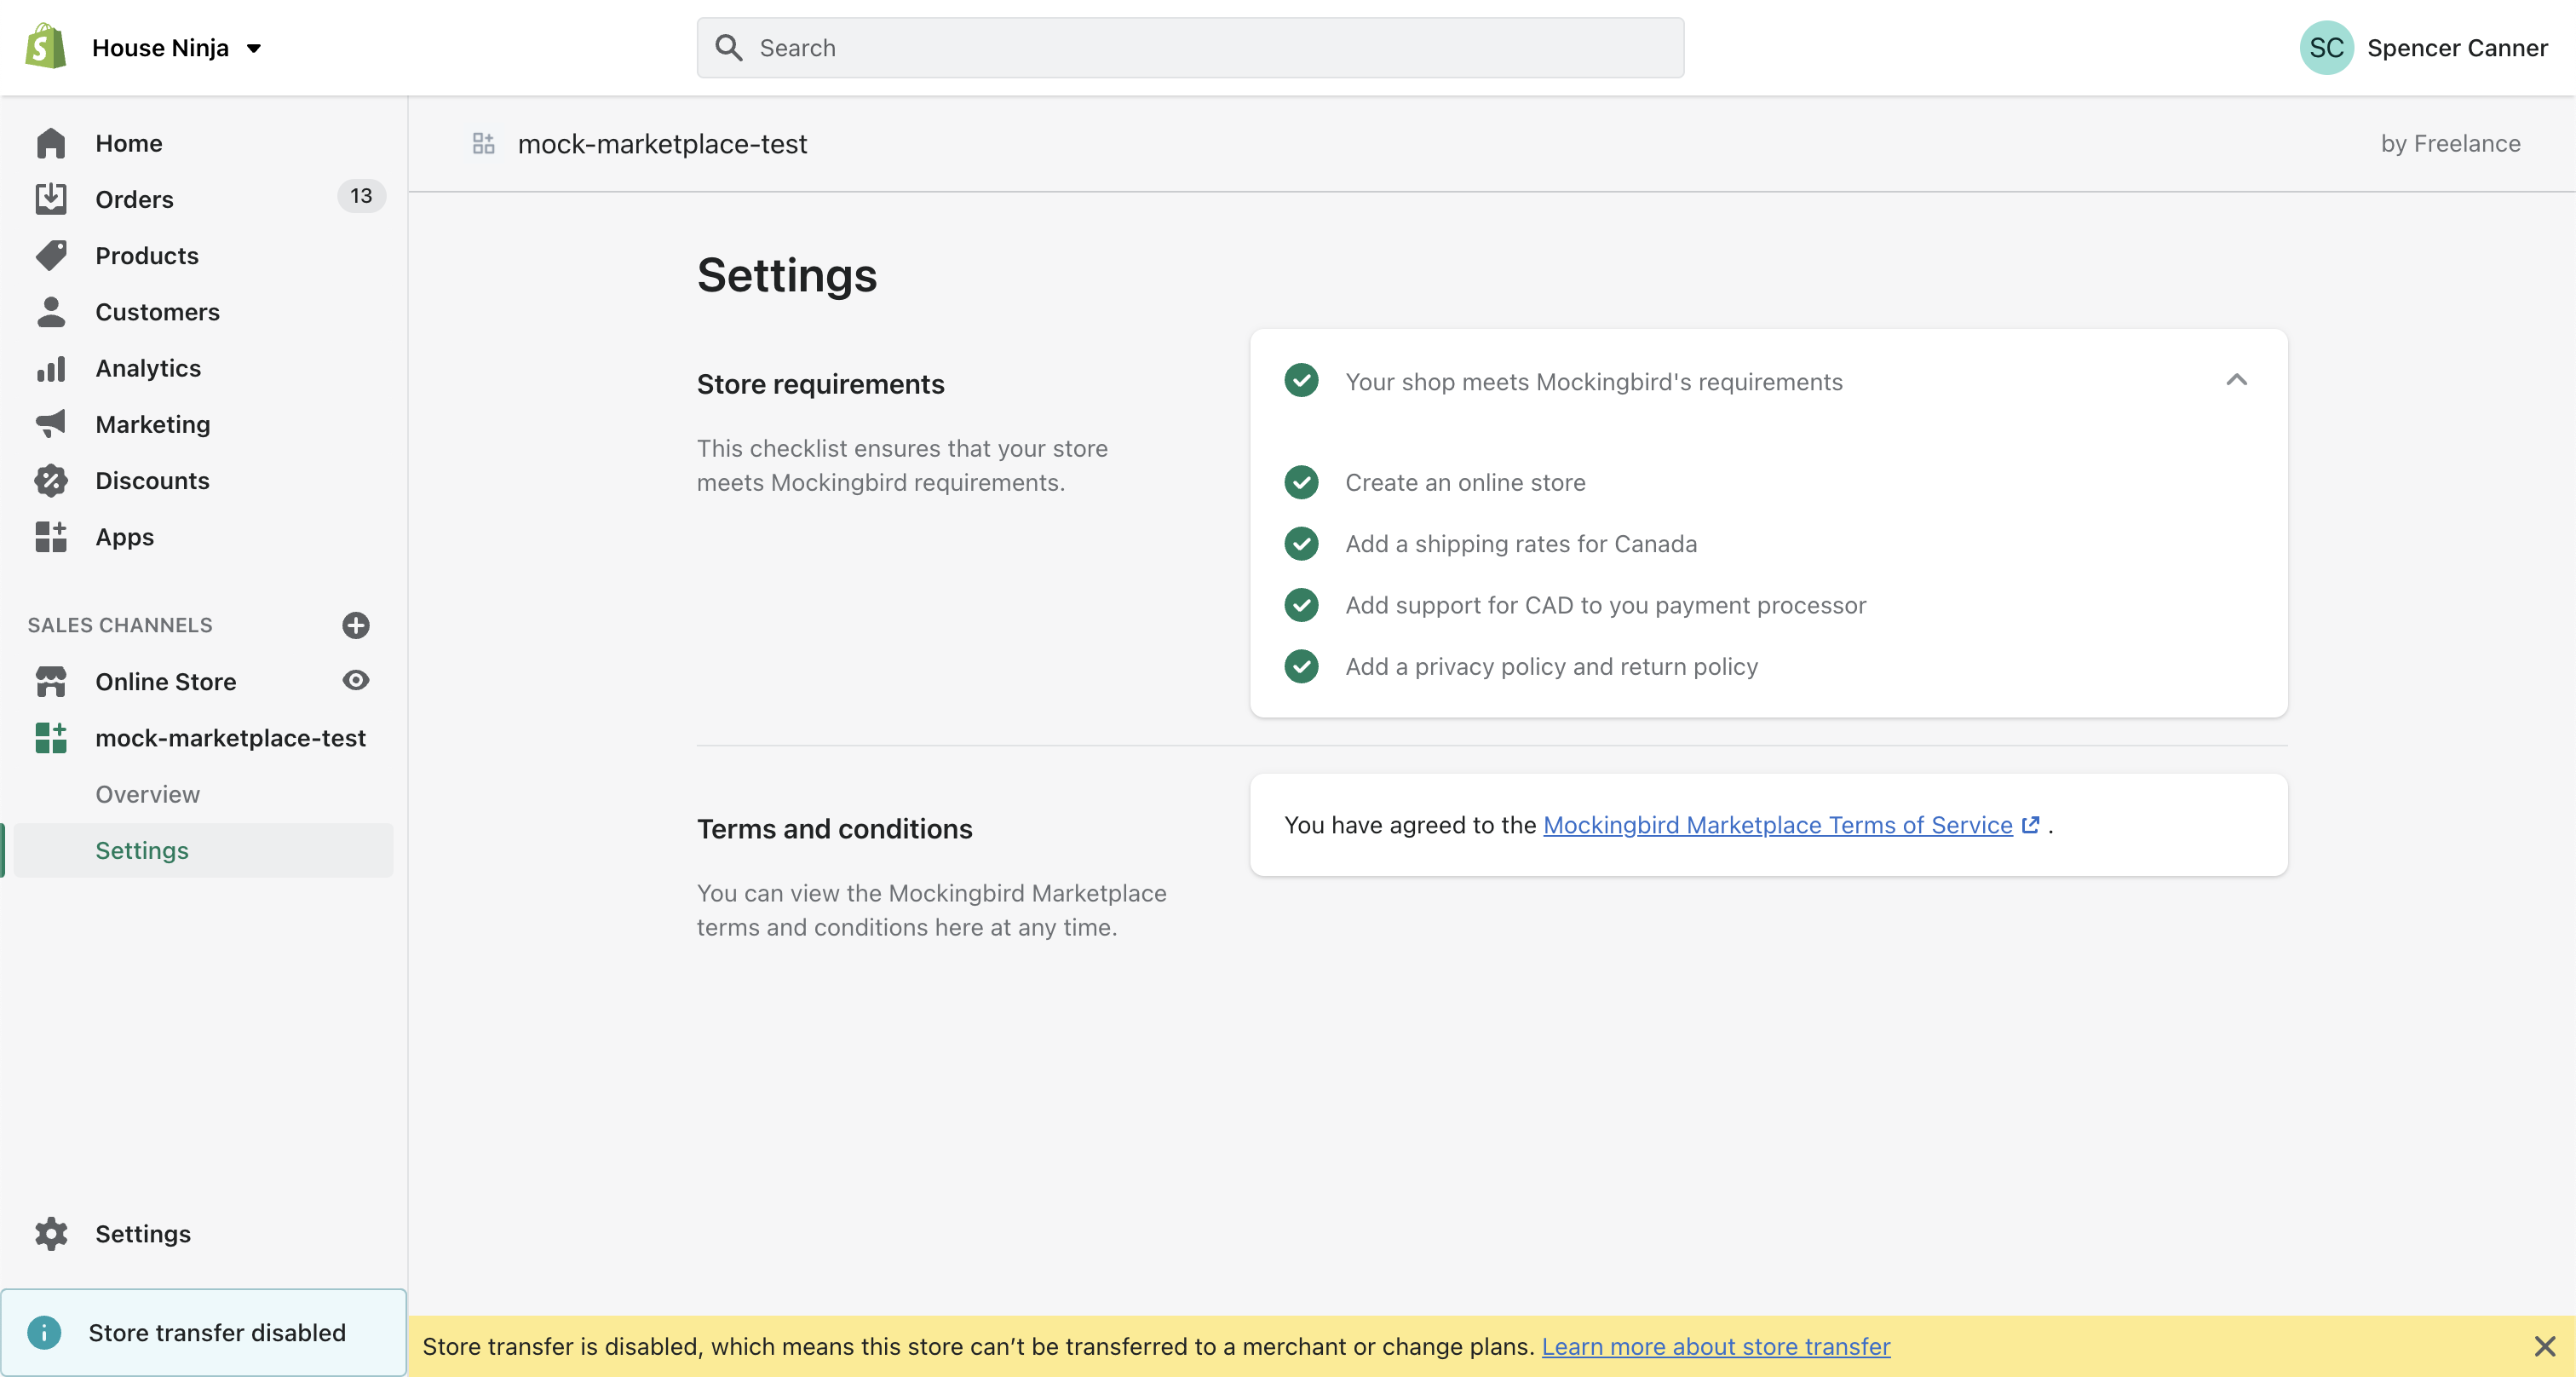
app/src/sections/Settings.jsx, update theSettingscomponent to render aChecklistcomponent with the requirements.You can also render a loading state.
The requirements checklist should now be visible on the settings page.
In
app/src/sections/Home.jsx, update the query to retrieve themeetsRequirementsfield and pass it into theOverviewcomponent.In
app/src/sections/Home/components/Overview.jsx, update theOverviewcomponent to render a banner with a link to the settings page if the requirements are not met.If one or more requirement is not met, then an error banner should appear on the overview page.

Learn about creating post-checkout functionality for your marketplace, including storing order details in your database and billing merchants a fee for sales on the marketplace.
Share feedback on Marketplace Kit.