Getting started with the Customer Account API
The Customer Account API is a GraphQL API that requires an access token associated with a specific customer. You can call the API from any HTTP client, including mobile clients. This guide shows you how to get started building unique customer experiences with the Customer Account API.
Anchor to What you'll learnWhat you'll learn
In this tutorial, you'll learn how to do the following tasks:
- Enable customer accounts.
- Configure Customer Account API access on the Headless and Hydrogen sales channels.
- Perform authorization requests and make queries.
- Rotate credentials.
Anchor to RequirementsRequirements
- You have Apps and channels permissions on the Shopify store that you're working with.
- You have installed the Headless or Hydrogen sales channel from the Shopify App Store.
Anchor to Step 1: Enable customer accountsStep 1: Enable customer accounts
Shopify's customer accounts is required to use the Customer Account API. Customer accounts allow you to seamlessly persist customer logins across online store, Hydrogen, and checkout.
- From your Shopify admin, click Settings.
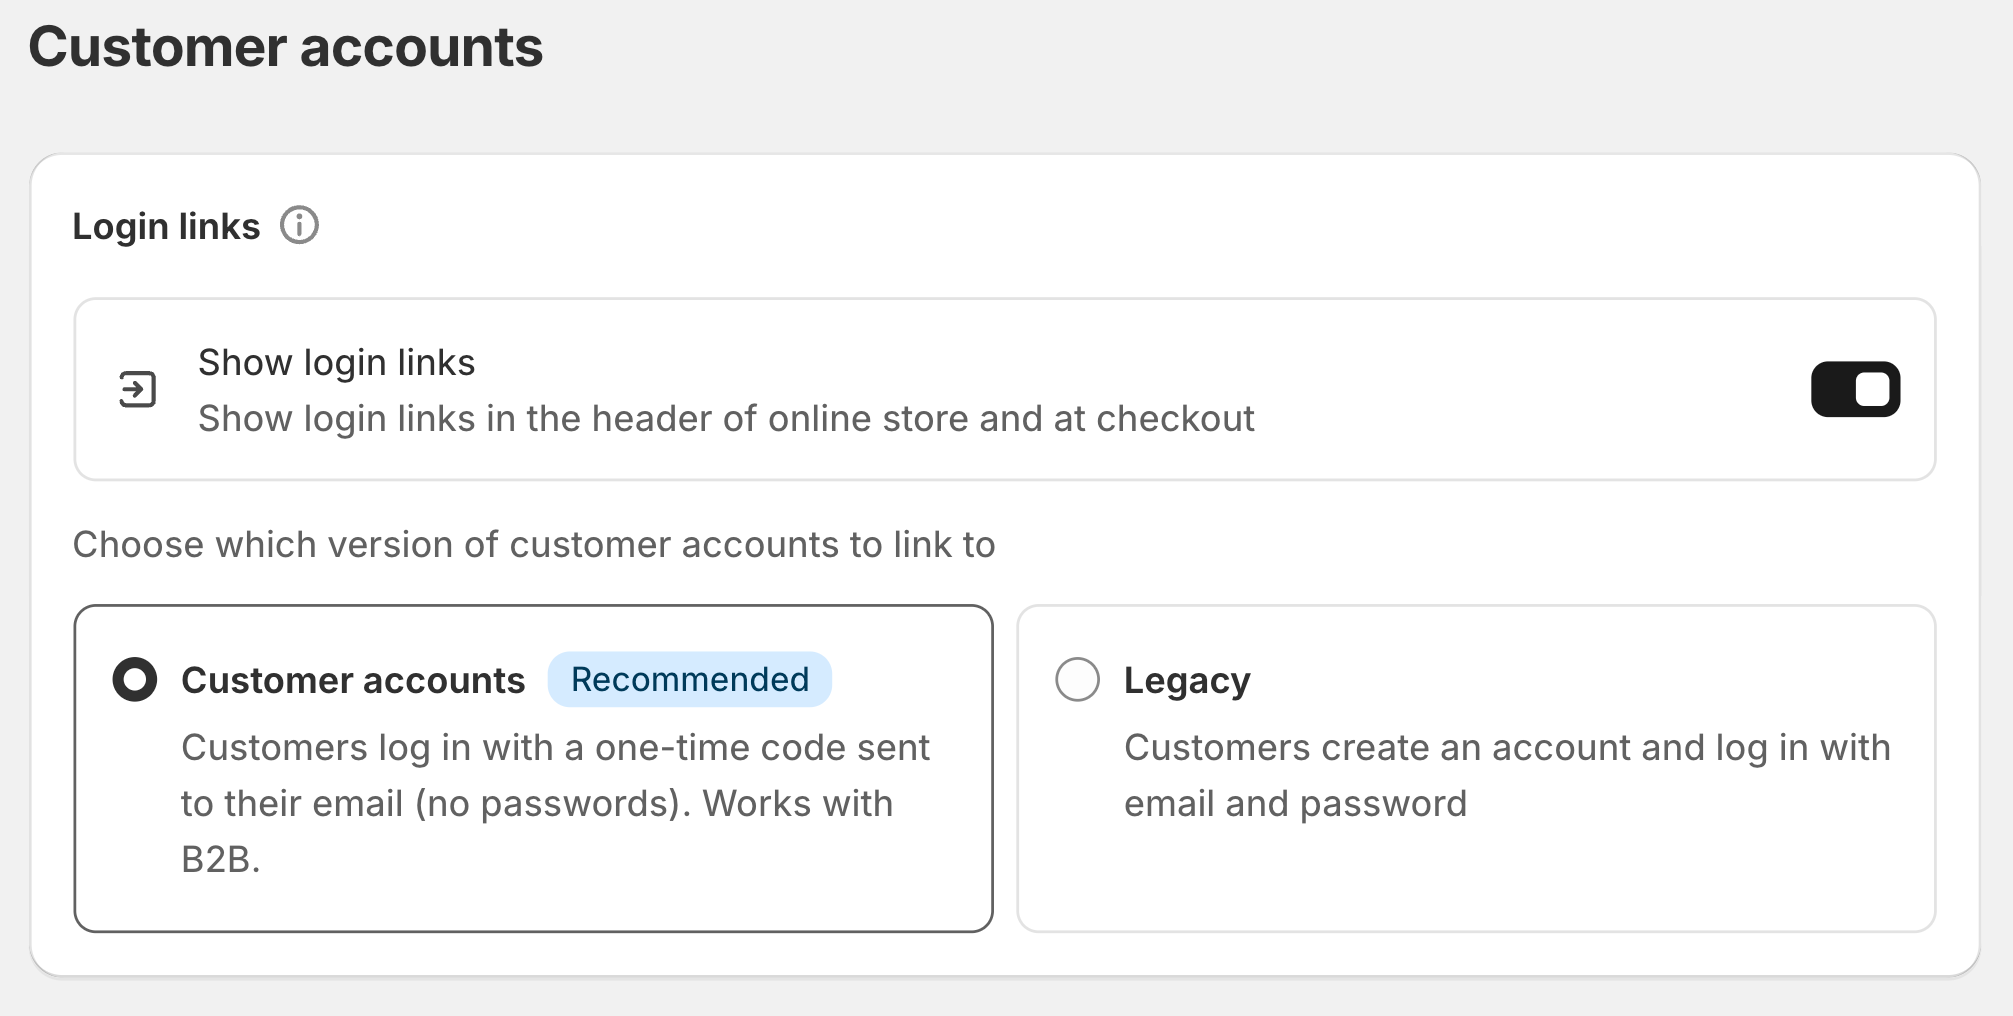
- Click Customer accounts.
- Under Accounts in online store and checkout section, click on Edit.
- Choose Customer accounts.
- Click Save.
Anchor to Step 2: Configure Customer Account API accessStep 2: Configure Customer Account API access
To use the Customer Account API, you first need to enable it and get your access credentials.
- From your Shopify admin, under Sales channels, click Headless or Hydrogen.
- Select your storefront.
- Complete one of the following steps:
- If you selected Headless, then navigate to Customer Account API settings.
- If you selected, Hydrogen, then navigate to Storefront settings.
- Optional: Modify the client type.
- Public clients: For applications that are strictly client-side, or that don't have a server-side session where they can store the refresh token safely, for example, SPA, mobile applications, or Hydrogen.
- Web clients: Suitable for web applications where the client-side environment is the primary interface for user interactions.
- Mobile clients: Designed for mobile applications that require access to the API and don't have a server-side session for securely storing refresh tokens, for example, iOS and Android.
- Confidential clients: For applications that have a back-end to perform the authorization request and a server-side session to hold the refresh token, for example, Express.js, ASP.NET, or Rails.
- From the Credentials section, copy the client ID (and client secret, if applicable) to use in your requests.
- From the Permissions section, verify that the right permission controls are set for your custom storefront.
- Under Application endpoints, record the Authorization, Token, and Logout endpoints to be used in your requests.
- In the Application setup section, specify the following client application settings:
- Callback URL(s): The allowable list of URLs to redirect to after logging in.
- Web applications: Callback URLs must be in the HTTPS scheme to ensure security.
- Mobile applications: Callback URLs must use the custom scheme '**shop.{shop_id}.*' to make the scheme universally unique in accordance with Shopify's mobile application authorization standards.
- Javascript origins: Specifies the origins that are allowed to use a client's OAuth credentials in a JavaScript application. Applies specifically to web-type public clients.
- Logout URL (Optional): The URL to redirect to after logging out. This setting is not applicable to mobile public clients. For mobile clients, a successful logout returns a success message. Following this, any subsequent actions, such as navigating to a specific screen or displaying a confirmation message, are determined by the specific behaviors programmed into the mobile application.
- Callback URL(s): The allowable list of URLs to redirect to after logging in.
Shopify doesn't support the use of localhost or any http based URL due to security concerns. For development purposes, we recommend using a tunnelling service, such as ngrok.
To authenticate and use the Customer Account API, the OAuth 2.0 authorization specification needs to be implemented by the client as shown below.
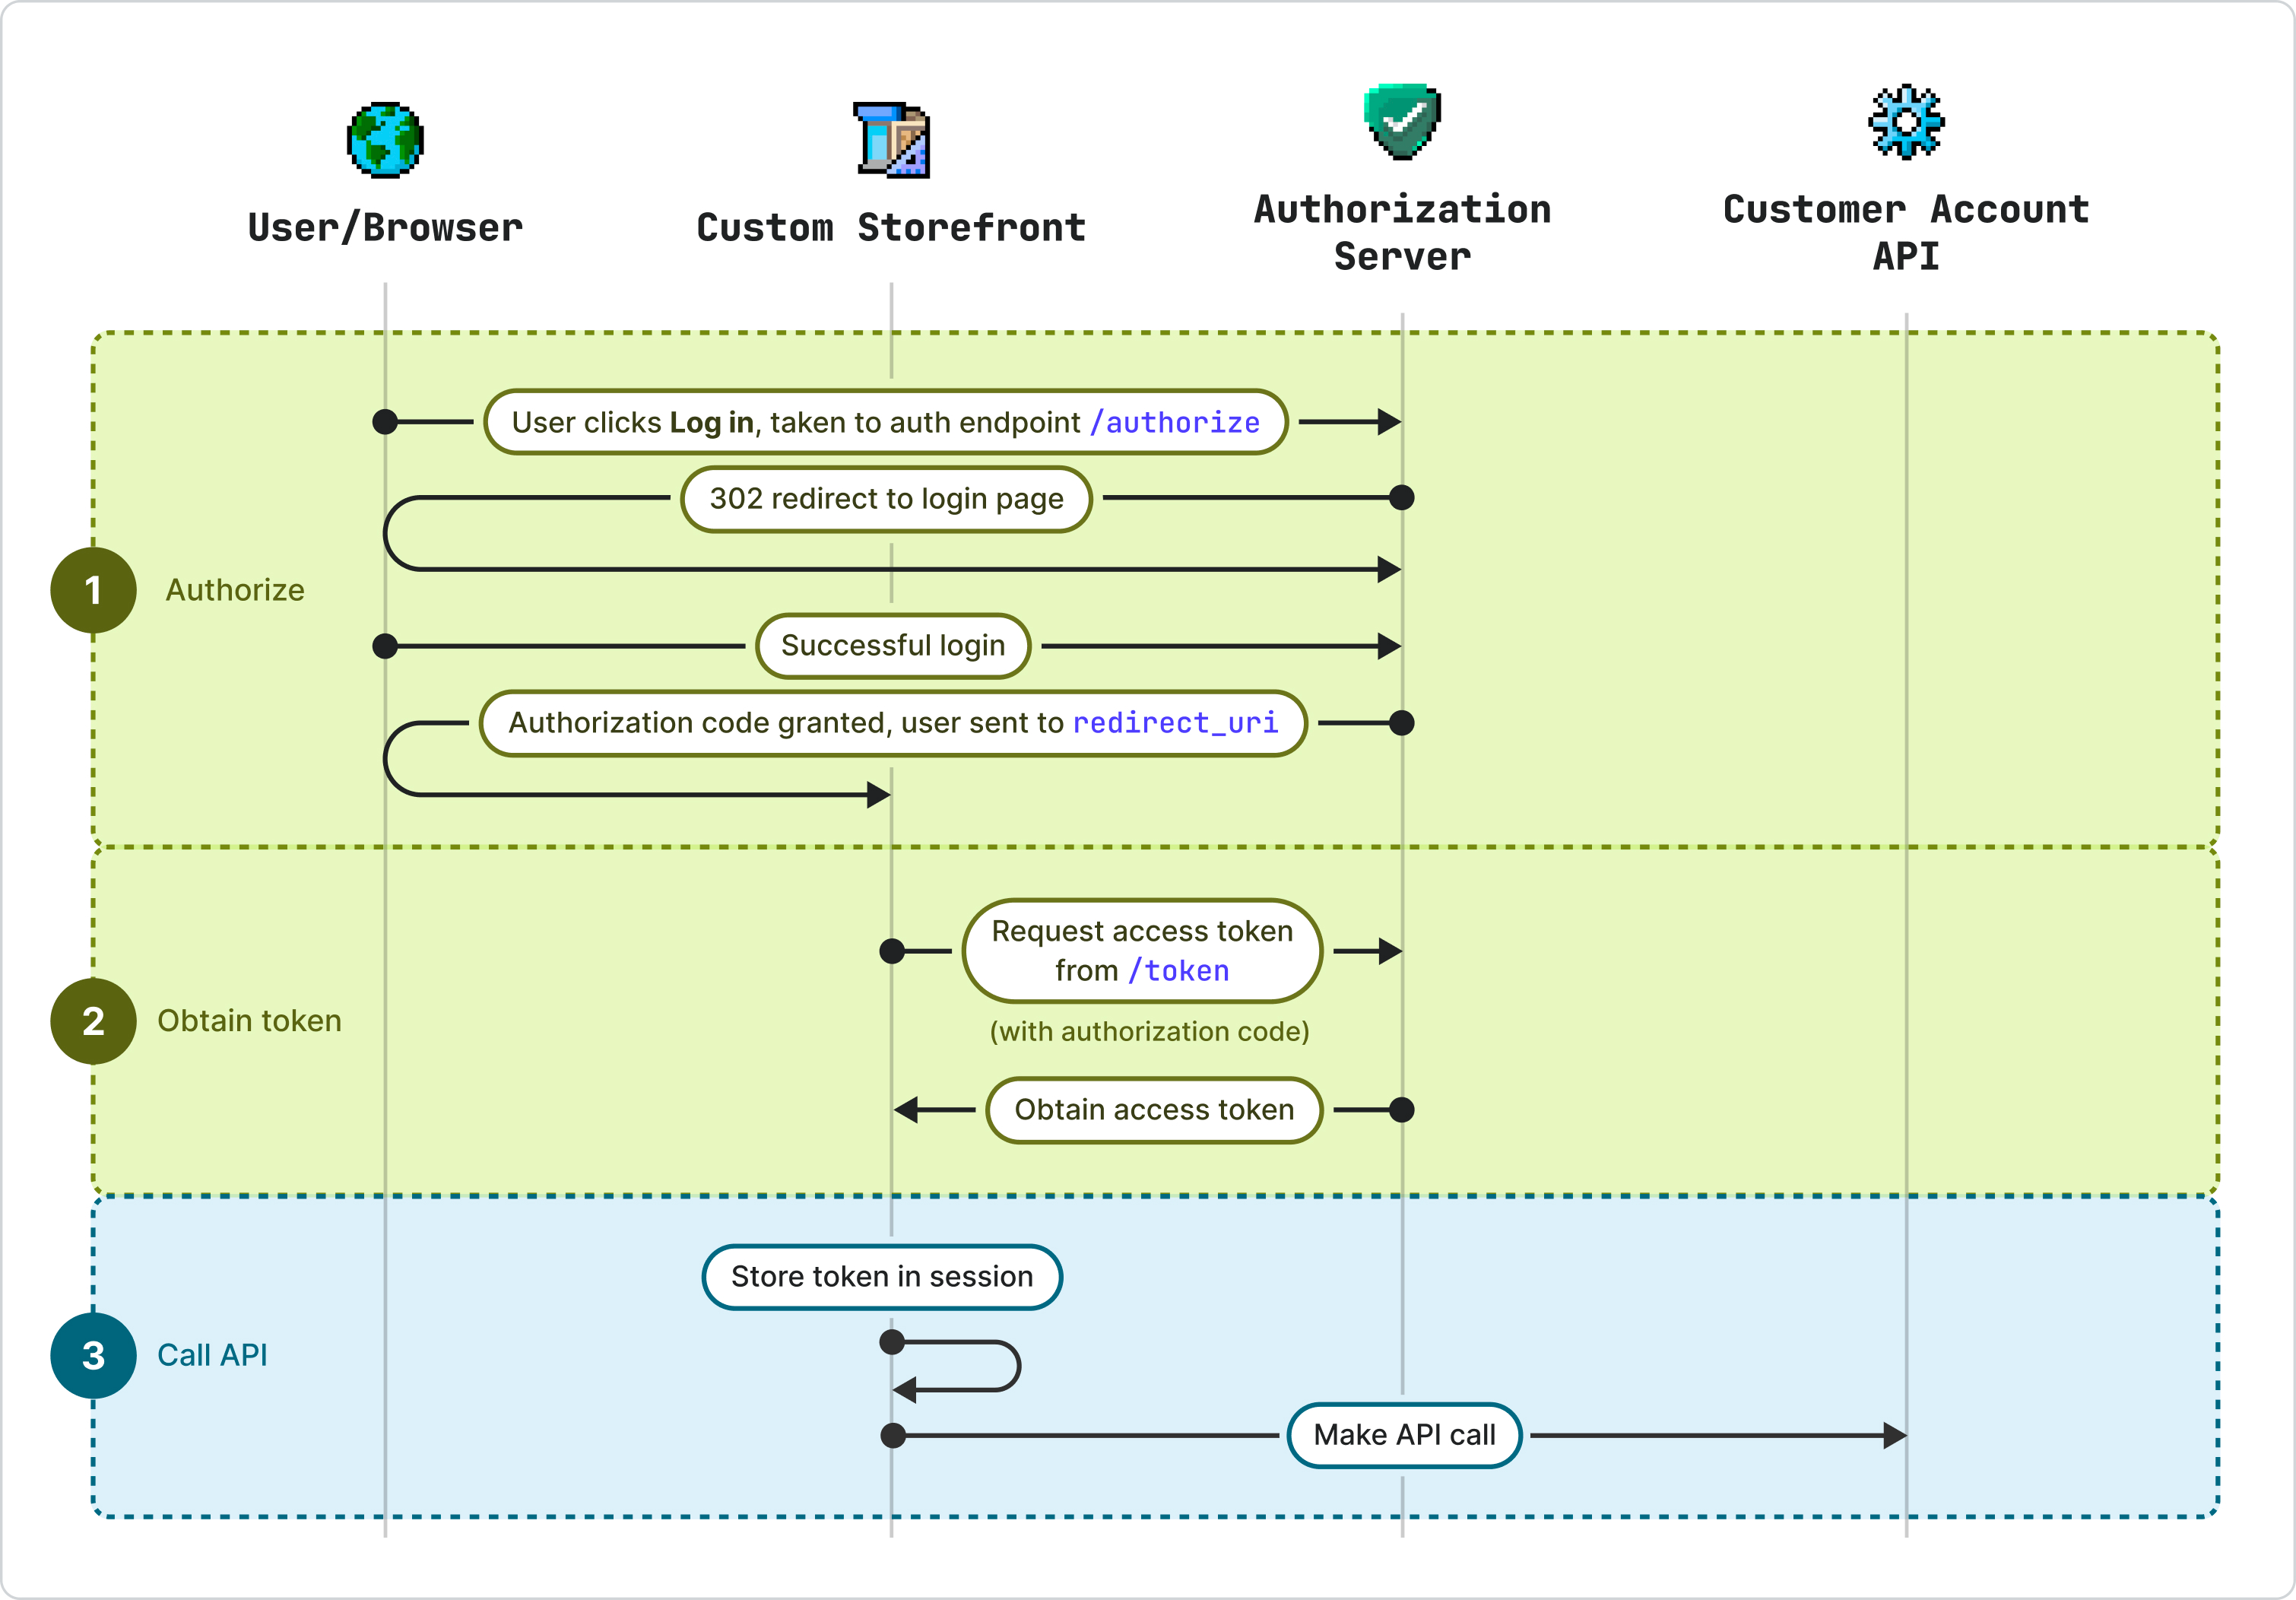
Begin the flow by redirecting a user to the Authorization endpoint (recorded in Step 2 above) and specify the following required parameters:
-
scope: Determine what data the access token will be able to retrieve from the API endpoints -
client_id: Recorded from Step 2 above -
response_type: Set tocodeto specify the authorization code flow -
redirect_uri: Specify one of the callback URLs defined in Step 2 above -
state: A string of characters which will be returned along with the code during callback/redirectIn addition to the parameters above, public clients need to implementing a code challenge and verifier and specify the
code_challengewhich is a string derived from thecode_verifierusing a hashing algorithm and thecode_challenge_methoddefining the type of hashing algorithm used (ie. S256).You can also pass optional
localeandregion_countryparameters for a market-aware login experience. Learn more about market-aware auth URLs.
Anchor to Obtain tokenObtain token
To obtain an access token, the client must make a POST request to the Token endpoint specified in Step 2 above, including the following required parameters:
-
grant_type: Set toauthorization_code -
client_id: The sameclient_idas used in the Authorize step -
code: The authorization code received in the Authorize step -
redirect_uri: The same URL specified in the Authorize stepConfidential clients are required to send their
client_idandclient_secretin the Authorization header.If successful, the client will receive an access token. More details on the Obtain access token step can be found in the reference guide.
Anchor to Call the APICall the API
After you've completed the OAuth 2.0 authorization flow for the Customer Account API and you have received a token from a logged-in customer, you can now make queries using the Customer Account API.
For an example of how to use the Customer Account API with a Hydrogen storefront, refer to the Using Customer Account API with Hydrogen tutorial and consult the Customer Account API reference for available objects, queries, and mutations.
To streamline development, there are multiple OAuth libraries available in a variety of different languages.
To streamline development, there are multiple OAuth libraries available in a variety of different languages.
Anchor to Rotate credentialsRotate credentials
After you revoke your old credentials, you need to update any applications or scripts that use these credentials, or else you won't be able to access the Customer Account API. Revoking credentials can't be undone.
After you revoke your old credentials, you need to update any applications or scripts that use these credentials, or else you won't be able to access the Customer Account API. Revoking credentials can't be undone.
- In the Credentials section, under Rotate credentials, click Generate new credentials.
- Update any applications or scripts with the new credentials. The old credentials remain valid until you revoke them.
- When all applications or scripts have been updated, click Revoke next to the old credentials.
- When prompted, click Revoke credentials.
Anchor to Next stepsNext steps
- Follow the Using Customer Account API with Hydrogen tutorial.
- Learn more about the Customer Account API.