Updating your theme
All themes published before May 15, 2025 on the Shopify Theme Store must be updated and submitted for review. To keep your themes published: • Review and meet new requirements for your themes and presets • Update your theme zip with the new file structure by June 22, 2025 • Edit your preset listing pages by July 1, 2025
All themes published before May 15, 2025 on the Shopify Theme Store must be updated and submitted for review. To keep your themes published: • Review and meet new requirements for your themes and presets • Update your theme zip with the new file structure by June 22, 2025 • Edit your preset listing pages by July 1, 2025
After you've first published a theme on the Theme Store, you begin the iterative process of considering merchant feedback, persistently innovating your build through regular quality assurance testing, and actively integrating the updates required by Shopify.
To avoid update fatigue for merchants, you must have a minimum of four weeks between updates. New themes on the Shopify Theme Store are an exception, and can have an update every two weeks for the first two months.
As a Shopify Theme Partner, you're required to provide ongoing updates to your theme to remain on the Shopify Theme Store.
The following sections describe the theme update process, the types of updates, and adding theme presets.
Anchor to Theme update processTheme update process
You can submit your updates for review as ZIP files through your Partner Dashboard. Each update should have a version number, determined by the content of the update, and release notes.
The theme review team primarily reviews theme updates during Eastern Standard Time (EST) hours, Monday through Friday. If you need to make a crucial update, then try to submit it earlier in the week, and earlier in the business day. Submitting a theme update outside of EST business hours might impact how quickly merchants receive and apply your updates.
Updates mandated by Shopify might be required by a deadline to accommodate a feature’s release date.
After your update has been successfully reviewed and published, you receive an automatic notification email. If you've added new presets, you will need to edit your theme's listing and provide marketing information for them. New presets are visible on the Theme Store once required marketing information is completed and submitted via the edit listing page, accessible from Partner Dashboard.
The Theme Store only lists the latest version of your theme and presets. Reviews from all previous versions appear under the same listing. You can’t charge different prices per version.
The Theme Store only lists the latest version of your theme and presets. Reviews from all previous versions appear under the same listing. You can’t charge different prices per version.
Anchor to Update typesUpdate types
Depending on the contents of the new theme version, a merchant's theme can be updated in the following ways:
-
Because each update type uses a unique update process, you should group changes based on update types as much as possible. Specifically, automated updates are more merchant-friendly as they require no manual action. Therefore, grouping changes can help to ensure that a greater number of merchants who have purchased your theme receive as many automatic updates as possible.
Anchor to Manual updatesManual updates
The theme review team publishes a theme update as a manual update if it contains at least one of the following code changes:
-
A setting ID is changed or removed
-
A setting type is changed or removed
-
The
minvalue for a setting of typerangeis increased -
The
maxvalue for a setting of typerangeis decreased -
A section or block is removed
These changes can significantly impact the merchant's experience, because they can invalidate current settings, or require the merchant to review and adjust their theme configuration. For example, changing the ID of a setting is equivalent to removing the current setting and adding a new one with the default value, which can lead to a poor merchant experience and should be avoided.
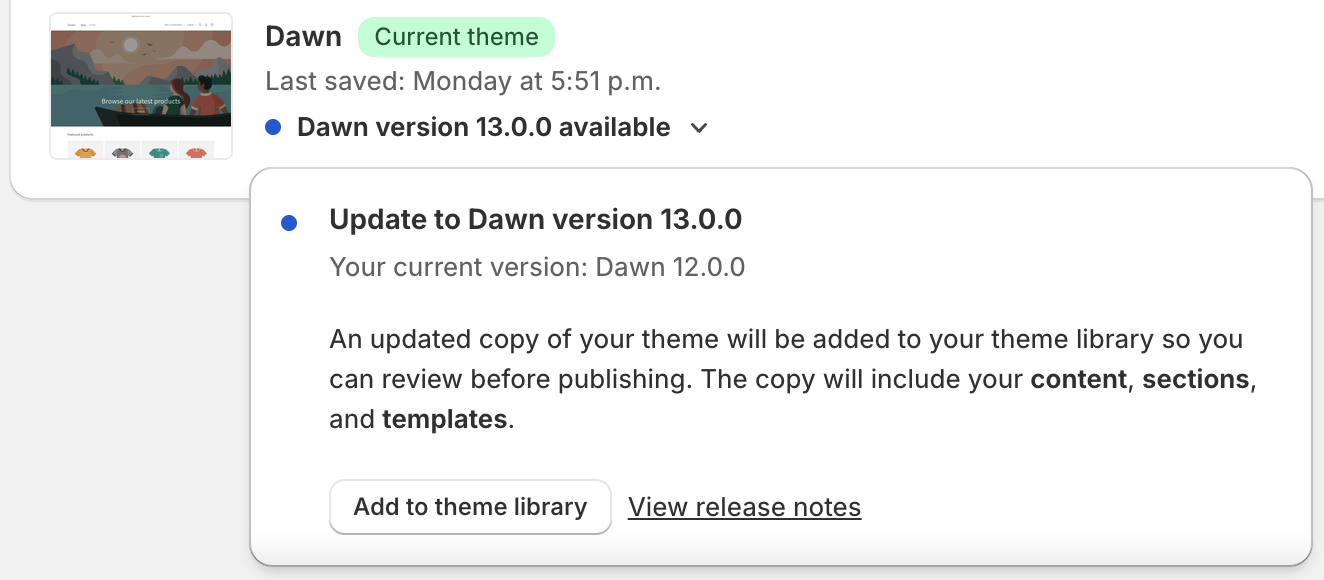
When an update is published as a manual update, merchants are shown a notification on the Online store > Themes page letting them know that they can update their theme. The updated theme is installed as an unpublished theme in their theme library. Merchants can review this unpublished theme before they publish it in their store. The parent theme is not modified.
Anchor to Automated updatesAutomated updates
If a theme update doesn't contain any changes that would categorize it as a manual update, then it's published as an automatic update. In this case, the new version of the theme replaces the current published version that merchant has installed, without creating a new theme.
A theme is automatically updated only if all theme files, except settings_data.json and any JSON files in the /templates directory, are in their original state. If a theme can't be automatically updated, then merchants are shown a notification on the Online store > Themes page letting them know that they can apply the update to an unpublished copy of their theme to be reviewed and published.
Anchor to Considerations for new versionsConsiderations for new versions
Consider the following, and the associated merchant impact, when creating new versions:
-
If you change an existing setting so that the merchant's value is no longer valid, then the merchant's value will be reset to the default, as specified in your new version. To create less friction for existing merchants, you should keep the same default settings when possible.
-
If you change the class of a section or change a CSS class name, then a merchant's custom CSS might be invalidated. You should avoid renaming existing classes unless necessary, and document any of these changes in your release notes.
CautionReducing certain limits or section availability can break and invalidate existing themes, and make themes ineligible for an update. Theme versions can't be submitted to the Theme Store if they include any of the following updates:
- Reducing the number of instances to any section file by changing the section limit.
- Reducing the limit of blocks in a section.
- Adding section restrictions to section groups using
disabled_onorenabled_on. - Adding restrictions that prevent sections from appearing on certain templates.
Caution:Reducing certain limits or section availability can break and invalidate existing themes, and make themes ineligible for an update. Theme versions can't be submitted to the Theme Store if they include any of the following updates:
- Reducing the number of instances to any section file by changing the section limit.
- Reducing the limit of blocks in a section.
- Adding section restrictions to section groups using
disabled_onorenabled_on. - Adding restrictions that prevent sections from appearing on certain templates.
Anchor to VersioningVersioning
Theme versions help merchants easily identify which theme they have, so that they can determine which features are available, or if there are more recent versions to update to.
When building your version string, you should use semantic versioning in the format of X.Y.Z.
| Component | Description |
|---|---|
X | Represents a major version that introduces or modifies features that aren't backwards compatible, such as the following:
For example, you might move from |
Y | Represents a minor version that introduces or modifies features that are backwards compatible, such as the following:
For example, you might move from |
Z | Represents a maintenance version that fixes bugs or security issues, or makes non-visual code improvements. For example, you might move from |
The theme version can be included in the theme through theme metadata.
Anchor to Release notesRelease notes
For each theme version, you need to have release notes that highlight the main features of the version.
The main audience for release notes is merchants, so the language you use should reflect that. Release notes aren't intended to be a changelog, but rather a curated list of items that will impact merchants, or their buyers. As such, any user-facing changes should be included, and developer-facing changes should be excluded. You should also include only information related to the current release.
Anchor to Include release notes in your themeInclude release notes in your theme
To include release notes with your theme, create a markdown file in the root of your theme's ZIP called release-notes.md.
The release-notes.md file is required only after a theme has been published to the Theme Store. You should exclude this file during the review process.
The release-notes.md file is required only after a theme has been published to the Theme Store. You should exclude this file during the review process.
The file's contents should contain the following components:
| Component | Description |
|---|---|
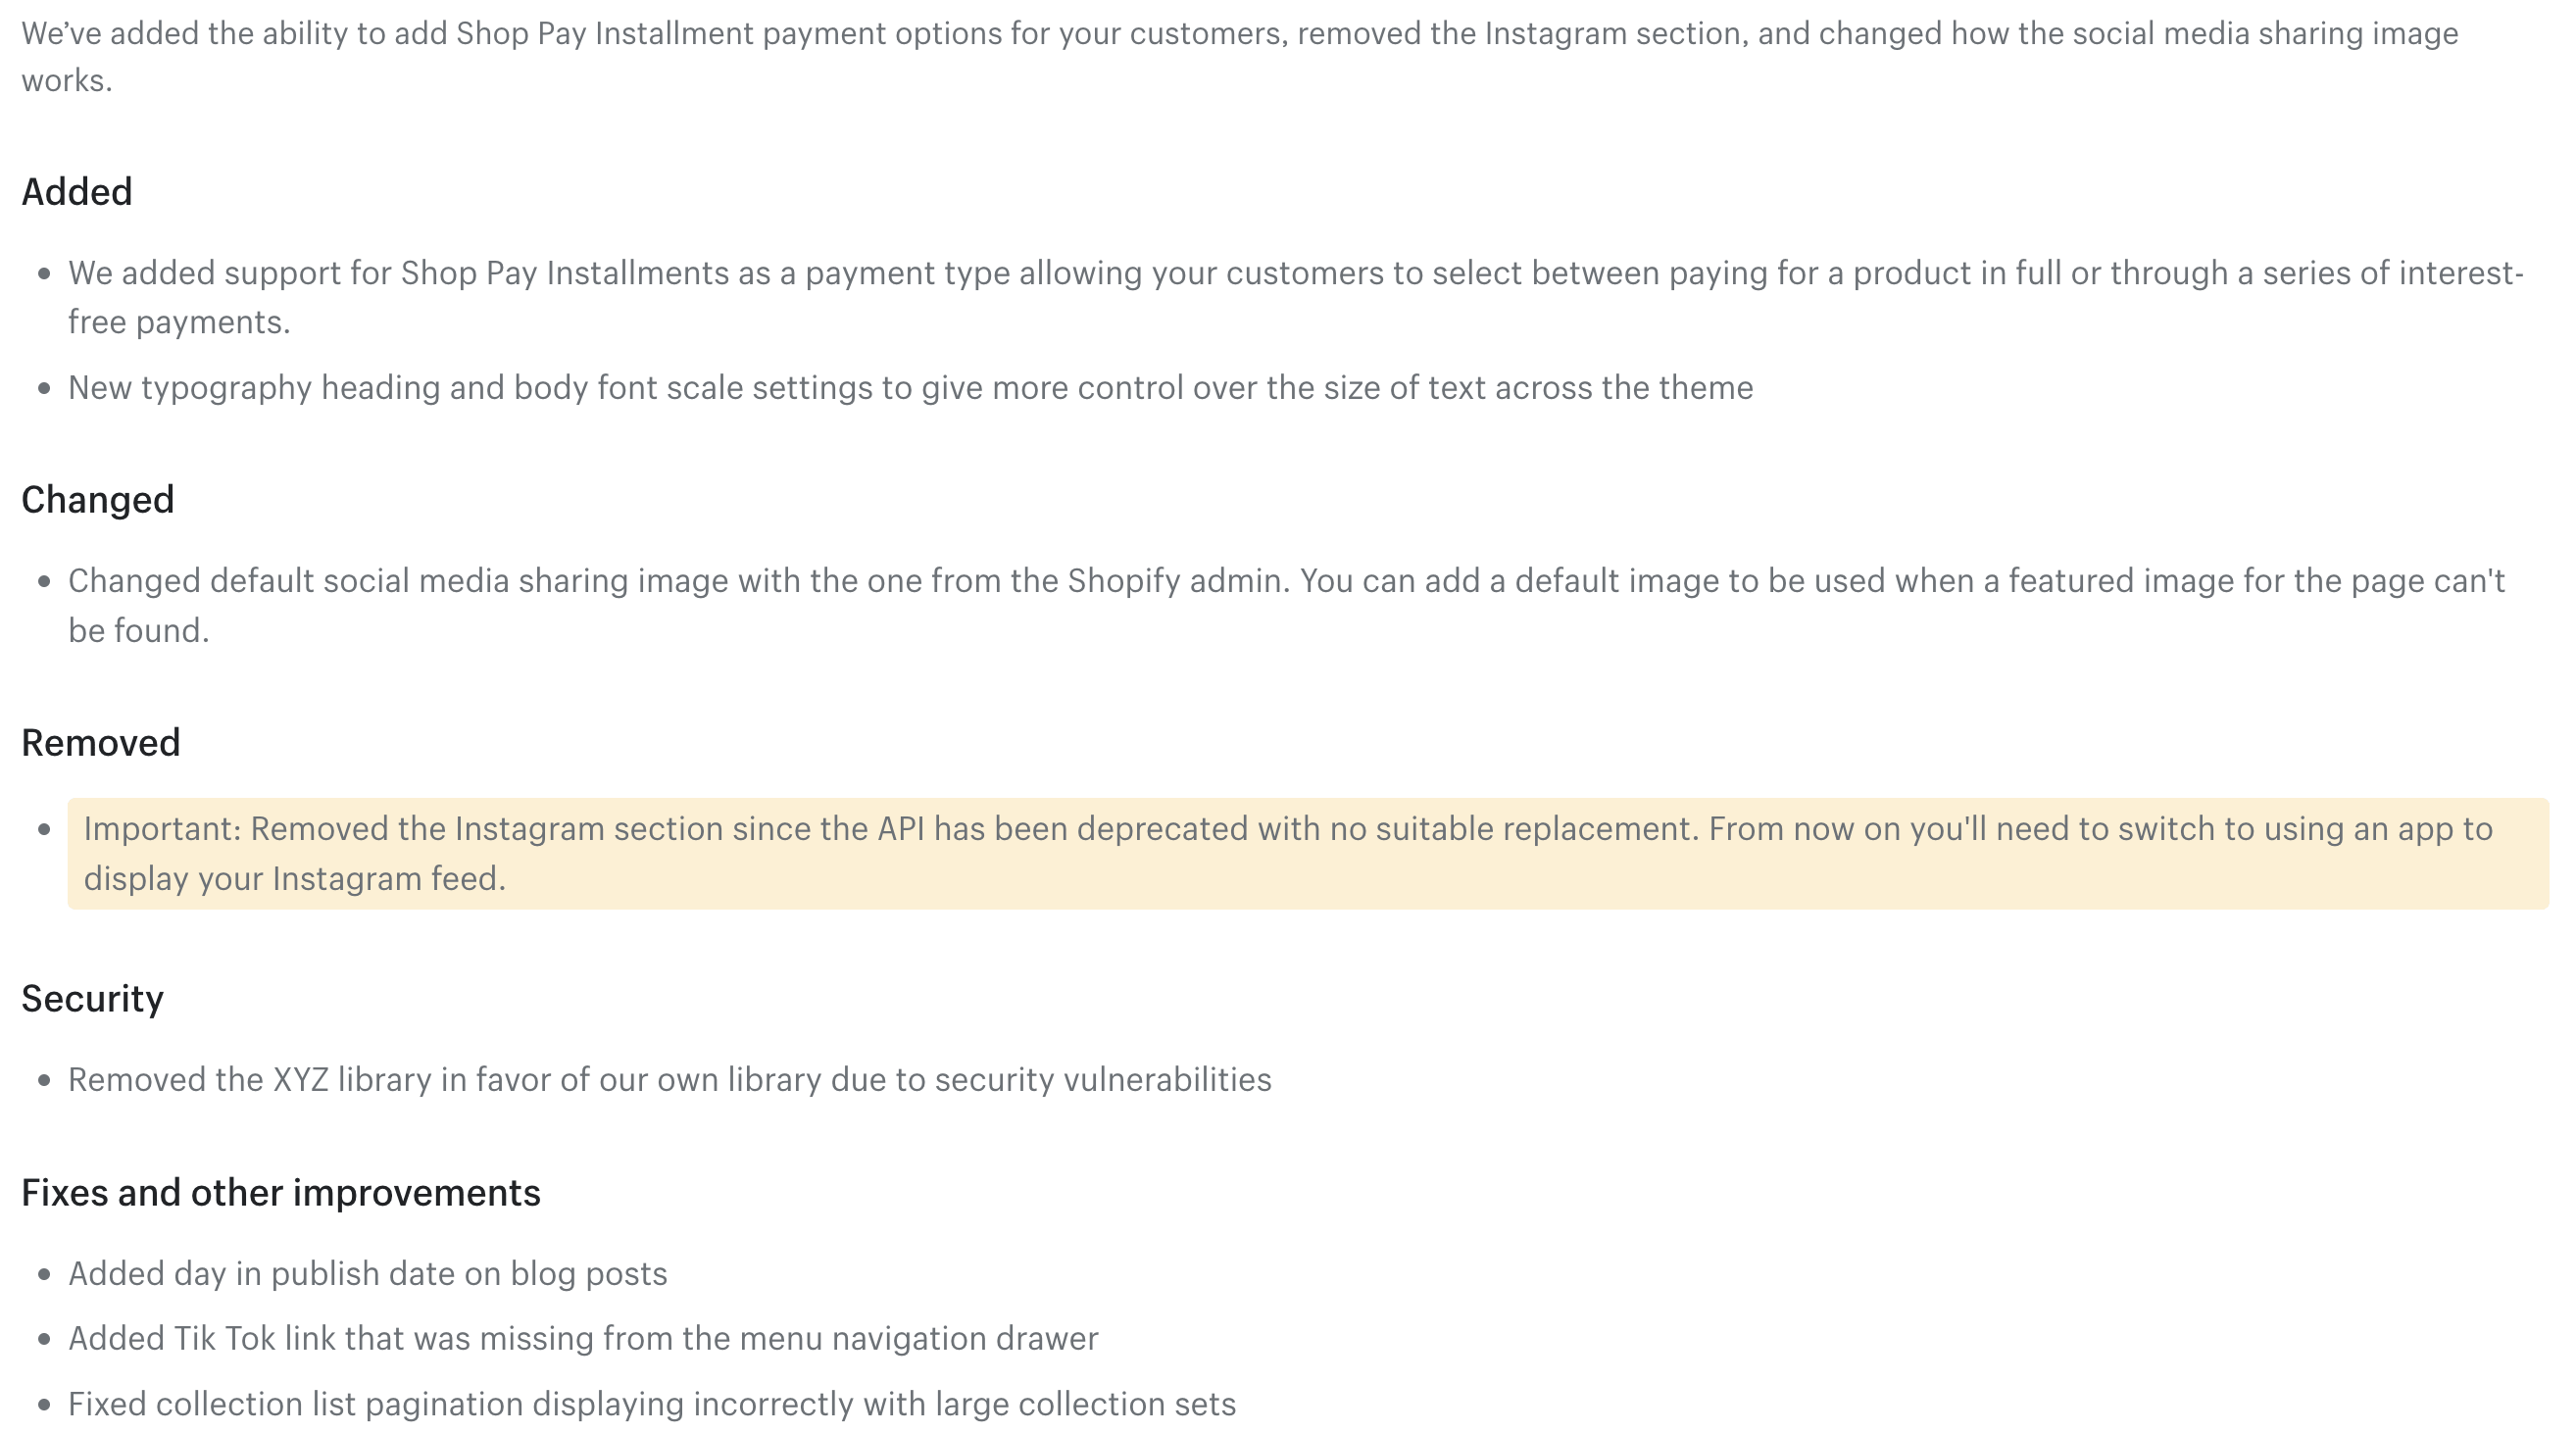
| Description | A summarized description of the most important changes in this version. |
| List of changes | A list of changes contained in the version. Changes can fall under one of the following headings:
Changes should be listed in bullet point under their respective heading. Each heading should be treated as an H3, so needs to be preceded by If there are specific changes that you want to bring attention to, then you can prepend the change with
When the release notes are rendered, these important changes will be visually highlighted. |
Anchor to ExampleExample
release-notes.md
Anchor to Urgent updatesUrgent updates
An urgent update is a theme update that merchants require immediately to run their business without interruption. Urgent updates can be either manual or automated. The urgency is meant to alert the theme review team that the update is more critical than a regular update.
Typically, only updates that address an issue with the purchase flow are considered urgent. The purchase flow is the process that a customer undertakes when making a purchase, starting from the product page and continuing to checkout through the accelerated checkout button, or continuing from the cart to checkout through the checkout call-to-action or accelerated checkout buttons.
If you have an update that you deem to be important that doesn't affect the purchase flow, then you can consult your Theme Partner Manager before you submit the update.
Anchor to Adding theme presetsAdding theme presets
Presets enable you to create up to five pre-configured designs from the same theme code base. Each preset includes a combination of layout options, color palettes or color schemes, typography, and other visual elements.
Theme presets are included under one theme package. This gives merchants multiple customization options that they can apply to their store to change the general look and feel of the theme without extensive design skills or coding knowledge. Each preset gets its own dedicated listing page on the Theme Store that aligns to a primary industry and catalog size to appeal to a specific merchant segment.
Complete the following steps to update your theme so that it includes a theme preset:
- Edit your theme code to add a new preset. Themes must use the following file structure when adding presets:
Shopify theme preset file structure
- Submit a new ZIP file through the Partner Dashboard as a theme update.
- Include the new preset demo URL and password in the theme update submission form.
- After submitting, our team will review and test your update before rejecting or approving. You will receive an email notification once we've made a decision.
After your update has been approved, you need to edit your theme's listing page to provide marketing information and demo store details. This can be accessed in the Partner Dashboard for the newly added presets. Once the required fields are complete, submit. Your new presets will be visible on the Theme Store.
After your update has been approved, you need to edit your theme's listing page to provide marketing information and demo store details. This can be accessed in the Partner Dashboard for the newly added presets. Once the required fields are complete, submit. Your new presets will be visible on the Theme Store.
Anchor to Best practices on structuring your theme zipBest practices on structuring your theme zip
The following is an example of what would pass validation as a theme zip submission. You need to modify your settings_data.json file and contents in the theme zip’s /listings folder to ensure your theme matches the new structure rules.
Example theme: Embiggen (specified in settings_schema.json)
Example presets:
-
Embiggen
-
Canine Gourmand
-
Zenful
-
Embox
-
7th Street
Example settings_data.json
settings_data.json
Do:
-
Use upper and lower case letters to reflect proper sentence structure
-
Use less than 30 characters and 1-2 words for preset names
-
Name one preset the same as your theme name
Don't:
-
Include special characters (i.e. - . é), except a single space
-
Include more than two words for preset names
Example theme zip structure
Theme zip structure
Do:
-
Include preset-unique .json files in each preset listing folder; no need to duplicate identical files
- Preset folders do not need to include the same number of .json files.
- Root level
/templatesand/sectionsfolders should include the complete “base” set of .json files. - Include
/templatesfolder in for each preset, these will overwrite the base set of /template .json files. - Include
/sectionsfolder as necessary. If you don’t have preset-specific changes, you can exclude this folder entirely. These will overwrite the “base”/sections.json files.
-
Preset listing folders are kebab-case so that they can be used in URLs (i.e.
hello there→hello-there).Don't:
-
Include special characters in folder names (i.e. do not use spaces)
-
Duplicate .json files for every preset when the contents are identical
-
Include “demo” .json (or sections within that .json file) that shouldn’t be used by merchants (i.e. things that showcase what your theme does vs. what a merchant would use upon install)