Create a theme
You're ready to create a new theme. You might be asking yourself: How can I quickly set up my development environment and start coding?
In this tutorial, you'll use Shopify CLI and the Skeleton reference theme to create a new theme and upload it to Shopify.
Anchor to What you'll learnWhat you'll learn
After you've finished this tutorial, you'll have accomplished the following:
- Set up your local development environment
- Cloned the Skeleton theme
- Previewed changes made to your local code
- Pushed theme code to your Shopify store and published your theme
Anchor to RequirementsRequirements
- You've installed Shopify CLI.
- You've created a dev store (recommended for this tutorial).
- The URL of the store that you want to work on, such as
example.myshopify.com. - You have a collaborator account or staff account with the Manage themes permission or Themes permission for the store that you want to work on, or you're the store owner.
To use a dev store with Shopify CLI, you need to be the store owner, or have a staff account on the store. If you create a dev store, then you're assigned as the store owner. Other staff members must be added to the store.
To use a dev store with Shopify CLI, you need to be the store owner, or have a staff account on the store. If you create a dev store, then you're assigned as the store owner. Other staff members must be added to the store.
Anchor to Step 1: Initialize a new themeStep 1: Initialize a new theme
Use shopify theme init to clone the Skeleton theme Git repository to your local machine.
The Skeleton theme is a minimal, carefully structured Shopify theme designed to help you quickly get started. Designed with modularity, maintainability, and Shopify's best practices in mind.
-
In a terminal, navigate to the working directory where you want to build your theme.
-
Enter the following command:
shopify theme init -
You're prompted to enter a name for your theme, such as
my-new-theme. The theme is cloned into a folder with the same name. -
After the theme is cloned, navigate to the folder:
cd "my-new-theme"
You can also use the init command to clone a theme from another Git repository.
You can also use the init command to clone a theme from another Git repository.
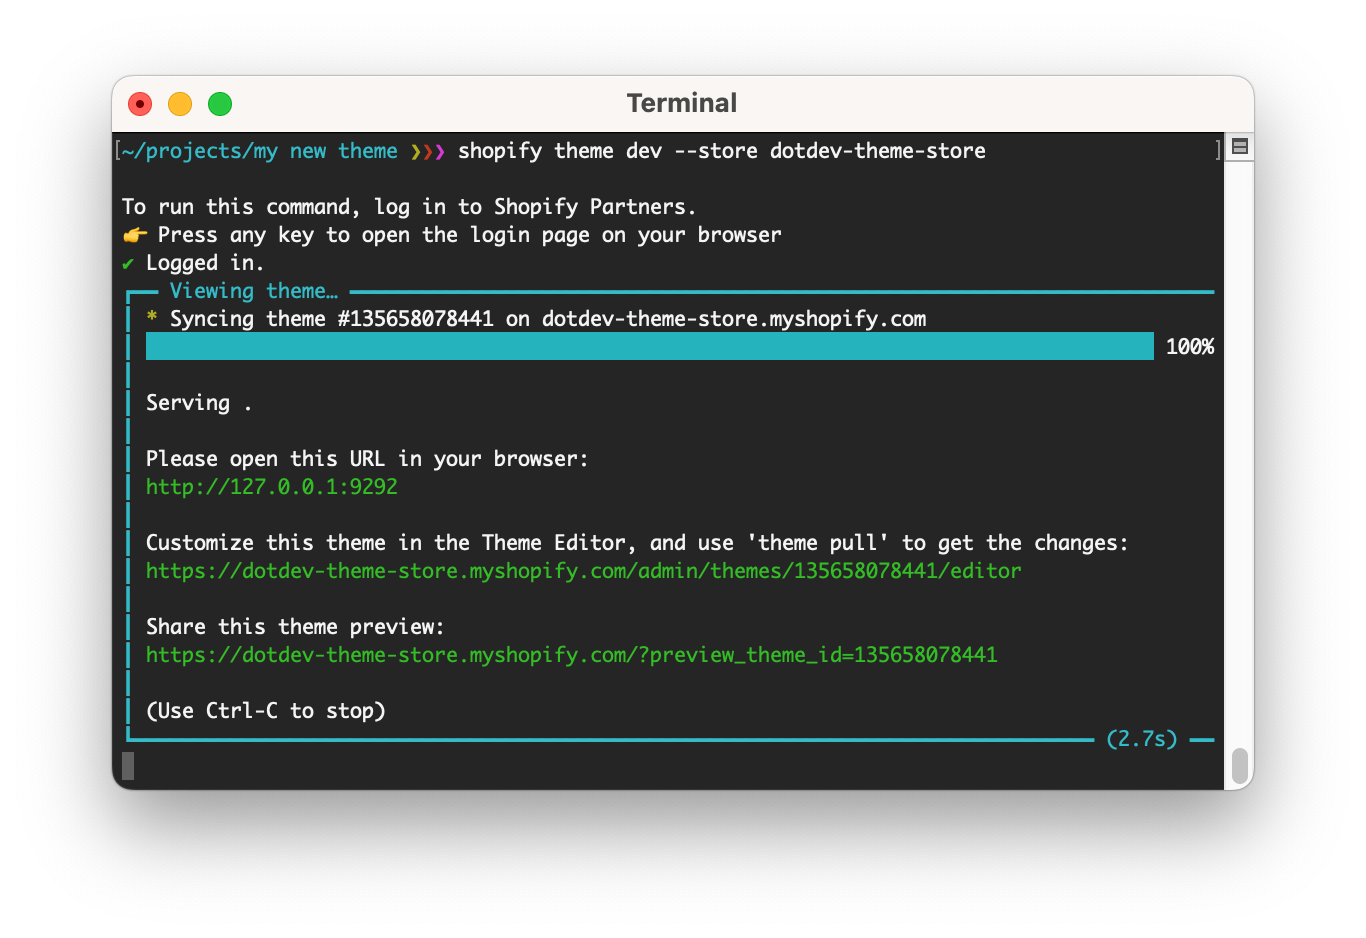
Anchor to Step 2: Start a local development serverStep 2: Start a local development server
After you initialize your theme, you can run shopify theme dev to interact with the theme in a browser. Shopify CLI uploads the theme as a development theme on the store.
The command returns a URL that hot reloads local changes to CSS and sections, allowing you to preview changes in real time using the store's data. This preview is only available in Google Chrome.
The first time you run the dev command, you're prompted to log in to Shopify.
-
To serve your theme, run the following command, where
--storerepresents the name of the store that you want to use to preview your theme:shopify theme dev --store my-storeYou need to pass the
--storeflag the first time you preview your theme. The store that you specify is used for future commands until you pass the--storeflag with a new value. To check which store you're connected to, runshopify theme info. -
In Google Chrome, navigate to
http://127.0.0.1:9292to open the theme preview.
You can also use the dev to generate a preview link and a link to the theme editor for the development theme.
You can also use the dev to generate a preview link and a link to the theme editor for the development theme.
The following image shows a development server being started using dev:
Anchor to Step 3: Upload your theme to a storeStep 3: Upload your theme to a store
If you want to share a permanent link to your theme, update the code of an existing theme, or prepare for your theme to be published, then you need to push your theme code to Shopify using the theme push command.
The first time you push your theme code, you might want to upload the theme to your theme library as a new, unpublished theme. You can do this by running the command with the --unpublished flag. When you run the command using this flag, you're prompted to provide a name for the theme that appears in the theme library.
After the theme is created, you can update your theme code by running the push command without any flags:
Anchor to Step 4: Publish your themeStep 4: Publish your theme
If you want to make your theme live on your store, then you can publish it using the theme publish command. Before you run this command, make sure that you've pushed all of your local changes to Shopify using the theme push command.
-
Enter the following command:
shopify theme publish -
Select the theme that you want to publish from the list.
-
Select
Yesto confirm that you want to publish the specified theme.
The theme is published and is now the active theme for the store.
Anchor to Next stepsNext steps
Creating your first theme with our tools is only the first step in building your theme. Consider the following next steps: