About discounts
Discount apps integrate with the Shopify admin to provide discount types for app users. This guide introduces the ways that you can extend your app code into Shopify checkout and customize the discount experience.
- Use the GraphQL Admin API to create and manage discounts that are native to Shopify.
- Use Shopify Functions to extend your app code into Shopify checkout and create discount functionality that isn't offered out of the box with Shopify.
- Build configuration UIs with admin UI extensions or React Router App UI, to allow merchants to configure the discount functionality in the Shopify admin.
Anchor to Build with the GraphQL Admin APIBuild with the Graph
The GraphQL Admin API enables you to create and manage Shopify discounts.
Anchor to Discount methodsDiscount methods
You can create discounts that are either applied automatically, or applied with discount codes.
The following table describes the different discount methods you can use as part of your app using the GraphQL Admin API:
| Discount method | Description | Example use cases |
|---|---|---|
| Automatic discount | A discount that's automatically applied at checkout and on a cart if prerequisites are met. | - A Buy X Get Y or Spend X Get Y automatic discount - A percentage or fixed-amount automatic discount |
| Code discount | A discount that customers can redeem using a specific code. Merchants can create and share discount codes individually with customers. | - A Buy X Get Y or Spend X Get Y code discount - A percentage or fixed-amount code discount - A free shipping code discount |
Visit the Shopify Help Center to learn about the limitations and considerations that apply to each discount type:
Anchor to Access scopesAccess scopes
To use discount-related GraphQL mutations when building with the GraphQL Admin API, your app needs to request the following access scopes for a Shopify store:
| Access scope | Required or optional? | Description |
|---|---|---|
write_discounts | Required | Allows apps to create and update Shopify discounts |
read_customers | Optional | Allows apps to query a store's customers |
read_products | Optional | Allows apps to query a store's products |
read_shipping | Optional | Allows apps to query the countries that a store ships to |
Anchor to Build with Shopify FunctionsBuild with Shopify Functions
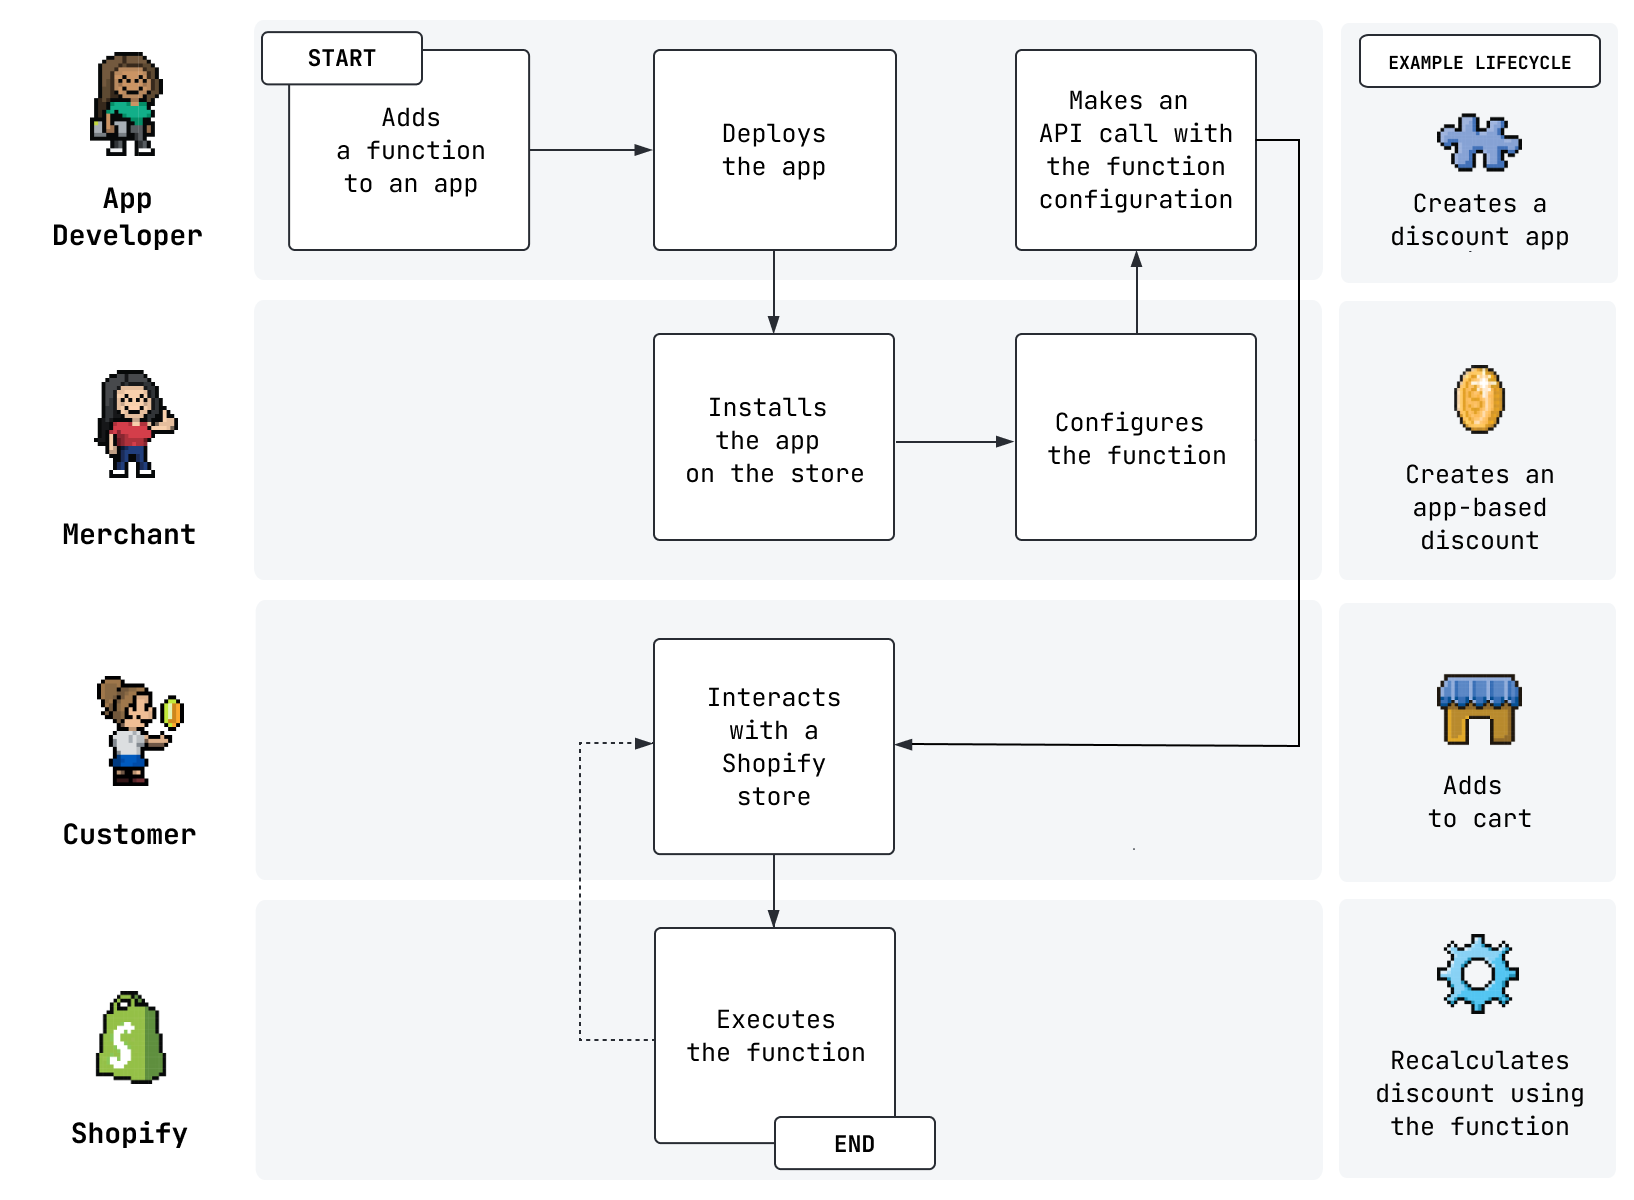
Shopify Functions enable you to create discount functionality that isn't offered out of the box with Shopify. For example, a discount Function can be used to create a single discount that can reduce the price of a product and shipping rate at once, or volume discounts with different discount rates when a line item quantity meets defined thresholds.
When you create and deploy an app with a Function, you can define a new discount type. After merchants install the app, they can create discounts using these custom discount types. Shopify executes the Function to calculate discounts in real-time when buyers add products to their cart.
Anchor to How discounts are appliedHow discounts are applied
Shopify's discount system allows for targeted price reductions across different parts of the shopping experience. Discounts can be applied to the following:
-
Cart lines: Reductions applied to specific products in the cart
-
Order subtotals: Discounts applied to the entire purchase amount
-
Shipping rates: Reductions in shipping costs
When you create a Discount, you can specify where the discount should be applied by defining discount classes on a discount instance. These classes determine which part of the cart the discount Function targets, enabling Shopify to correctly calculate and apply the appropriate price reduction during checkout.
Anchor to Discount classesDiscount classes
Discount classes are used to define the effect of a discount on a cart. The discount's discountClasses field determines which Function targets will be executed during checkout.
App discounts built with the Discount Function API can return operations that use Order and Product discount classes in their CartLinesDiscountsGenerateRunResult and the Shipping class in CartDeliveryOptionsDiscountsGenerateRunResult.
| Discount Class | API Target | Description |
|---|---|---|
| Order | CartLinesDiscountsGenerateRunResult | Applies discounts to the entire cart through cart operations |
| Product | CartLinesDiscountsGenerateRunResult | Applies discounts to specific products through cart operations |
| Shipping | CartDeliveryOptionsDiscountsGenerateRunResult | Applies discounts to shipping rates through delivery operations |
Explore the following resources to manage discounts in your app. Use mutations to craft, modify, and remove discounts, and use queries to retrieve detailed listings.
Anchor to Automatic discount mutationsAutomatic discount mutations
The following table outlines some common mutations for creating, updating, and deleting automatic discounts:
| Discount type | Mutations |
|---|---|
| Buy X Get Y or Spend X Get Y | discountAutomaticBxgyCreate discountAutomaticBxgyUpdate discountAutomaticDelete |
| Percentage or fixed amount | discountAutomaticBasicCreate discountAutomaticBasicUpdate discountAutomaticDelete |
| Free shipping | discountAutomaticFreeShippingCreate discountAutomaticFreeShippingUpdate discountAutomaticDelete |
| App | discountAutomaticAppCreate discountAutomaticAppUpdate discountAutomaticDelete |
Anchor to Code discount mutationsCode discount mutations
The following table outlines some common mutations for creating, updating, and deleting code discounts:
| Discount type | Mutations |
|---|---|
| Buy X Get Y or Spend X Get Y | discountCodeBxgyCreate discountCodeBxgyUpdate discountCodeDelete |
| Percentage or fixed amount | discountCodeBasicCreate discountCodeBasicUpdate discountCodeDelete |
| Free shipping | discountCodeFreeShippingCreate discountCodeFreeShippingUpdate discountCodeDelete |
| App | discountCodeAppCreate discountCodeAppUpdate discountCodeDelete |
| Bulk actions | discountCodeBulkActivate discountCodeBulkDeactivate discountCodeBulkDelete |
Anchor to QueriesQueries
The following table outlines some common queries for interacting with automatic and code discounts.
| Discount type | Queries |
|---|---|
| Automatic discounts | automaticDiscountNode automaticDiscountNodes |
| Code discounts | codeDiscountNode codeDiscountNodes |
Anchor to Where you can buildWhere you can build
Discount apps extend multiple Shopify surfaces. Choose where you want to add functionality:
Anchor to Getting startedGetting started
Anchor to Developer tools and resourcesDeveloper tools and resources
Explore the following developer tools and resources to learn more about building with Shopify Functions: