About Flow
Shopify Flow is an app that allows merchants to customize their store through automation. As a developer, you can integrate your app with the Flow platform through custom tasks, such as triggers and actions.
This guide introduces you to the different extensions you can create, building a Flow trigger and action, and considerations when making changes to your extensions.
Anchor to Why build for FlowWhy build for Flow
Building for Flow can help you to increase the value of your app by allowing merchants to automate their business processes. For example, suppose that you have a review app. After a review is created, merchants might want to send a notification (using email, Slack, or SMS), award loyalty points, and more. If you build the Review created trigger, Flow allows merchants to do any of those actions with your app. By integrating with Flow, you can:
- Improve integrations between your app, Shopify, and other apps: Any task you build can be used with the triggers and actions that Flow already provides, which immediately connects your app to thousands of new features.
- Save development time: Rather than building and maintaining direct integrations with many other apps, you can integrate with Flow and provide similar value to your merchants.
- Improved visibility: Merchants can discover your templates or tasks in Flow, even if they don't have your app installed. Additionally, when you integrate with Flow, you receive a Works with Flow badge on your listing in the Shopify App Store. Your app will also be listed in the Flow app directory.
Anchor to What you can buildWhat you can build
As a Partner you can build one or more tasks related to your app for your merchants to use. These merchants need to have both your app and Shopify Flow installed. Shopify Flow includes the following task types:
| Extension type | Description | Example |
|---|---|---|
| Trigger | An event that starts a workflow, and can be something that happens in a store or in an app. | A new order is created in a merchant's online store. |
| Condition | A rule that determines whether an action will be taken. As a developer you cannot create a condition task. | A condition is set to check whether the total amount paid for the order is over $200.00. |
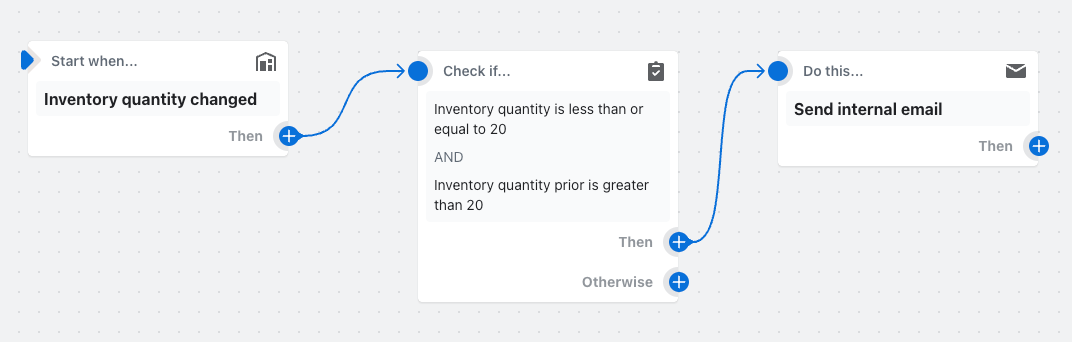
| Action | A task that's executed in a store or in an app when certain conditions are met. | If the total amount paid for the order is over $200.00, then a tag is added to the customer account that placed the order. |
| Template | An example that demonstrates how your task works for a key use case. Templates are available through Flow's template library. | A workflow that sends an internal email when your trigger runs. |
Anchor to Plans supportedPlans supported
Flow is an optional app that's available to Shopify merchants on any paid plan. Flow is widely adopted by Shopify merchants, especially those with stores on Shopify Plus.
Flow features differ by plan. For apps, the primary difference is that if you have a custom app, your Flow app extensions are available only to a Shopify Plus store that has your app installed.
Anchor to TemplatesTemplates
A template in Shopify Flow is an example workflow that can be copied into a merchant's shop. Templates help merchants automate a specific use case with minimal or no additional configuration. Flow's template library offers hundreds of templates with features to filter, browse, and search. You can create a template for Shopify Flow that showcases your custom triggers and actions and help merchants do more.