Create a post-purchase subscription
Post-purchase checkout extensions are in beta and can be used without restrictions in a development store. To use post-purchase extensions on a live store, you need to request access.
Post-purchase checkout extensions are in beta and can be used without restrictions in a development store. To use post-purchase extensions on a live store, you need to request access.
In this tutorial, you'll learn how to use Shopify Extensions to create a post-purchase offer that allows a buyer to add a subscription to their order.

Anchor to What you'll learnWhat you'll learn
In this tutorial, you’ll learn how to do the following tasks:
- Update your app with the required scopes to manage subscriptions
- Add UI elements to allow buyers to select one time or subscription products
- Update the app server to return subscription data
Anchor to RequirementsRequirements
- You've completed Build a post-purchase product offer checkout extension.
- You've enabled Shopify Payments in test mode on your dev store.
Anchor to LimitationsLimitations
You can't create a post-purchase subscription that does any of the following things:
- Modifies a subscription on an order with an existing subscription
- Adds a subscription to an order with an existing subscription
- Converts a one-time purchase into a subscription order
Anchor to Step 1: Add required dataStep 1: Add required data
To offer a customer a subscription, a product needs to have an associated selling plan group. Selling plans represent how products can be sold and purchased. When you create a selling plan, you can determine the policies under which a product can be sold. For example, you can create a selling plan where a customer can purchase a subscription on a monthly billing cycle, and where you offer a 15% discount for weekly deliveries of the product.
If your app already has the capability to manage selling plans, or if you're integrating with an app that already has this capability, then you can skip to step 2. To complete this tutorial, the product on the store you will have in the upsell offer needs to be associated with a selling plan.
If your app already has the capability to manage selling plans, or if you're integrating with an app that already has this capability, then you can skip to step 2. To complete this tutorial, the product on the store you will have in the upsell offer needs to be associated with a selling plan.
Anchor to Update app scopesUpdate app scopes
To create a selling plan and associate it to a product, you need to add the write_purchase_options scope to the app.
Update the app scopes in the shopify.app.toml file to include the write_purchase_options scope. This scope allows you to create selling plan groups.
After you update scopes, when you navigate to the App Home in the Shopify admin, you should be prompted to reauthorize the app to allow editing of purchase options. If you're not prompted to reauthorize, restart your server, and then navigate to the App Home in the Shopify admin.
shopify.app.toml
Anchor to Create a selling plan groupCreate a selling plan group
Use the GraphQL Admin API to create a selling plan group, and associate a product with the selling plan group. In the following cURL command, add the myshopify domain of your dev store, the access token for the app, and the product and variant IDs of the product that you're offering in the upsell.
You can run npm run prisma studio to view your data in your browser.
The access token is stored in the Session table in the accessToken column.
You can run npm run prisma studio to view your data in your browser.
The access token is stored in the Session table in the accessToken column.
Terminal
Anchor to Step 2: Return subscription information from the app serverStep 2: Return subscription information from the app server
Update the OFFERS array in the app/offer.server.js file that you created in the previous tutorial to return an offer with the selling plan information that you created in the previous step.
app/offer.server.js
Anchor to Step 3: Update your extension code to offer subscriptionsStep 3: Update your extension code to offer subscriptions
Replace the content of your extension script with the following code.
src/index
src/index.jsx
React
import { useEffect, useState } from "react";
import {
extend,
render,
useExtensionInput,
BlockStack,
Button,
BuyerConsent,
CalloutBanner,
Heading,
Image,
Text,
TextContainer,
Separator,
Select,
Tiles,
TextBlock,
Layout,
} from "@shopify/post-purchase-ui-extensions-react";
// For local development, replace APP_URL with your local tunnel URL.
const APP_URL = "https://abcd-1234.trycloudflare.com";
// Preload data from your app server to ensure the extension loads quickly.
extend(
"Checkout::PostPurchase::ShouldRender",
async ({ inputData, storage }) => {
const postPurchaseOffer = await fetch(`${APP_URL}/api/offer`, {
method: "POST",
headers: {
Authorization: `Bearer ${inputData.token}`,
"Content-Type": "application/json",
},
body: JSON.stringify({
referenceId: inputData.initialPurchase.referenceId,
}),
}).then((response) => response.json());
await storage.update(postPurchaseOffer);
// For local development, always show the post-purchase page
return { render: true };
}
);
render("Checkout::PostPurchase::Render", () => <App />);
export function App() {
const { storage, inputData, calculateChangeset, applyChangeset, done } =
useExtensionInput();
const [loading, setLoading] = useState(true);
const [calculatedPurchase, setCalculatedPurchase] = useState();
// Track the buyer's approval to the subscriptions policies.
const [buyerConsent, setBuyerConsent] = useState(false);
const [buyerConsentError, setBuyerConsentError] = useState();
const [selectedPurchaseOption, setSelectedPurchaseOption] = useState(0);
const { offers } = storage.initialData;
const purchaseOptions = offers;
const purchaseOption = purchaseOptions[selectedPurchaseOption];
// Define the changes that you want to make to the purchase, including the discount to the product.
useEffect(() => {
async function calculatePurchase() {
// Call Shopify to calculate the new price of the purchase, if the above changes are applied.
const result = await calculateChangeset({
changes: purchaseOptions[selectedPurchaseOption].changes,
});
setCalculatedPurchase(result.calculatedPurchase);
setLoading(false);
}
calculatePurchase();
// Add the selectedPurchaseOption to the dependency of the useEffect.
// This will ensure that when the buyer selects a new purchase option, the price breakdown is recalculated.
}, [calculateChangeset, purchaseOptions, selectedPurchaseOption]);
// Extract values from the calculated purchase.
const shipping =
calculatedPurchase?.addedShippingLines[0]?.priceSet?.presentmentMoney
?.amount;
const taxes =
calculatedPurchase?.addedTaxLines[0]?.priceSet?.presentmentMoney?.amount;
const total = calculatedPurchase?.totalOutstandingSet.presentmentMoney.amount;
const discountedPrice =
calculatedPurchase?.updatedLineItems[0].totalPriceSet.presentmentMoney
.amount;
const originalPrice =
calculatedPurchase?.updatedLineItems[0].priceSet.presentmentMoney.amount;
async function acceptOffer() {
setLoading(true);
// Make a request to your app server to sign the changeset with your app's API secret key.
const token = await fetch(`${APP_URL}/api/sign-changeset`, {
method: "POST",
headers: {
Authorization: `Bearer ${inputData.token}`,
"Content-Type": "application/json",
},
body: JSON.stringify({
referenceId: inputData.initialPurchase.referenceId,
changes: purchaseOptions[selectedPurchaseOption].id,
}),
})
.then((response) => response.json())
.then((response) => response.token)
.catch((e) => console.log(e));
// Send the value of the buyer consent with the changeset to Shopify to add the subscription
const result = await applyChangeset(token, {
buyerConsentToSubscriptions: buyerConsent,
});
// Ensure that there is no buyer consent error
if (
result.errors.find((error) => error.code === "buyer_consent_required")
) {
// Show an error if the buyer didn't accept the subscriptions policy
setBuyerConsentError("You need to accept the subscriptions policy.");
setLoading(false);
} else {
// Redirect to the Thank you page.
done();
}
// Redirect to the thank-you page.
done();
}
function declineOffer() {
setLoading(true);
// Redirect to the thank-you page.
done();
}
return (
<BlockStack spacing="loose">
<CalloutBanner>
<BlockStack spacing="xtight">
<TextContainer>
<Text size="medium" emphasized>
It's not too late to add this to your order
</Text>
</TextContainer>
<TextContainer>
<Text size="medium">
Add the {purchaseOption.productTitle} to your order and{" "}
</Text>
<Text size="medium" emphasized>
save {purchaseOption.changes[0].discount.title}
</Text>
</TextContainer>
</BlockStack>
</CalloutBanner>
<Layout
media={[
{ viewportSize: "small", sizes: [1, 0, 1], maxInlineSize: 0.9 },
{ viewportSize: "medium", sizes: [532, 0, 1], maxInlineSize: 420 },
{ viewportSize: "large", sizes: [560, 38, 340] },
]}
>
<Image
description="product photo"
source={purchaseOption.productImageURL}
/>
<BlockStack />
<BlockStack spacing="loose">
<BlockStack>
<Heading>{purchaseOption.productTitle}</Heading>
<PriceHeader
discountedPrice={discountedPrice}
originalPrice={originalPrice}
/>
<ProductDescription textLines={purchaseOption.productDescription} />
</BlockStack>
{purchaseOptions.length > 1 && (
<Select
label="Purchase options"
onChange={(value) =>
setSelectedPurchaseOption(parseInt(value, 10))
}
value={selectedPurchaseOption.toString()}
options={purchaseOptions.map((option, index) => ({
label: option.title,
value: index.toString(),
}))}
/>
)}
{purchaseOption.changes[0].type === "add_subscription" && (
<BlockStack spacing="xtight">
<TextBlock subdued size="small">
Delivery{" "}
{getBillingInterval(purchaseOption.sellingPlanInterval)}, save{" "}
{purchaseOption.changes[0].discount.value}%
</TextBlock>
<TextBlock subdued size="small">
Auto-renews, skip or cancel anytime
</TextBlock>
</BlockStack>
)}
<BlockStack spacing="tight">
<Separator />
<MoneyLine
label="Subtotal"
amount={formatCurrency(discountedPrice)}
/>
<MoneyLine label="Shipping" amount={formatCurrency(shipping)} />
<MoneyLine label="Taxes" amount={formatCurrency(taxes)} />
<Separator />
<BlockStack spacing="tight">
<MoneySummary label="Total" amount={formatCurrency(total)} />
{purchaseOption.sellingPlanInterval && (
<RecurringSummary
label="Recurring subtotal"
amount={originalPrice}
interval={purchaseOption.sellingPlanInterval}
/>
)}
</BlockStack>
</BlockStack>
{purchaseOption.changes[0].type === "add_subscription" && (
<BuyerConsent
policy="subscriptions"
checked={buyerConsent}
onChange={setBuyerConsent}
error={buyerConsentError}
/>
)}
<BlockStack>
<Button onPress={acceptOffer} submit loading={loading}>
Pay now · {formatCurrency(total)}
</Button>
<Button onPress={declineOffer} subdued>
Decline this offer
</Button>
</BlockStack>
</BlockStack>
</Layout>
</BlockStack>
);
}
function PriceHeader({ discountedPrice, originalPrice }) {
return (
<TextContainer alignment="leading" spacing="loose">
<Text role="deletion" size="large">
{formatCurrency(originalPrice)}
</Text>
<Text emphasized size="large" appearance="critical">
{" "}
{formatCurrency(discountedPrice)}
</Text>
</TextContainer>
);
}
function ProductDescription({ textLines }) {
return (
<BlockStack spacing="xtight">
{textLines.map((text, index) => (
<TextBlock key={index} subdued>
{text}
</TextBlock>
))}
</BlockStack>
);
}
function MoneyLine({ label, amount, size = "small" }) {
return (
<Tiles>
<TextBlock size={size}>{label}</TextBlock>
<TextContainer alignment="trailing">
<TextBlock emphasized size={size}>
{amount}
</TextBlock>
</TextContainer>
</Tiles>
);
}
function MoneySummary({ label, amount }) {
return (
<Tiles>
<TextBlock size="medium" emphasized>
{label}
</TextBlock>
<TextContainer alignment="trailing">
<TextBlock emphasized size="medium">
{amount}
</TextBlock>
</TextContainer>
</Tiles>
);
}
function RecurringSummary({ label, amount, interval }) {
return (
<BlockStack spacing="xtight">
<Tiles>
<TextBlock size="small">{label}</TextBlock>
<TextContainer alignment="trailing">
<TextBlock size="small" subdued>
{formatCurrency(amount)} {getBillingInterval(interval)}
</TextBlock>
</TextContainer>
</Tiles>
<TextBlock size="small" subdued>
Doesn't include shipping, tax, duties, or any applicable discounts.
</TextBlock>
</BlockStack>
);
}
function getBillingInterval(interval) {
switch (interval) {
case "DAY":
return "every day";
case "WEEK":
return "every week";
case "MONTH":
return "every month";
case "YEAR":
return "every year";
}
}
function formatCurrency(amount) {
if (!amount || parseInt(amount, 10) === 0) {
return "Free";
}
return `$${amount}`;
}Vanilla
import {
  extend,
  BlockStack,
  Button,
  CalloutBanner,
  Heading,
  Image,
  Text,
  TextContainer,
  Separator,
  Tiles,
  TextBlock,
  Layout,
  BuyerConsent,
  Select,
} from "@shopify/post-purchase-ui-extensions";

// For local development, replace APP_URL with your local tunnel URL.
const APP_URL = "https://abcd-1234.trycloudflare.com";

// Preload data from your app server to ensure the extension loads quickly.
extend(
  "Checkout::PostPurchase::ShouldRender",
  async ({ inputData, storage }) => {
    const postPurchaseOffer = await fetch(`${APP_URL}/api/offer`, {
      method: "POST",
      headers: {
        Authorization: `Bearer ${inputData.token}`,
        "Content-Type": "application/json",
      },
      body: JSON.stringify({
        referenceId: inputData.initialPurchase.referenceId,
      }),
    }).then((response) => response.json());

    await storage.update(postPurchaseOffer);

    // For local development, always show the post-purchase page
    return { render: true };
  }
);

extend(
  "Checkout::PostPurchase::Render",
  (root, { done, storage, calculateChangeset, applyChangeset, inputData }) => {
    const { offers } = storage.initialData;

    // Track the buyer's approval to the subscriptions policies.
    let buyerConsent = false;
    let selectedPurchaseOption = 0;

    const purchaseOptions = offers;
    const purchaseOption = purchaseOptions[selectedPurchaseOption];

    const calloutBannerComponent = root.createComponent(
      CalloutBanner,
      { title: "It's not too late to add this to your order." },
      [
        root.createComponent(
          Text,
          { size: "medium" },
          `Add the ${purchaseOption.productTitle} to your order and `
        ),
        root.createComponent(
          Text,
          { size: "medium", emphasized: true },
          "save 15%."
        ),
      ]
    );

    const productDescriptionTextBlocks = purchaseOption.productDescription.map(
      (text) => root.createComponent(TextBlock, { subdued: true }, text)
    );
    const productDescriptionComponent = root.createComponent(
      BlockStack,
      { spacing: "xtight" },
      productDescriptionTextBlocks
    );

    const acceptButtonText = root.createText("");
    const acceptButton = root.createComponent(
      Button,
      {
        onPress: acceptOffer,
        submit: true,
        disabled: true,
        loading: true,
      },
      acceptButtonText
    );
    const declineButton = root.createComponent(
      Button,
      { onPress: declineOffer, subdued: true },
      "Decline this offer"
    );
    const buttonsComponent = root.createComponent(BlockStack, {}, [
      acceptButton,
      declineButton,
    ]);

    const subtotalAmount = root.createText("");
    const shippingAmount = root.createText("");
    const taxesAmount = root.createText("");
    const totalAmount = root.createText("");
    const originalPriceAmount = root.createText("");
    const discountedPriceAmount = root.createText("");

    const priceBreakdownComponent = root.createComponent(
      BlockStack,
      { spacing: "tight" },
      [
        root.createComponent(Separator),
        createPriceBreakdownLine({
          label: "Subtotal",
          amount: subtotalAmount,
        }),
        createPriceBreakdownLine({
          label: "Shipping",
          amount: shippingAmount,
        }),
        createPriceBreakdownLine({
          label: "Taxes",
          amount: taxesAmount,
        }),
        root.createComponent(Separator),
        createMoneySummary({ label: "Total", amount: totalAmount }),
      ]
    );

    const originalPriceHeader = root.createComponent(
      Text,
      { role: "deletion", size: "large" },
      originalPriceAmount
    );

    const discountedPriceHeader = root.createComponent(
      Text,
      { emphasized: true, size: "large", appearance: "critical" },
      discountedPriceAmount
    );

    const priceHeaderComponent = root.createComponent(
      TextContainer,
      { alignment: "leading", spacing: "loose" },
      [originalPriceHeader, " ", discountedPriceHeader]
    );

    const wrapperComponent = root.createComponent(BlockStack, {}, [
      root.createComponent(Heading, {}, purchaseOption.productTitle),
      priceHeaderComponent,
      productDescriptionComponent,
      priceBreakdownComponent,
      buttonsComponent,
    ]);

    const buyerConsentComponent = root.createComponent(BuyerConsent, {
      policy: "subscriptions",
      checked: buyerConsent,
      onChange: () => {
        buyerConsent = !buyerConsent;
      },
    });

    function createPriceBreakdownLine({ label, amount, textSize = "small" }) {
      return root.createComponent(Tiles, {}, [
        root.createComponent(TextBlock, { size: "small" }, label),
        root.createComponent(
          TextContainer,
          { alignment: "trailing" },
          root.createComponent(
            TextBlock,
            { emphasized: true, size: textSize },
            amount
          )
        ),
      ]);
    }

    function createMoneySummary({ label, amount }) {
      return root.createComponent(Tiles, {}, [
        root.createComponent(
          TextBlock,
          { emphasized: true, size: "medium" },
          label
        ),
        root.createComponent(
          TextContainer,
          { alignment: "trailing" },
          root.createComponent(
            TextBlock,
            { emphasized: true, size: "medium" },
            amount
          )
        ),
      ]);
    }

    const purchaseOptionSelect = root.createComponent(Select, {
      label: "Purchase options",
      value: selectedPurchaseOption.toString(),
      options: purchaseOptions.map((option, index) => ({
        label: option.title,
        value: index.toString(),
      })),
      onChange: (value) => {
        const previousPurchaseOption = purchaseOptions[selectedPurchaseOption];
        selectedPurchaseOption = parseInt(value, 10);
        updatePriceBreakdownUI(previousPurchaseOption);
      },
    });

    if (purchaseOptions.length > 1) {
      wrapperComponent.insertChildBefore(
        purchaseOptionSelect,
        priceBreakdownComponent
      );
    }

    // Get shipping costs and taxes and update the UI
    async function updatePriceBreakdownUI(previousPurchaseOption) {
      const currentPurchaseOption = purchaseOptions[selectedPurchaseOption];
      acceptButton.updateProps({ loading: true });
      // Request shopify to calculate shipping costs and taxes for the upsell
      const result = await calculateChangeset({
        changes: purchaseOptions[selectedPurchaseOption].changes,
      });

      // Extract values from response
      const shipping =
        result.calculatedPurchase?.addedShippingLines[0]?.priceSet
          ?.presentmentMoney?.amount;
      const taxes =
        result.calculatedPurchase?.addedTaxLines[0]?.priceSet?.presentmentMoney
          ?.amount;
      const total =
        result.calculatedPurchase?.totalOutstandingSet.presentmentMoney.amount;
      const originalPrice =
        result.calculatedPurchase?.updatedLineItems[0].priceSet.presentmentMoney
          .amount;
      const discountedPrice =
        result.calculatedPurchase?.updatedLineItems[0].totalPriceSet
          .presentmentMoney.amount;

      // Update all of the text nodes once the purchase is calculated by Shopify's API
      totalAmount.updateText(formatCurrency(total));
      subtotalAmount.updateText(formatCurrency(discountedPrice));
      shippingAmount.updateText(formatCurrency(shipping));
      taxesAmount.updateText(formatCurrency(taxes));
      originalPriceAmount.updateText(formatCurrency(originalPrice));
      discountedPriceAmount.updateText(formatCurrency(discountedPrice));

      const recurringSummaryText = root.createText(
        `${formatCurrency(originalPrice)} ${getBillingInterval(
          currentPurchaseOption.interval
        )}`
      );
      const recurringSummary = root.createComponent(
        BlockStack,
        { spacing: "xtight" },
        [
          root.createComponent(Tiles, {}, [
            root.createComponent(
              TextBlock,
              { size: "small" },
              "Recurring subtotal"
            ),
            root.createComponent(
              TextContainer,
              { alignment: "trailing" },
              root.createComponent(
                TextBlock,
                { subdued: true, size: "small" },
                recurringSummaryText
              )
            ),
          ]),
          root.createComponent(
            TextBlock,
            { size: "small", subdued: true },
            "Doesn't include shipping, tax, duties, or any applicable discounts."
          ),
        ]
      );

      const sellingPlanDescription = root.createComponent(
        BlockStack,
        {
          spacing: "xtight",
        },
        [
          root.createComponent(
            TextBlock,
            { subdued: true, size: "small" },
            `Delivery ${getBillingInterval(
              currentPurchaseOption.interval
            )}, save ${currentPurchaseOption.changes[0].discount?.title} %`
          ),
          root.createComponent(
            TextBlock,
            { subdued: true, size: "small" },
            "Auto-renews, skip or cancel anytime"
          ),
        ]
      );

      // When selecting a selling plan
      if (
        currentPurchaseOption.changes[0].sellingPlanId &&
        !previousPurchaseOption.changes[0].sellingPlanId
      ) {
        // Show the buyer consent
        wrapperComponent.insertChildBefore(
          buyerConsentComponent,
          buttonsComponent
        );

        // Show the recurring summary
        priceBreakdownComponent.appendChild(recurringSummary);

        // Show the selling plan description
        wrapperComponent.insertChildBefore(
          sellingPlanDescription,
          priceBreakdownComponent
        );

        // When selecting the one-time purchase option
      } else if (
        !currentPurchaseOption?.changes[0].sellingPlanId &&
        previousPurchaseOption?.changes[0].sellingPlanId
      ) {
        // Hide the buyer consent
        wrapperComponent.removeChild(buyerConsentComponent);

        // Hide the recurring summary
        priceBreakdownComponent.removeChild(recurringSummary);

        // Hide the selling plan description
        wrapperComponent.removeChild(
          wrapperComponent.children[wrapperComponent.children.length - 3]
        );
      } else if (
        currentPurchaseOption?.changes[0].sellingPlanId &&
        previousPurchaseOption?.changes[0].sellingPlanId
      ) {
        // Update the recurring summary
        priceBreakdownComponent.removeChild(recurringSummary);
        priceBreakdownComponent.appendChild(recurringSummary);
      }

      // Enable the accept button
      acceptButton.updateProps({ disabled: false, loading: false });
      acceptButtonText.updateText(`Pay now · ${formatCurrency(total)}`);
    }

    // Calculate the initial price breakdown
    updatePriceBreakdownUI();

    // Decline button click handler
    function declineOffer() {
      acceptButton.updateProps({ disabled: true });
      declineButton.updateProps({ disabled: true, loading: true });
      done();
    }

    // Accept button click handler
    async function acceptOffer() {
      async function doAcceptOrder() {
        // Make a request to your app server to sign the changeset with your app's API secret key.
        const token = await fetch(`${APP_URL}/api/sign-changeset`, {
          method: "POST",
          headers: {
            Authorization: `Bearer ${inputData.token}`,
            "Content-Type": "application/json",
          },
          body: JSON.stringify({
            referenceId: inputData.initialPurchase.referenceId,
            changes: purchaseOptions[selectedPurchaseOption].id,
          }),
        })
          .then((response) => response.json())
          .then((response) => response.token)
          .catch((e) => console.log(e));

        // Make a request to Shopify servers to apply the changeset
        const result = await applyChangeset(token, {
          buyerConsentToSubscriptions: buyerConsent,
        });

        if (
          result.errors.find((error) => error.code === "buyer_consent_required")
        ) {
          buyerConsentComponent.updateProps({
            error: "You need to accept the subscriptions policy.",
          });
          acceptButton.updateProps({ disabled: false, loading: false });
          declineButton.updateProps({ disabled: false });
        } else {
          done();
        }
      }

      // First update the state of the buttons, then call the async function
      acceptButton.updateProps({ disabled: true, loading: true });
      declineButton.updateProps({ disabled: true });
      await doAcceptOrder();
    }

    // Put all the components together and render the UI
    root.appendChild(
      root.createComponent(BlockStack, { spacing: "loose" }, [
        calloutBannerComponent,
        root.createComponent(
          Layout,
          {
            media: [
              { viewportSize: "small", sizes: [1, 0, 1], maxInlineSize: 0.9 },
              {
                viewportSize: "medium",
                sizes: [532, 0, 1],
                maxInlineSize: 420,
              },
              { viewportSize: "large", sizes: [560, 38, 340] },
            ],
          },
          [
            root.createComponent(Image, {
              source: purchaseOption.productImageURL,
              description: "Product photo",
            }),
            root.createComponent(BlockStack),
            wrapperComponent,
          ]
        ),
      ])
    );
  }
);

function formatCurrency(amount) {
  if (!amount || parseInt(amount, 10) === 0) {
    return "Free";
  }
  return `$${amount}`;
}

function getBillingInterval(interval) {
  switch (interval) {
    case "DAY":
      return "every day";
    case "WEEK":
      return "every week";
    case "MONTH":
      return "every month";
    case "YEAR":
      return "every year";
  }
}
Anchor to How the example extension code worksHow the example extension code works
The following sections explain how different parts of the example extension code in Step 2 works.
Anchor to Showing the selling plan optionsShowing the selling plan options
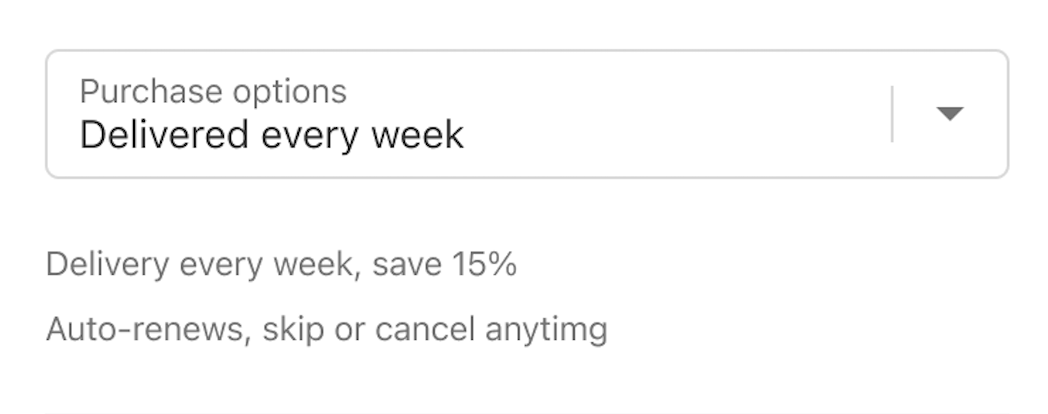
To show the selling plan options to buyers, you need to use the Select component. When a buyer selects a new selling plan, we update the value of the selected purchase option.
src/index
src/index.jsx
React
<Select
  label="Purchase options"
  onChange={(value) =>
    setSelectedPurchaseOption(parseInt(value, 10))
  }
  value={selectedPurchaseOption.toString()}
  options={purchaseOptions.map((option, index) => ({
    label: option.title,
    value: index.toString(),
  }))}
/>
Vanilla
const purchaseOptionSelect = root.createComponent(Select, {
  label: 'Purchase options',
  value: selectedPurchaseOption.toString(),
  options: purchaseOptions.map((option, index) => ({
    label: option.title,
    value: index.toString(),
  })),
  onChange: (value) => {
    const previousPurchaseOption = purchaseOptions[selectedPurchaseOption];
    selectedPurchaseOption = parseInt(value, 10);
    updatePriceBreakdownUI(previousPurchaseOption);
  },
});

if (purchaseOptions.length > 1) {
  wrapperComponent.insertChildBefore(
    purchaseOptionSelect,
    priceBreakdownComponent
  );
}
After you've updated the code, the selling plan option renders as follows:
Anchor to Updating the price breakdownUpdating the price breakdown
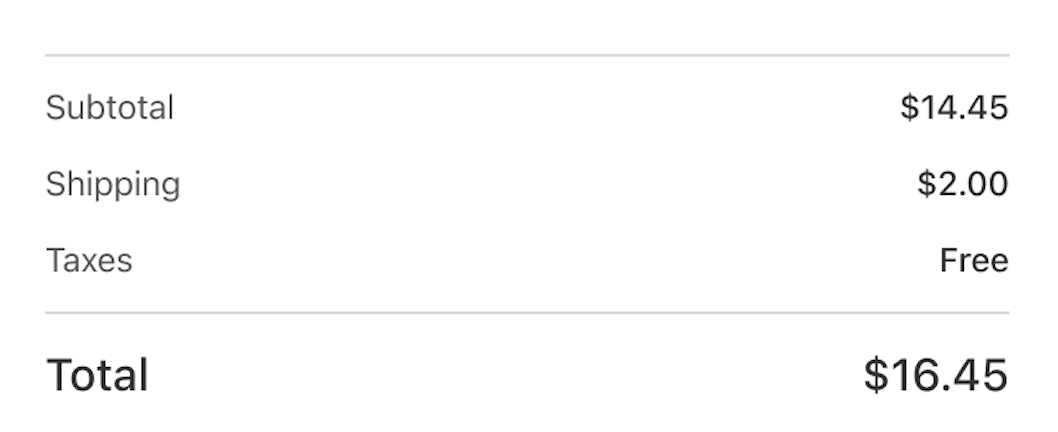
To show the price breakdown matching the currently selected offer, you need to call calculateChangeset when the buyer selects a selling plan:
src/index
src/index.jsx
React
// Define the changes that you want to make to the purchase, including the discount to the product.
useEffect(() => {
  async function calculatePurchase() {
    // Call Shopify to calculate the new price of the purchase, if the above changes are applied.
    const result = await calculateChangeset({
      changes: purchaseOptions[selectedPurchaseOption].changes,
    });

    setCalculatedPurchase(result.calculatedPurchase);
    setLoading(false);
  }

  calculatePurchase();

  // Add the selectedPurchaseOption to the dependency of the useEffect.
  // This will ensure that when the buyer selects a new purchase option, the price breakdown is recalculated.
}, [calculateChangeset, purchaseOptions, selectedPurchaseOption]);
Vanilla
// Request Shopify to calculate shipping costs and taxes for the upsell.
const result = await calculateChangeset({
  changes: purchaseOptions[selectedPurchaseOption].changes,
});
After you've updated the code, the price breakdown renders as follows:
Anchor to Showing a recurring subtotalShowing a recurring subtotal
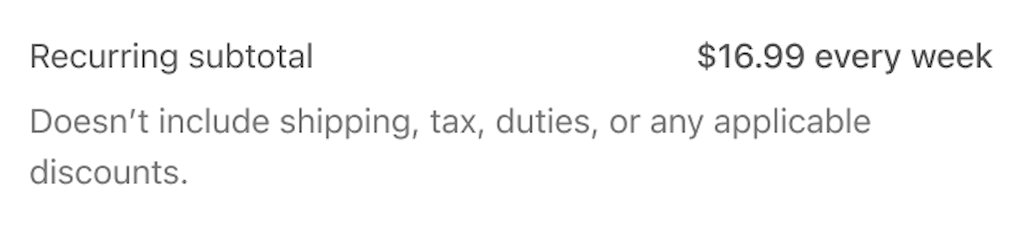
For subscription offers, you need to display the recurring subtotal of the order.
The totalPriceSet for subscription items indicates the price of that item after discounts at each billing cycle, and not the total for the subscription duration.
The totalPriceSet for subscription items indicates the price of that item after discounts at each billing cycle, and not the total for the subscription duration.
src/index
src/index.jsx
React
function RecurringSummary({label, amount, interval}) {
return (
<BlockStack spacing="xtight">
<Tiles>
<TextBlock size="small">{label}</TextBlock>
<TextContainer alignment="trailing">
<TextBlock size="small" subdued>
{formatCurrency(amount)} {getBillingInterval(interval)}
</TextBlock>
</TextContainer>
</Tiles>
<TextBlock size="small" subdued>
Doesn't include shipping, tax, duties, or any applicable discounts.
</TextBlock>
</BlockStack>
);
}
const originalPrice = calculatedPurchase?.updatedLineItems[0].priceSet.presentmentMoney.amount;
// ...
{purchaseOption.sellingPlanInterval && (
<RecurringSummary
label="Recurring subtotal"
amount={originalPrice}
interval={purchaseOption.sellingPlanInterval}
/>
)}Vanilla
const recurringSummary = root.createComponent(
  BlockStack,
  {spacing: 'xtight'},
  [
    root.createComponent(Tiles, {}, [
      root.createComponent(
        TextBlock,
        {size: 'small'},
        'Recurring subtotal'
      ),
      root.createComponent(
        TextContainer,
        {alignment: 'trailing'},
        root.createComponent(
          TextBlock,
          {subdued: true, size: 'small'},
          recurringSummaryText
        )
      ),
    ]),
    root.createComponent(
      TextBlock,
      {size: 'small', subdued: true},
      "Doesn't include shipping, tax, duties, or any applicable discounts."
    ),
  ]
);

if (
    currentPurchaseOption?.changes[0].sellingPlanId &&
    previousPurchaseOption?.changes[0].sellingPlanId
) {
  // ...
  priceBreakdownComponent.appendChild(recurringSummary);
}
After you've updated the code, the recurring subtotal renders as follows:
Anchor to Collecting buyer's consentCollecting buyer's consent
To add a subscription item to an order, the buyer’s payment method must be vaulted for future billing cycles of the subscription. Before you can vault the buyer's payment method, the buyer has to explicitly give consent to the subscription policies. Use the BuyerConsent component in App Bridge to collect consent:
src/index
src/index.jsx
React
// Track the buyer's approval to the subscriptions policies.
const [buyerConsent, setBuyerConsent] = useState(false);
const [buyerConsentError, setBuyerConsentError] = useState();

// ...

{purchaseOption.changes[0].type === "add_subscription" && (
  <BuyerConsent
    policy="subscriptions"
    checked={buyerConsent}
    onChange={setBuyerConsent}
    error={buyerConsentError}
  />
)}
Vanilla
// Track the buyer's approval to the subscriptions policies.
let buyerConsent = false;

const buyerConsentComponent = root.createComponent(BuyerConsent, {
  policy: 'subscriptions',
  checked: buyerConsent,
  onChange: () => {
    buyerConsent = !buyerConsent;
  },
});

if (
  currentPurchaseOption?.changes[0].sellingPlanId &&
  previousPurchaseOption?.changes[0].sellingPlanId
) {
  // ...

  wrapperComponent.insertChildBefore(
    buyerConsentComponent,
    buttonsComponent
  );
}
This component creates a checkbox and a link to the subscription policies.

Anchor to Applying the subscription changeApplying the subscription change
For the add_subscription change to be accepted, the value of the buyer consent checkbox needs to be provided as a new parameter to the applyChangeset method. Without this parameter, the changeset won’t be applied and an error is returned.
src/index
src/index.jsx
React
await applyChangeset(token, {buyerConsentToSubscriptions: buyerConsent});Vanilla
await applyChangeset(token, {buyerConsentToSubscriptions: buyerConsent});Anchor to Step 4: Test your extensionStep 4: Test your extension
Complete a test order on your store and go through the checkout steps. When the post-purchase page appears, add a subscription product to your order. Navigate to the orders section of the Shopify Admin. You should see that on the latest order you have a one time as well as a subscription product.
Anchor to Next stepsNext steps
- Get familiar with the UX guidelines for creating subscriptions with post-purchase checkout extensions.