Extensions for payments
Payments extensions integrate with the Shopify admin and checkout to provide customized payment processing services for merchants. Only approved Partners can build payments extensions on Shopify's Payments Platform.
Payments extensions provide merchant stores with the following features:
- provide additional payment methods
- perform specific operations on payment methods
- control payment security for buyers
- automate payment services, such as reoccurring payments
- decide if they want to capture funds at the time of purchase or at the time of fulfillment. For more information, refer to Payment authorization
The option to build a custom payment extensions is limited to eligible Shopify Plus Merchants only. Contact Shopify Plus Support to confirm eligibility.
The option to build a custom payment extensions is limited to eligible Shopify Plus Merchants only. Contact Shopify Plus Support to confirm eligibility.
Anchor to How it worksHow it works
You can create a payments extension to provide customized payment processing services for merchants, and install your payments extension on a dev store to test it. Only approved Partners can build payments extensions on Shopify's Payments Platform.
When you publish your payments extensions, your extensions becomes available, and merchants can install and use them in their Shopify stores.
Anchor to How a merchant installs a payments extensionHow a merchant installs a payments extension
The following diagram describes the different phases of the onboarding cycle for payments extensions:
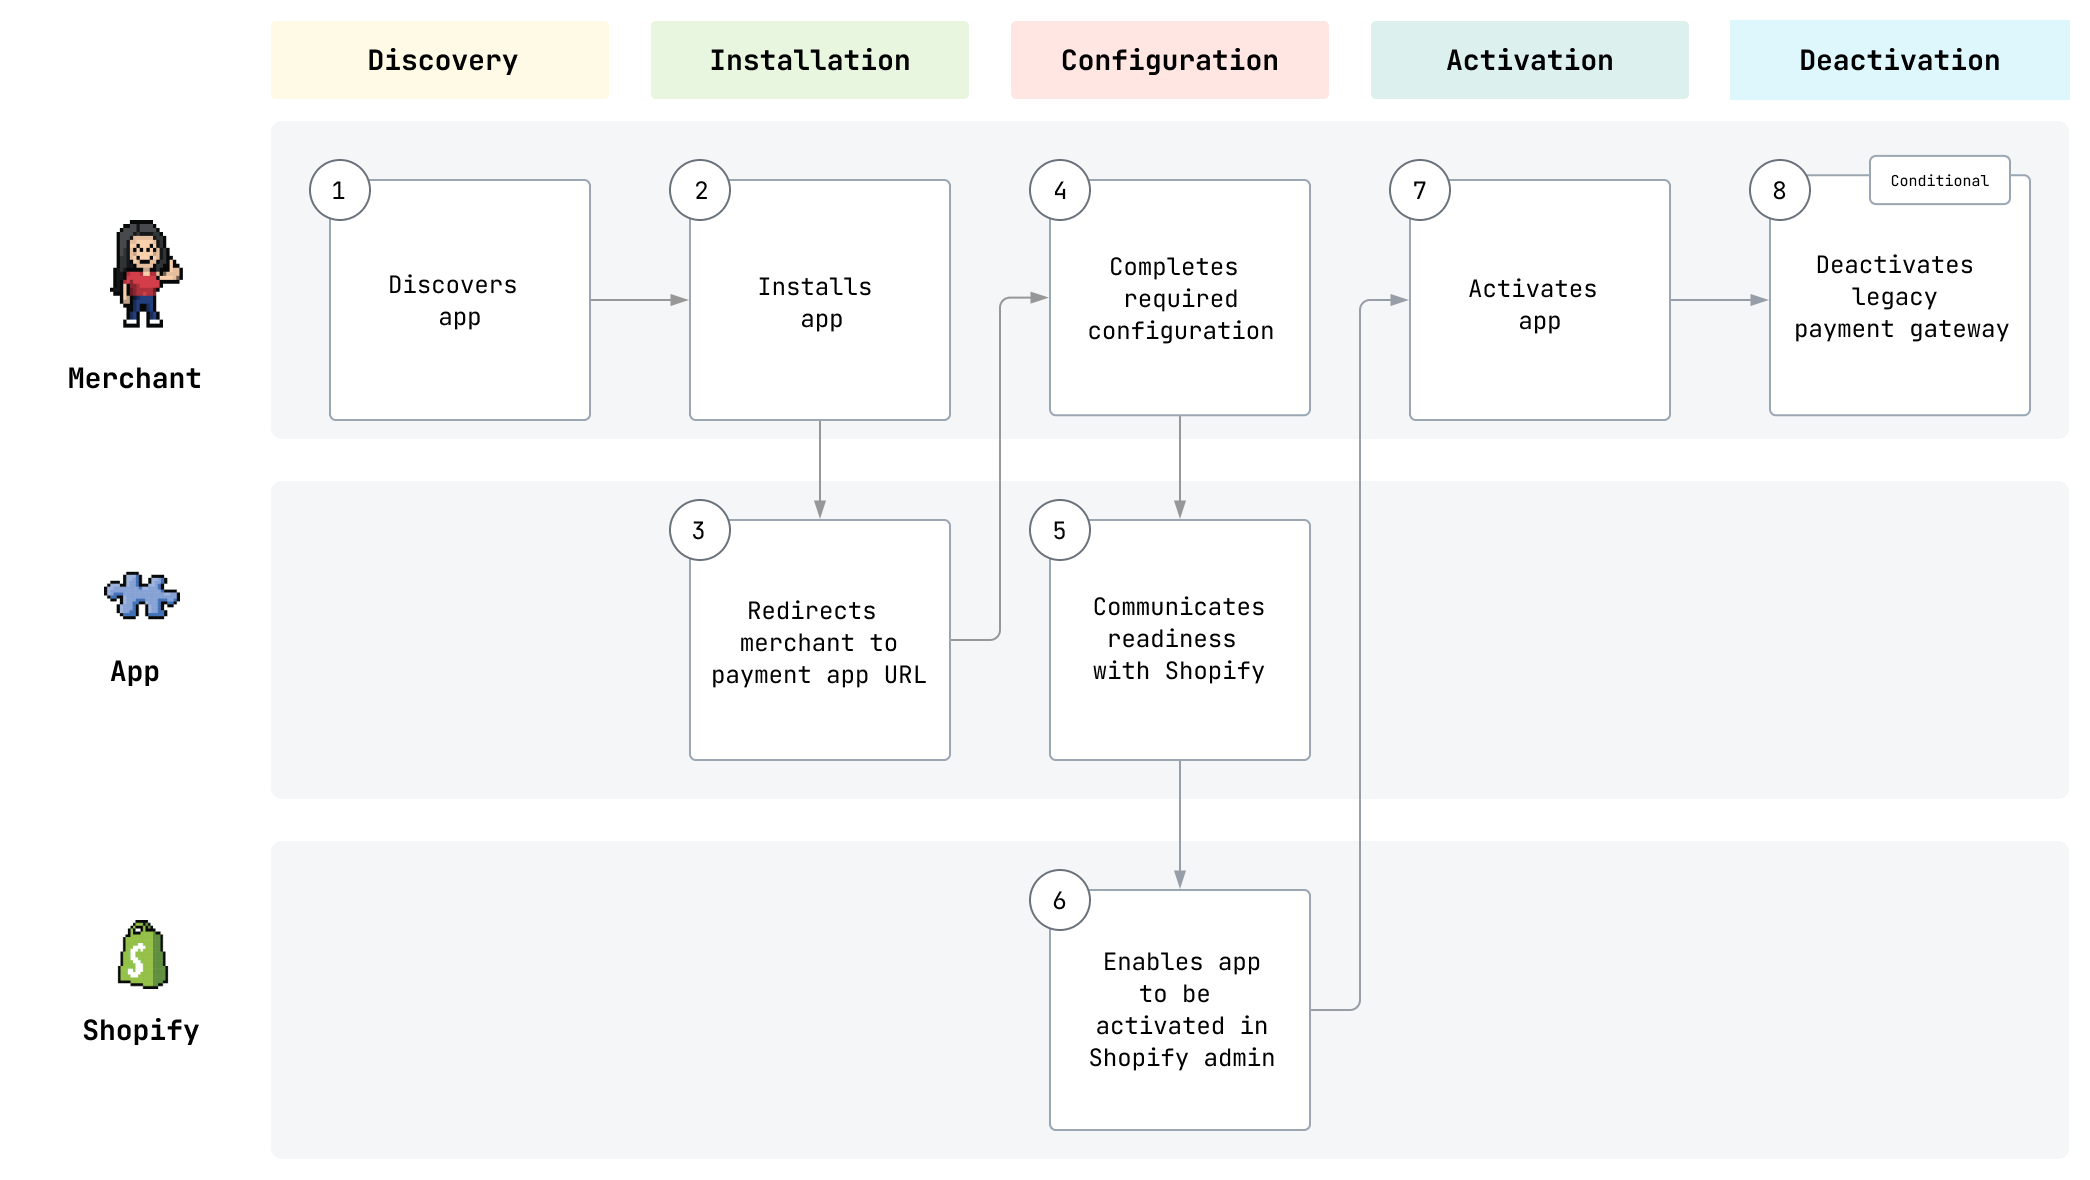
- The payments app is installed by merchants directly through an installation link that's shared by the payments developer, or through Shopify's public list of payment gateways in the Shopify admin.
- The merchant installs the app on the OAuth grant page.
- The merchant is redirected to the payments app page to configure the payments app settings. Until configuration is complete, a banner indicates that the provider isn't ready to process payments.
- The merchant configures the payments app.
- The app marks itself as ready by calling the Shopify API.
- Shopify enables the app to be activated by the merchant in the Shopify admin.
- The merchant activates the app.
- The merchant deactivates the legacy payment gateway to avoid duplicate payment methods during checkout, if applicable.
Anchor to Where you can buildWhere you can build
Payments extensions integrate with Shopify checkout to process payments during the customer's purchase flow.
Anchor to Build optionsBuild options
There are five types of payments extensions:
- Credit card payment extensions: Allows merchants to accept credit card purchases on their checkout. This extension type also support 3D Secure Authentication.
- Credit card with UI extensibility: Allows Partners to define additional fields required for processing credit card payments. Partners can collect information, such as installment details, directly on checkout before a payment is initiated.
- Custom credit card payment extension: Allows Partners to define the specific credit card hosted fields needed to process custom credit cards directly on checkout.
- Alternative payment extensions: Allows Partners to define additional fields required for the processing of alternative payment methods. Partners can collect information directly on checkout and complete payment process with or without redirecting buyers to an app-hosted website.
- Offsite payment extension: Allows merchants to redirect their buyers to an app-hosted website to complete the payment process.
- Redeemables payment extensions: Merchants can accept gift card payments with third-party vendors, natively on their checkout.
The choice between the five types of payment extensions depends on the specific needs and preferences of the merchant and their customers. Some merchants might choose to use multiple types of payment extensions to offer their customers a wider range of payment options.
Anchor to ConsiderationsConsiderations
The following table introduces the key considerations for Partners that are building payments apps.
| Consideration | Description |
|---|---|
| Minimum product requirements | All payments extensions must adhere to technical requirements and provide a high-quality merchant experience. |
| Approval process | To make sure merchants can present a positive buyer experience, payments apps must be approved by Shopify. For more information on requirements for payments apps, refer to Payment extensions requirements. |
| Making your app discoverable | For a payments extension to appear on Shopify's public list of payment gateways, the payments extension must meet certain criteria. After the criteria are met, Payments Partners can apply to Shopify to have their payments extension included in the list of payment gateways in the Shopify admin. Shopify reviews and determines whether the payments extension is approved for public listing. |
| Payments Partner requirements | Payments extensions must adhere to all Payments Partner requirements, including revenue share agreements. |
Anchor to Supported featuresSupported features
Payments extensions support the following payments methods and operations.
Anchor to Supported payment methodsSupported payment methods
Merchants can use payments extensions to accept credit card purchases on their checkout or redirect customers to an app-hosted page for payment processing. The following payment methods are supported:
- Cards
- Buy now pay later, installments, and buyer financing
- Bank transfers and online banking
- Cryptocurrency
- Cash and ATM
- Wallets (refer to Prohibited actions for current limitations)
Anchor to Supported payment operationsSupported payment operations
The payment methods support the following operations:
- Charge: Partners can collect a buyer's payment information and charge them for their purchase.
- Refund: Merchants can trigger a refund from their Shopify admin.
- Authorize: Merchants can place a hold that can be charged at a later time.
- Capture: Merchants can charge the amount previously specified using an authorization.
- Void: Merchants can cancel a previously authorized amount.
Anchor to Developer tools and resourcesDeveloper tools and resources
Explore the following developer tools and resources to learn more about payments extensions.
Anchor to Next stepsNext steps
- Learn about the payments app requirements
- Learn about the payments app review process
- Build a credit card payments extension
- Build a credit card payments extension with UI extensibility
- Build a custom credit card payments extension
- Build an alternative payments extension
- Build a redeemables payments extension
- Build an offsite payments extension