Build a redeemables payment extension
Processing a payment with a redeemables payments extension is currently in an invite-only closed beta.
Processing a payment with a redeemables payments extension is currently in an invite-only closed beta.
This payment method is only available to be installed by Shopify Plus plans.
This payment method is only available to be installed by Shopify Plus plans.
Redeemables payments extension enable merchants to integrate their external gift card provider as a payment method at checkout. Your payment extension enables customers to apply gift cards directly on the checkout page, without having to redirect them to an offsite page.
Your payments extension will provide a Checkout UI extension and Balance Request endpoint to enable Shopify to check the balance of gift cards during checkout.
Anchor to Step 1: Scaffold an appStep 1: Scaffold an app
Most of the steps outlined in this document serve as an extension of the offsite payments extension tutorial.
Most of the steps outlined in this document serve as an extension of the offsite payments extension tutorial.
To build a redeemables payments extension you will need to create a new app, with a redeemables payments extension and checkout UI extension correctly applied.
Create your new app using the Shopify CLI.
Ensure you have the latest version of Shopify CLI installed to access all payment extension features.
Ensure you have the latest version of Shopify CLI installed to access all payment extension features.
Anchor to Step 2: Create a checkout UI extensionStep 2: Create a checkout UI extension
After creating your app, generate a checkout UI extension and deploy your app to Shopify. This extension will be used to collect gift card details from buyers directly on checkout.
-
Use the Shopify CLI to scaffold a checkout UI extension for your app.
-
Name your extension
-
Choose to work in TypeScript Preact.
NoteRefer to the sample extension, written in TypeScript Preact, and ensure that you use the target and APIs as demonstrated.
Note:Refer to the sample extension, written in TypeScript Preact, and ensure that you use the target and APIs as demonstrated.
-
After you generate the extension, deploy your app. This enables you to link the checkout UI extension with your payments app extension in the next section.
Anchor to Step 3: Implement the checkout UI extensionStep 3: Implement the checkout UI extension
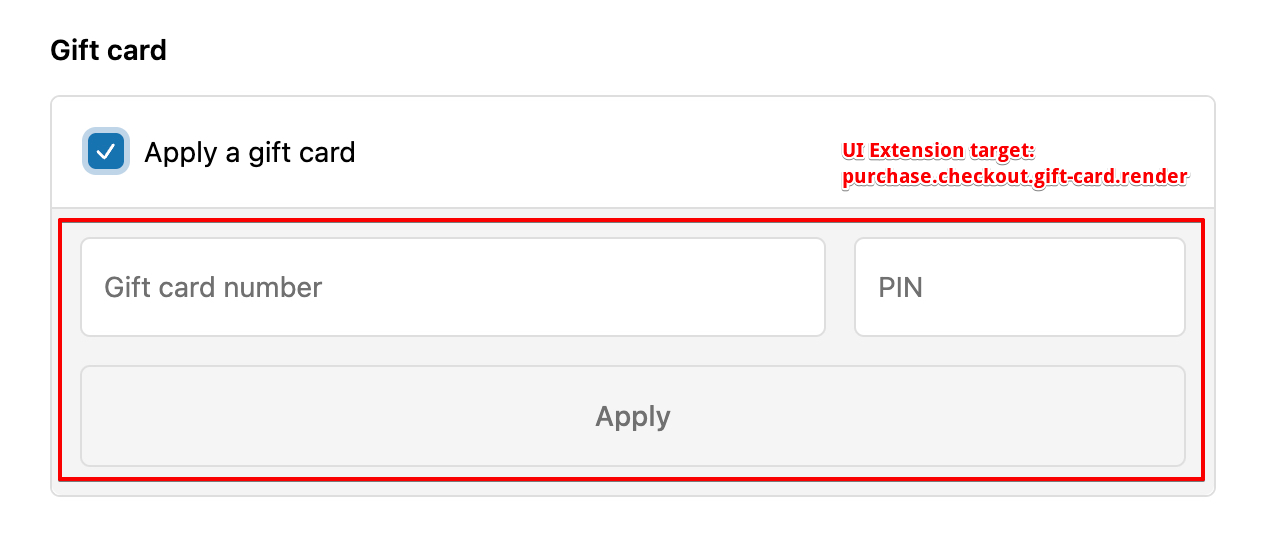
Your UI extension must use the purchase.checkout.gift-card.render target. This ensures that your UI renders in the correct location for gift card payments and has access to the applyRedeemableChange API method to apply a gift card to a checkout.
The purchase.checkout.gift-card.render target can only be used for payments apps that process gift cards. You must specify the target you're rendering to (purchase.checkout.gift-card.render) in the shopify.extension.toml file in your extension directory.
The purchase.checkout.gift-card.render target can only be used for payments apps that process gift cards. You must specify the target you're rendering to (purchase.checkout.gift-card.render) in the shopify.extension.toml file in your extension directory.
applyRedeemableChange is a new API method which can be pulled from the useApplyRedeemableChange hook on @shopify/ui-extensions/checkout/preact.
Anchor to [object Object]applyRedeemableChange
applyRedeemableChangeThis method applies a redeemable (i.e. gift card) to the checkout your extension is rendered on. This method triggers a Fetch Balance request explained later.
The attributes provided to this method should mirror the definitions in the UI Extension Field Definitions configuration on your payments app extension. If the attributes provided don't match your field definitions, the call will fail and an error will be returned.
Example applyRedeemableChange payload:
Example applyRedeemableChange usage:
Anchor to SuccessSuccess
When applyRedeemableChange successfully completes, the following will be returned:
Anchor to ErrorError
A number of errors may rise when applyRedeemableChange is run and fails. The output would look like:
message is human-readable, and can be any of:
- Could not apply redeemable
- Access denied: the extension does not have the required approval scopes
- Invalid RedeemableChange type
- Could not apply redeemable change: the buyer journey is completed
These messages are for debugging and should not be displayed to the buyer. Shopify owns displaying errors to buyers within checkout.
Anchor to ExampleExample
Refer to the Sample checkout UI extension for an example implementation of what your gift card form will look like.
Anchor to Things to considerThings to consider
While implementing the UI extension you may want to consider the following:
- Localization: The labels and visible text displayed to the buyer should be localized. We provide the useTranslate hook through the StandardAPI for this purpose.
- Field validation: Before making the
applyRedeemableChangerequest, it is advisable to validate the gift card input fields. To present field validation messages, you can utilize the error property provided by the text field component. - Loading, Error, and Success states: When the buyer submits a gift card, your UI extension needs to handle loading, error, and success states. To accomplish this:
- Loading state: Display a loading spinner in the "Apply" button while the request is pending. To achieve this, you can use the spinner component.
- Success state: Reset the form fields to their initial state after successfully applying the gift card to the checkout.
- Error state: Do not reset the form fields in case of an error. Instead, you may want to indicate which fields need to be corrected by utilizing field validation errors.
- Responsive UI: Use CSS media queries and responsive design techniques to make your UI extension responsive to different viewport sizes, focus states, and hover states.
Anchor to Step 4: Create a payments extensionStep 4: Create a payments extension
Anchor to Generate the extensionGenerate the extension
Your Shopify app becomes a payments app after you've created and configured your payments extension.
Redeemables describes a payment method that can be redeemed. Examples are gift cards, store credit, etc.
Shopify will need to enable the beta for your Shopify Partners account to see the redeemables payments extension. Shopify will also need to enable a beta for the shop you intend to test your payment method on.
Shopify will need to enable the beta for your Shopify Partners account to see the redeemables payments extension. Shopify will also need to enable a beta for the shop you intend to test your payment method on.
- Run the following command to start generating your payment extension:
pnpm
shopify app generate extension - When prompted, choose your organization & create this as a new app
- When prompted for "Type of extension", select Payments extensions > Redeemable and name your extension
Anchor to Step 5: Configure your payments extensionStep 5: Configure your payments extension
Configuration of a redeemables payments extension is similar to a Offsite payments extension.
Your payments extension configures the following fields:
| Property name | Description |
|---|---|
payment_session_url required | The URL that receives payment and order details from the checkout. |
refund_session_url required | The URL that refund session requests are sent to. |
capture_session_url optional | The URL that capture session requests are sent to. This is only used if your payments app supports merchant manual capture. |
void_session_url optional | The URL that void session requests are sent to. This is only used if your payments app supports merchant manual capture or void payments. |
supported_countries required | The countries where your payments app is available. Refer to the list of ISO 3166 (alpha-2) country codes where your app is available for installation by merchants. Ensure the countries match the geographic requirements in your app listing when submitting your app for review. |
supported_payment_methods required | The payment methods (for example, Visa) that are available with your payments app. Learn more. |
merchant_label optional | The name for your payment provider extension. This name is displayed to merchants in the Shopify admin when they search for payment methods to add to their store. Limited to 50 characters. |
buyer_label optional | The name of the method. Your checkout name can be the same as your merchant admin name or it can be customized for customers. This name is displayed with the payment methods that you support in the customer checkout. After a checkout name has been set, translations should be provided for localization. |
test_mode_available required | Enables merchants using your payments app to test their setup by simulating transactions. To test your app on a dev store, your payment provider in the Shopify admin must be set to test mode. |
api_version required | The Payments Apps GraphQL API version used by the payment provider app to receive requests from Shopify. You must use the same API version for sending GraphQL requests. You can't use the unstable version of the API in production. API versions are updated in accordance with Shopify's general API versioning timelines. |
multiple_capture optional | Enables merchants using your payment provider app to partially capture an authorized payment multiple times up to the full authorization amount. This is used only if your payments app supports merchant manual capture. |
balance_url required | The URL that balance requests are sent to. |
ui_extension_handle required | The UI extension that renders your payments app in checkout. This value can only be a UI extension linked to this specific payments app. |
checkout_payment_method_fields required | The fields your payments app will accept from buyers in checkout (for example, installment details, payment plan). Each field is composed of a key name, and a data type. The data type defines the input that a buyer can provide. |
The balance_url, ui_extension_handle, and checkout_payment_method_fields are new app extension configurations, specifically for payments apps that process gift cards. You'll want to select the UI extension you created in Create a Checkout UI Extension as the value for the ui_extension_handle field.
The balance_url, ui_extension_handle, and checkout_payment_method_fields are new app extension configurations, specifically for payments apps that process gift cards. You'll want to select the UI extension you created in Create a Checkout UI Extension as the value for the ui_extension_handle field.
The UI extension generated in Create a checkout UI extension will determine what fields, validation, and form submission behavior is presented to buyers during checkout.
Anchor to UI ExtensionUI Extension
This is where you would identify the checkout extension you built prior to creating your payment extension to tie them into one another.
| Property name | Description |
|---|---|
ui_extension_handle required | The UI extension that renders your payments app in checkout. This value can only be a UI extension linked to this specific payments app. |
Anchor to UI Extension Field DefinitionsUI Extension Field Definitions
The fields you are looking to accept from your UI extensions so the payment method can validate the correct data is sent from the front end.
| Property name | Description |
|---|---|
checkout_payment_method_fields required | The fields your payments app will accept from buyers in checkout (for example, installment details, payment plan). Each field is composed of a key name, and a data type. The data type defines the input that a buyer can provide. |
Example UI extension field definitions
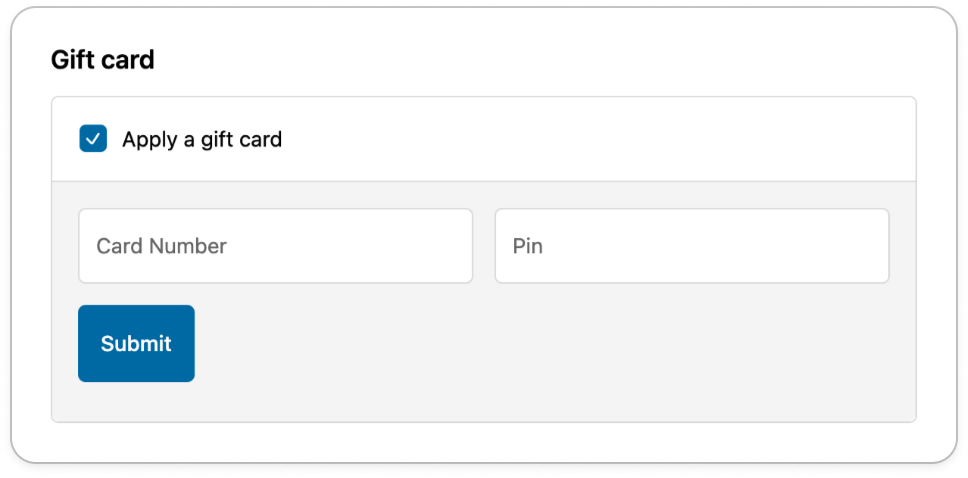
The example field definitions configure a checkout form that appears as follows:
Anchor to Step 6: Set up your payments appStep 6: Set up your payments app
Anchor to Update your app configurationUpdate your app configuration
Shopify apps are embedded by default, but payments apps are an exception to this, because they don't need to render anything in Shopify admin. In shopify.app.toml, update the embedded and set it to false.
The write_payment_gateways and write_payment_sessions scopes are automatically granted through the payment extension. Omit them from your shopify.app.toml file on initial deployment. In later deployments, you can add these scopes to request merchant permission for your payment extension.
Anchor to Step 7: Deploy your extensionStep 7: Deploy your extension
Create and release an app version with the deploy command.
-
Navigate to your app directory.
-
Run the following command. You can optionally provide a name or message for the version using the
--versionand--messageflags.Terminal
shopify app deployAn app version created using Shopify CLI contains the following:
-
The app configuration from the local configuration file.
-
The local version of the app's extensions. If you have an extension in your deployed app, but the extension code doesn't exist locally, then the extension isn't included in your app version.
Releasing an app version replaces the current active version that's served to stores with your app installed. It might take several minutes for app users to be upgraded to the new version.
If you want to create a version, but want to avoid releasing it to users, then run the deploy command with a --no-release flag.
You can release the unreleased app version using Shopify CLI's release command, or through the Dev Dashboard.
If you want to create a version, but want to avoid releasing it to users, then run the deploy command with a --no-release flag.
You can release the unreleased app version using Shopify CLI's release command, or through the Dev Dashboard.
Anchor to Step 8: Start your development serverStep 8: Start your development server
-
Start
app devif it's not already running:Terminal
shopify app devIn your terminal, select your dev store. You can use the generated URL to test your payments app by using it in your payments app configuration. If you want a consistent tunnel URL, then you can use the
--tunnel-urlflag with your own tunnel when starting your server. -
Press
pto open the app in your browser. This brings you to your development store's admin.
Anchor to Step 9: Test your payments app with a storeStep 9: Test your payments app with a store
Once this version has been released, follow these steps to install your app on your dev store:
You need to set your app as ready to process payments by calling the paymentsAppConfigure mutation.
POST https://{shop_domain}/payments_apps/api/{api_version}/graphql.json
Mutation
There are two required arguments that you need to provide in the mutation:
externalHandle: A account name or identifier associated with the account that the merchant has used with the Partner.ready: A signal that the provider is ready to process payments. Accepted values aretrueorfalse.true: Allows your app to process payments.false: Indicates your app isn't yet able to process payments.
If you set ready: false after the app is installed and activated on the store, the request will fail.
If you set ready: false after the app is installed and activated on the store, the request will fail.
After calling the mutation, you must configure your app to redirect back to the Shopify admin using the following URL:
-
Enable test mode on Shopify admin.
-
Click Activate.
Anchor to Implement the payments appImplement the payments app
Payments apps for gift cards are implemented very similarly to the existing offsite payments apps. The key difference is that, for gift cards, payments apps have an operation that occurs prior to a checkout completing - fetching the balance of a gift card.
Anchor to Step 1: Fetch BalanceStep 1: Fetch Balance
The first step in a gift card payment is to retrieve the balance, so that it can be applied to a checkout. In order to do so, we require that you set up a Balance URL in the payments app extension. Shopify will make a request to that URL to retrieve the balance of a gift card during checkout. If the request fails or times out, it's retried several times.
Example request payload:
Anchor to Request bodyRequest body
| Attribute | Description | Type |
|---|---|---|
id |
Globally unique identifier for the fetch balance attempt. Used as the idempotency key. Ensures that repeated requests with the same ID are treated the same, preventing duplicate fetch balance sessions. | String |
currency |
Three-letter ISO 4217 currency code. For example USD or CAD. |
String |
test |
Indicates whether the payment is in test or live mode. | Boolean |
merchant_locale | IETF BCP 47 language tag representing the language used by the merchant. For example, en-US or fr-FR. | String |
payment_method |
Indicates the type and data relevant for the chosen payment method. Refer to payment_method hash for more information. | Hash |
Anchor to [object Object], hashpayment_method hash
payment_method hash| Attribute | Description | Type |
|---|---|---|
type |
Indicates the type of payment method. Currently only "redeemable" is supported. |
String |
data |
Contains data relevant for the chosen payment method. Refer to payment_method.data hash for more information. | Hash |
Anchor to [object Object], hashpayment_method.data hash
payment_method.data hash| Attribute | Description | Type |
|---|---|---|
attributes |
Contains the gift card details associated with the buyer. For example, card_number and pin. These fields are defined by the UI Extension Field Definitions configuration in your payments extension. |
String |
Anchor to SuccessSuccess
If the balance can be successfully fetched, send a HTTP 2xx response to the above request with a JSON body in the following format, including the balance:
The provided value for currency can be any ISO 4217 currency code (i.e. USD, CAD).
Anchor to FailureFailure
In the event a balance fetch fails, there are a number of predefined codes you can respond with to surface an error to buyers.
| Error Code | Description |
|---|---|
| REDEEMABLE_INVALID | The redeemable's parameters are invalid. This is a generic error response. |
| REDEEMABLE_INSUFFICIENT_BALANCE | The redeemable has insufficient balance. |
| REDEEMABLE_EXPIRED | The redeemable has expired. |
| REDEEMABLE_DISABLED | The redeemable was disabled. |
Example failure response (HTTP 2xx):
Anchor to Fetch balance sequence diagramFetch balance sequence diagram
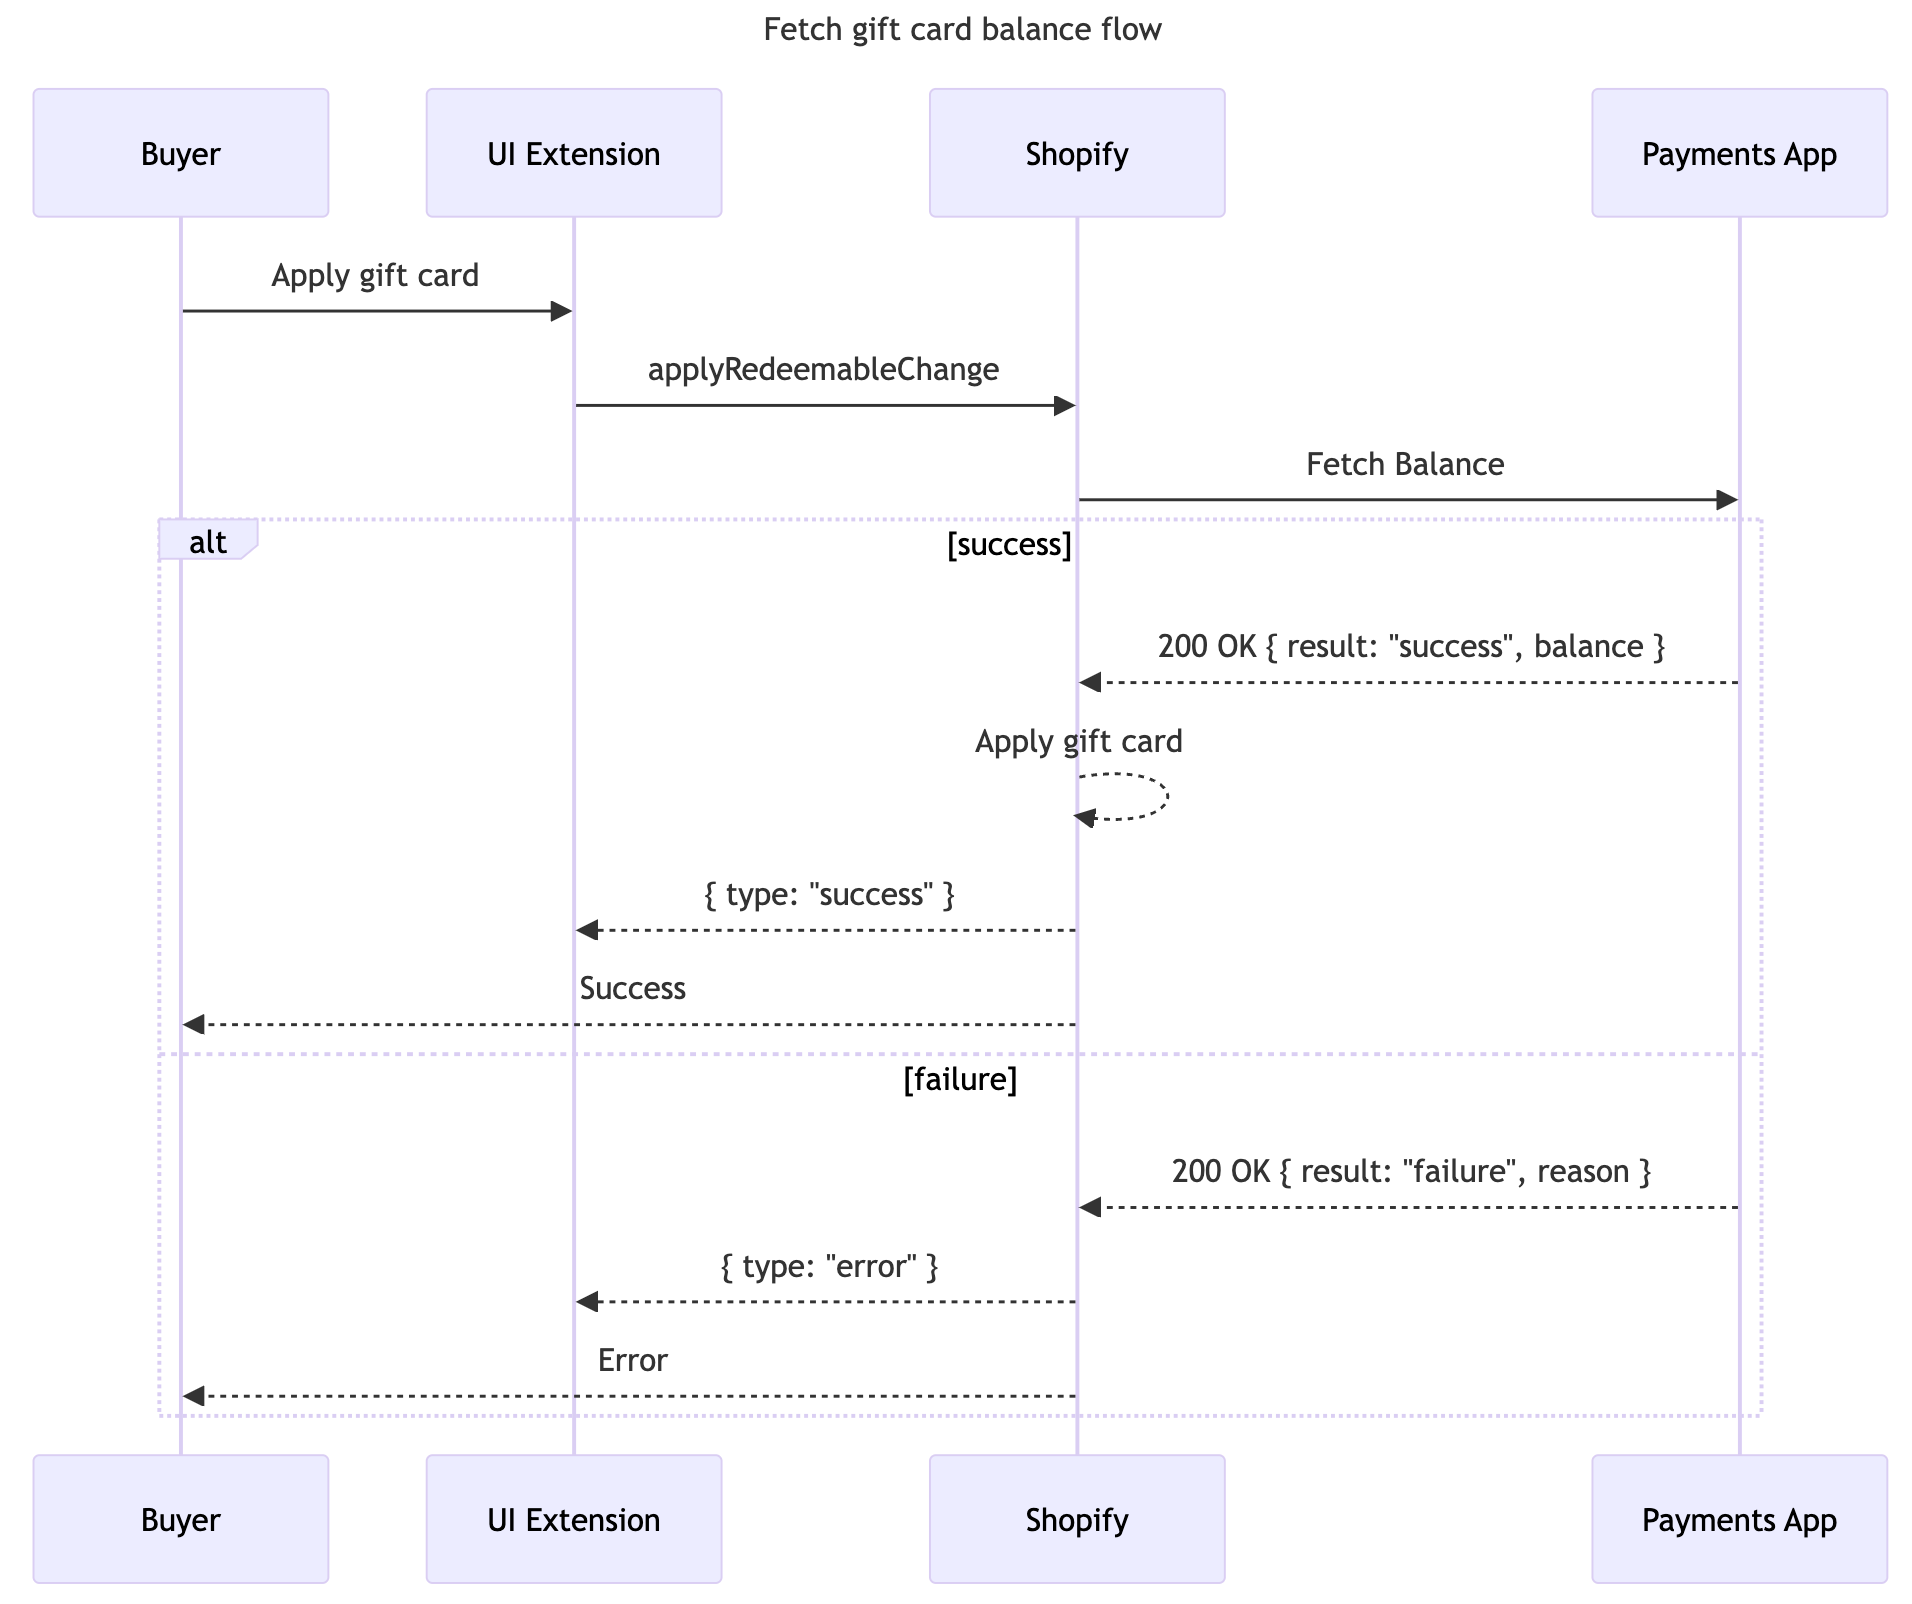
- The buyer enters their gift card details into the UI Extension.
- The UI extension, with the gift card details, calls
applyRedeemableChange, available through @shopify/ui-extensions/checkout/preact. - Shopify will call the payments app's endpoint located at their configured Balance URL, with a request to fetch the balance of the provided gift card. If this request times out or fails, it's retried several times.
- The payments app returns the balance for the gift card.
- Shopify applies the gift card to the buyer's checkout.
- The buyer is shown that the gift card has been applied to their checkout.
Anchor to Step 2: Process PaymentStep 2: Process Payment
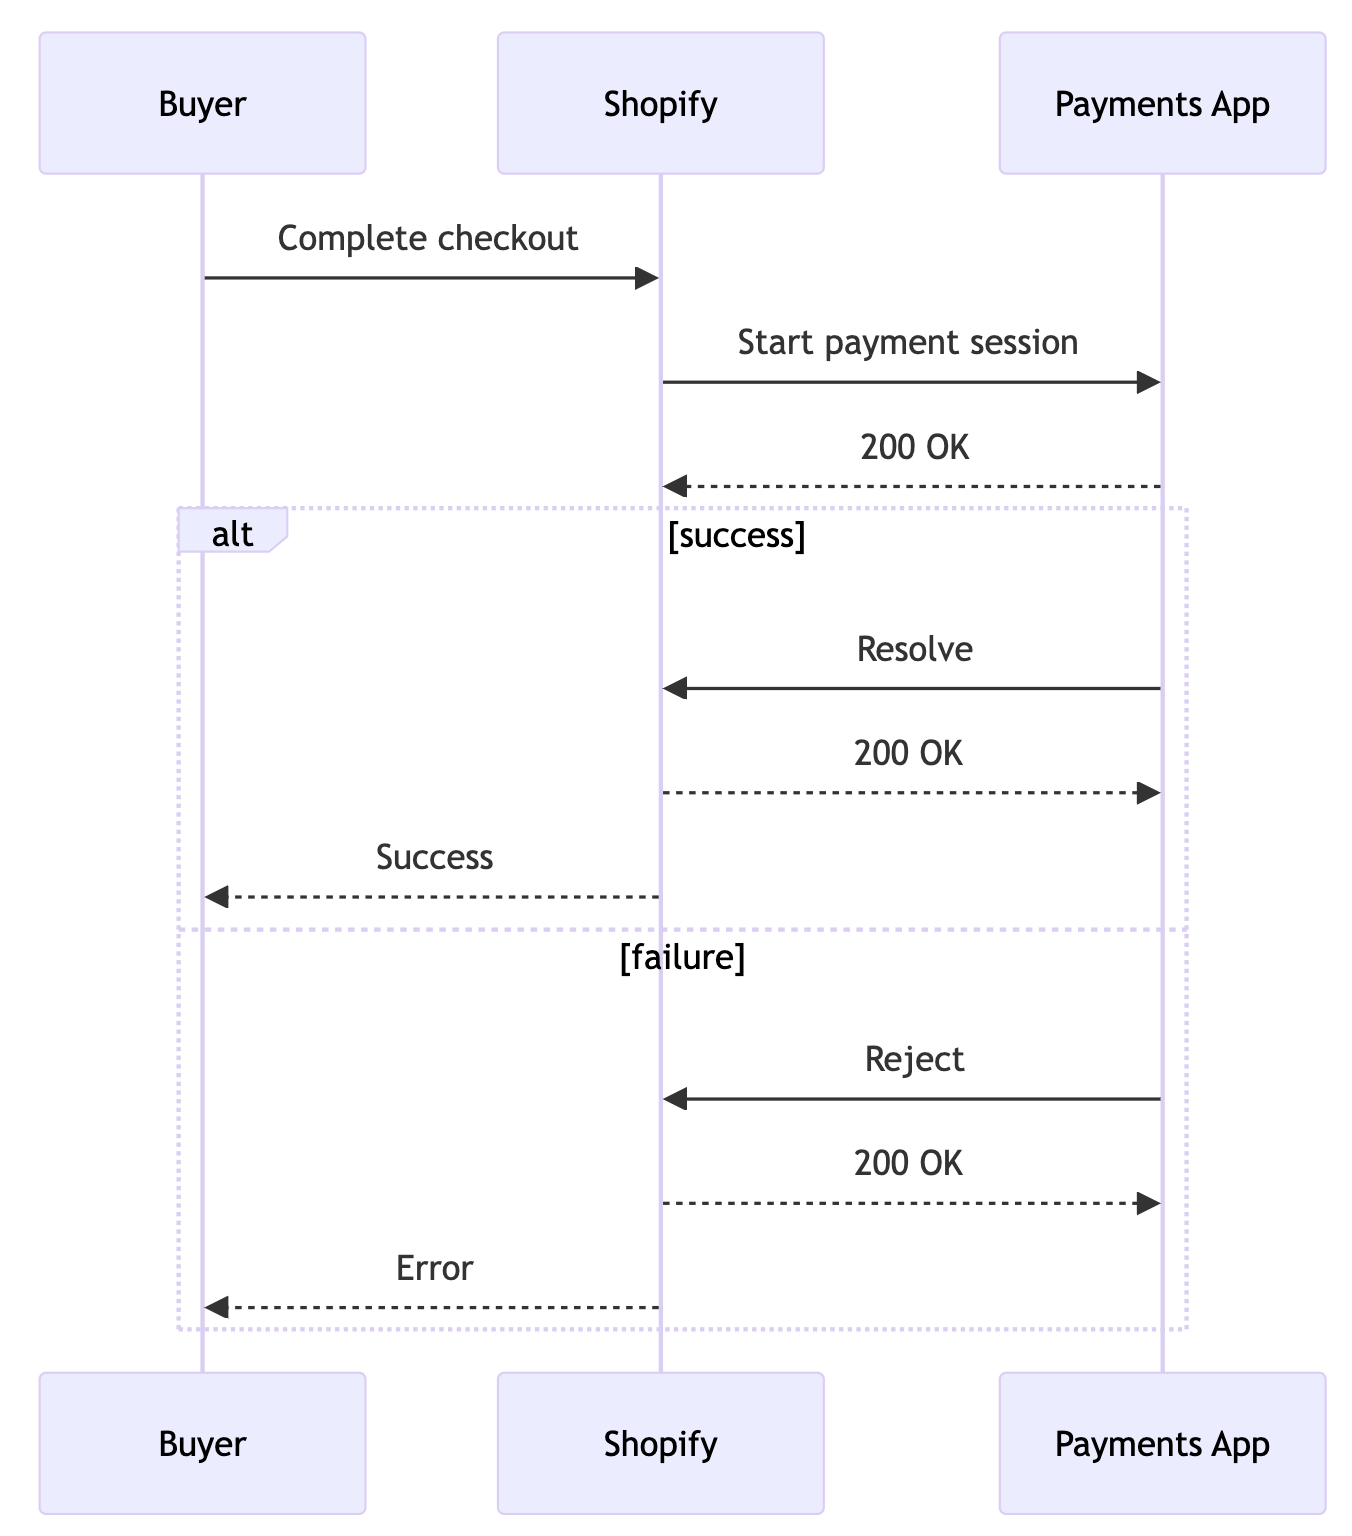
Payments with payments apps are processed asynchronously. When the buyer completes their checkout, a request will be sent from Shopify to the Payment session URL defined in Configure your payments app extension, with the checkout and payment details. The Payments app should respond with HTTP 2xx to indicate that the payment session was started, and should begin processing the gift card payment at this point.
Example request body:
Details on each attribute can be found here.
The payment method data object in the payment session request body is defined by the aforementioned UI Extension Field Definitions configuration in your app extension, just like for Fetch Balance.
If the request fails, then it's retried several times. If the request still fails, then the customer needs to retry their payment through Shopify checkout.
If there's an error on the payments app's side, then don't respond with an HTTP 2xx. Use an appropriate error status code instead.
Anchor to ResolveResolve
Once the payments app has responded to the initial start payment session request, it should begin processing the payment. Since this is an asynchronous process, the payments app will be performing the next step independently, through the paymentSessionResolve mutation on the Payments Apps GraphQL API. This mutation will resolve the payment session, indicating that the payment was successful.
Example GraphQL mutation:
With this input:
Example JSON response:
After this, the payment will be marked as resolved in Shopify.
Anchor to RejectReject
If a payment was unsuccessful for any reason, the payments app must use the paymentSessionReject mutation.
Example GraphQL mutation:
With this input:
Example JSON response:
Anchor to ErrorError
There are some defined errors that you can reject a paymentSession with.
| Error Code | Description |
|---|---|
| PROCESSING_ERROR | There was an error processing the payment. |
Anchor to Step 3: RefundsStep 3: Refunds
Refunds operate the same as they do with regular payments. Documentation can be found here.
Authorizations, captures, and voids allow merchants to use your payment app to initiate separate transactions to authorization and capture payments. These will operate the same as they do with regular payment apps. More context about authorizations can be found here.
Merchants control whether or not they use "sale or "authorization" payment transactions by changing their Payment capture method payment setting to "Manual" or "Automatically when order is fulfilled".
For details on how to implement and respond to capture and void session requests see:
| Diagram | Documentation | |
|---|---|---|
| Captures | Capture overview | Explore capture sessions |
| Voids | Void overview | Explore void sessions |
Anchor to Sample Checkout UI ExtensionSample Checkout UI Extension
Update to the latest version of checkout UI extensions so you can use web components. The legacy checkout-ui-extensions-react package is no longer required.
Update to the latest version of checkout UI extensions so you can use web components. The legacy checkout-ui-extensions-react package is no longer required.
The following example demonstrates a checkout UI extension for a redeemable payments app. It uses hooks, such as useApplyRedeemableChange from the Preact-specific package.
extensions/<extension-name>/src/Checkout.jsx
Anchor to Tutorial completeTutorial complete
Congratulations! You set up a redeemable payments extension.