Manage customer accounts with the Storefront API
As of January 2024, the Customer Account API is generally available. It's now the recommended cross-platform method for managing customer data. Learn more about getting started with the Customer Account API.
As of January 2024, the Customer Account API is generally available. It's now the recommended cross-platform method for managing customer data. Learn more about getting started with the Customer Account API.
You can create customers and update customer accounts using the Storefront API.
This guide covers how to create and activate a customer, and generate a customer access token. It also shows you how to accomplish common tasks like associating an address with a customer and recovering a customer's password.
Anchor to RequirementsRequirements
- You've completed the Getting started with the Storefront API guide.
- You're familiar with querying products and collections.
Anchor to Step 1: Create a customerStep 1: Create a customer
You create a customer using the customerCreate mutation. You can use this mutation to create a sign-up form on your storefront that, when completed, provides the customer with an account on the Shopify store.
If the mutation is successful, then a welcome email is sent to the customer with the information that their account has been activated.
POST https://{shop}.myshopify.com/api/{api_version}/graphql.json
GraphQL mutation
Variables
JSON response
Anchor to Step 2: Activate a customerStep 2: Activate a customer
If you run the customerCreate mutation on an inactivated customer account, then an account activation email is sent to the customer. The email includes an account activation link to Shopify where the customer can activate their account. You can use the link's activation URL to activate the customer.
If you pass an existing customer to the customerCreate mutation, then the mutation returns the following error:
In this case, the customer account already exists, but it's disabled and needs to be activated.
If your app is a custom storefront, then you can update the merchant's notification templates to link to the area of your app where the customer creates a password. You can append the activation URL to the link as a URL parameter.
When your app has the activation URL, you can activate the customer's account by using either the customerActivate mutation or the customerActivateByUrl mutation.
Anchor to Update the account invite templateUpdate the account invite template
You can update the Customer account invite email template so that it links to wherever in your storefront the customer can enter a new password. Include {{ customer.account_activation_url }} as a URL parameter at the end of the link.
- From the Shopify admin, go to Settings > Notifications.
- In the Customers notifications section, click the Customer account invite email template.
- In the template editor, update the Activate your account link to point to your storefront's account activation page.
Pass the activation URL as a URL parameter by appending ?activation_url={{ customer.account_activation_url }}. For example:
In the email notifications, the Activate your account link is rendered with the customer's unique password reset URL:
Anchor to [object Object], mutationcustomerActivate mutation
customerActivate mutationYou can use the customerActivate mutation to send the customer's new password and an activation token to Shopify. The activation token is included in the account activation URL:
To activate an account without needing to extract the activation token from the URL, use the customerActivateByUrl mutation.
To activate an account without needing to extract the activation token from the URL, use the customerActivateByUrl mutation.
The customerActivate mutation takes the activationToken from the Shopify account activation URL and sends it to Shopify along with the customer's password.
POST https://{shop}.myshopify.com/api/{api_version}/graphql.json
GraphQL mutation
Variables
Anchor to [object Object], mutationcustomerActivateByUrl mutation
customerActivateByUrl mutationYou can use the customerActivateByUrl mutation to send the customer's password and activation URL to Shopify. With this method, you don't need to parse the activation URL to extract the activation token.
POST https://{shop}.myshopify.com/api/{api_version}/graphql.json
GraphQL mutation
Variables
JSON response
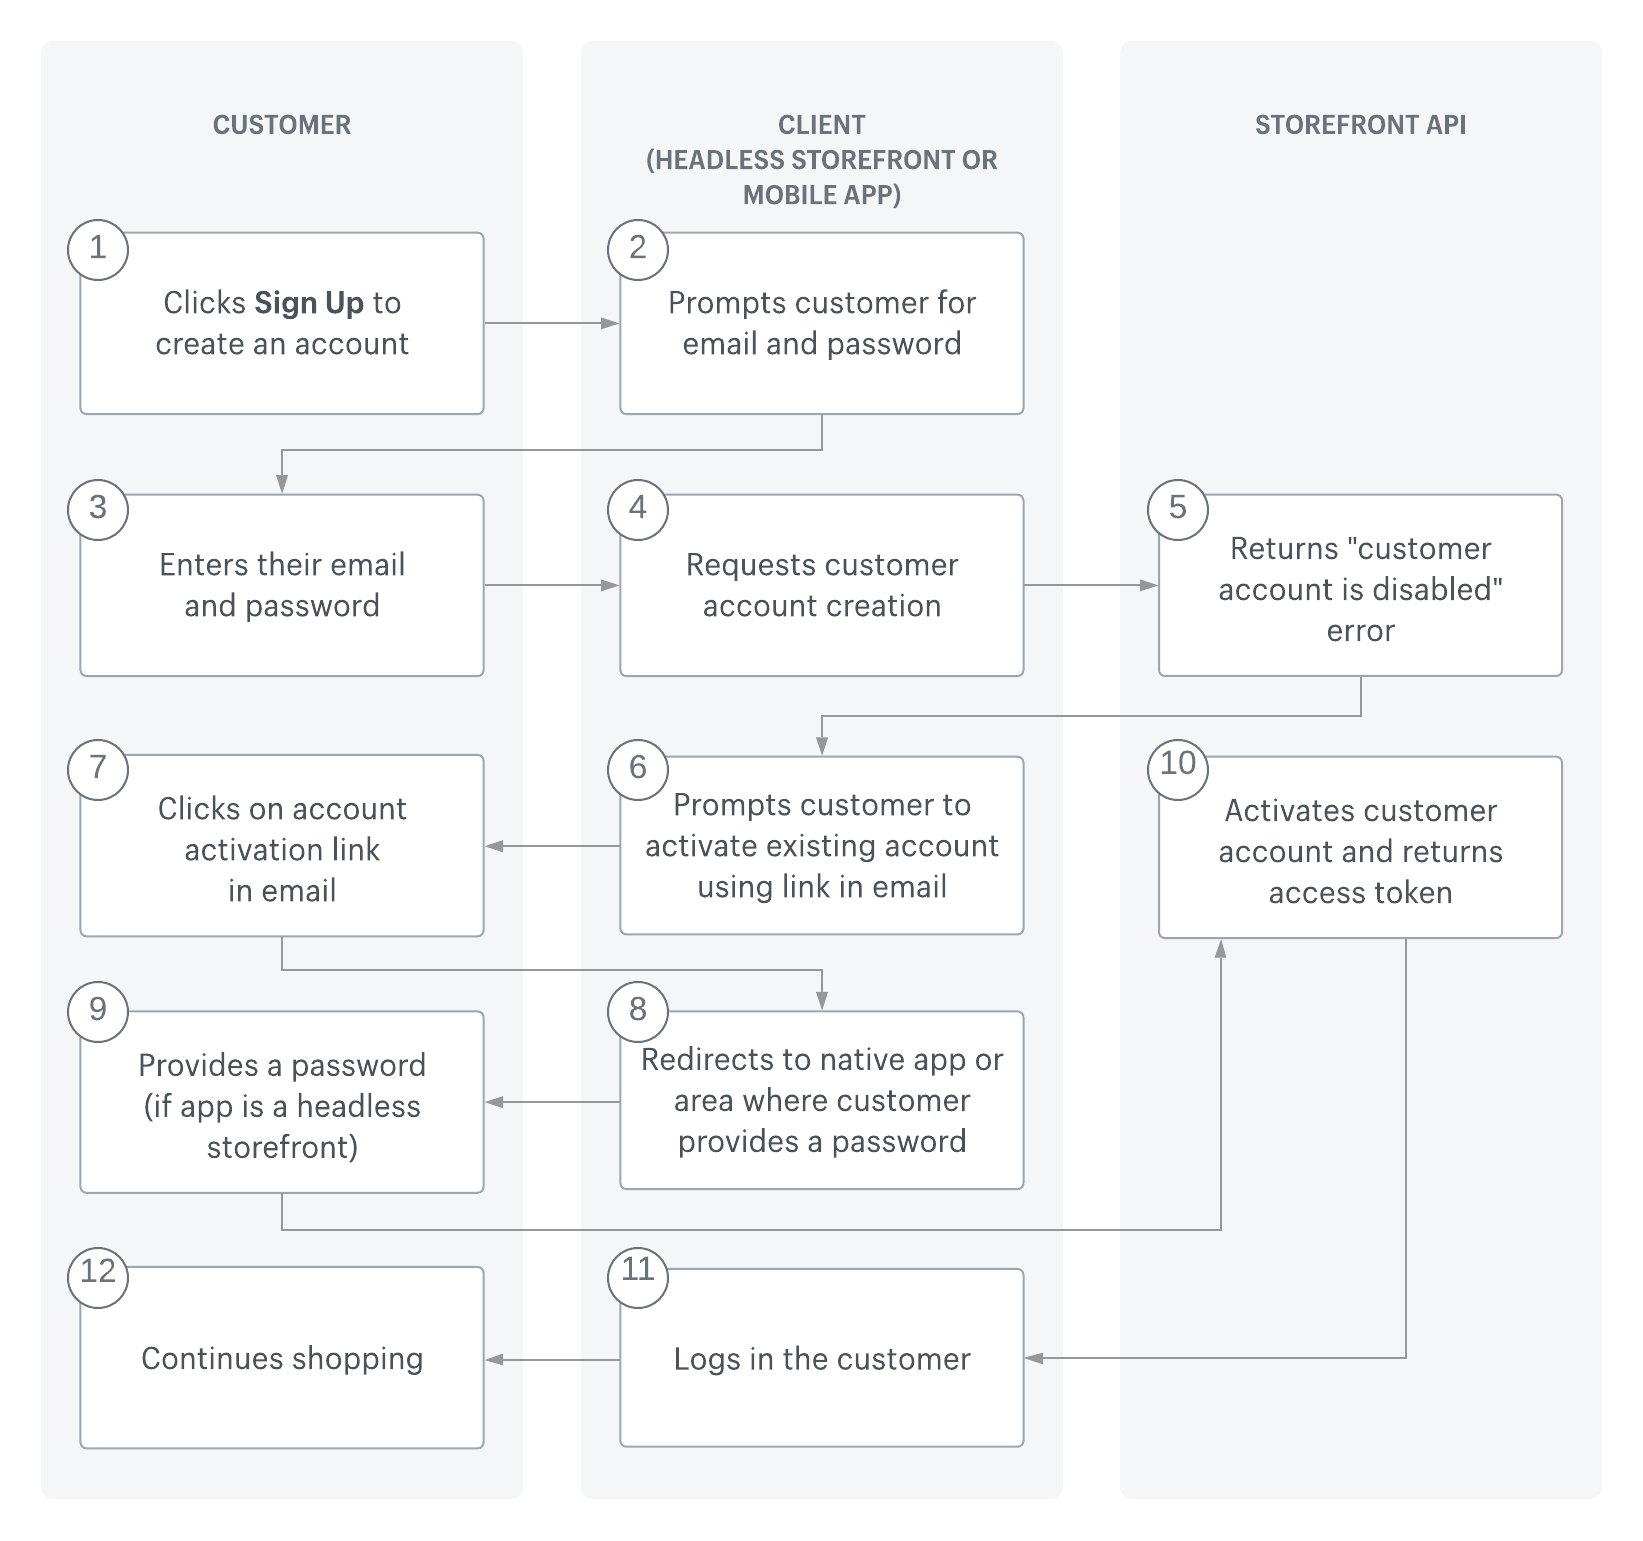
The following diagram shows the customer account activation workflow using the customerActivateByUrl mutation:
Anchor to iOS Universal Linksi
If you're using iOS Universal Links, then the Shopify account activation URL redirects to your native app. The app receives the activation URL as a request parameter.
Anchor to Step 3: Create an access tokenStep 3: Create an access token
After the customer account is created on your store, the customer can log in to their account. To log in a customer, you need to exchange their credentials for a customer access token. With an access token, you can query for customer accounts and perform update actions, such as associating an address with the customer.
To create a customer access token, you can use the customerAccessTokenCreate mutation.
Alternatively, if you have a valid Multipass token for a customer, then you can exchange it for a customer access token by using the customerAccessTokenCreateWithMultipass mutation.
Anchor to [object Object], mutationcustomerAccessTokenCreate mutation
customerAccessTokenCreate mutationYou can use the customerAccessTokenCreate mutation to create a customer access token.
POST https://{shop}.myshopify.com/api/{api_version}/graphql.json
GraphQL mutation
Variables
JSON response
Anchor to [object Object], mutationcustomerAccessTokenCreateWithMultipass mutation
customerAccessTokenCreateWithMultipass mutationWhen you redirect a Multipass customer to a store, the customerAccessTokenCreateWithMultipass mutation lets you generate an access token without the customer needing to provide their credentials.
If the customer doesn't exist in Shopify, then a new customer is created with the Multipass credentials.
The following mutation exchanges a Multipass token for a customer access token:
POST https://{shop}.myshopify.com/api/{api_version}/graphql.json
GraphQL mutation
Variables
JSON response
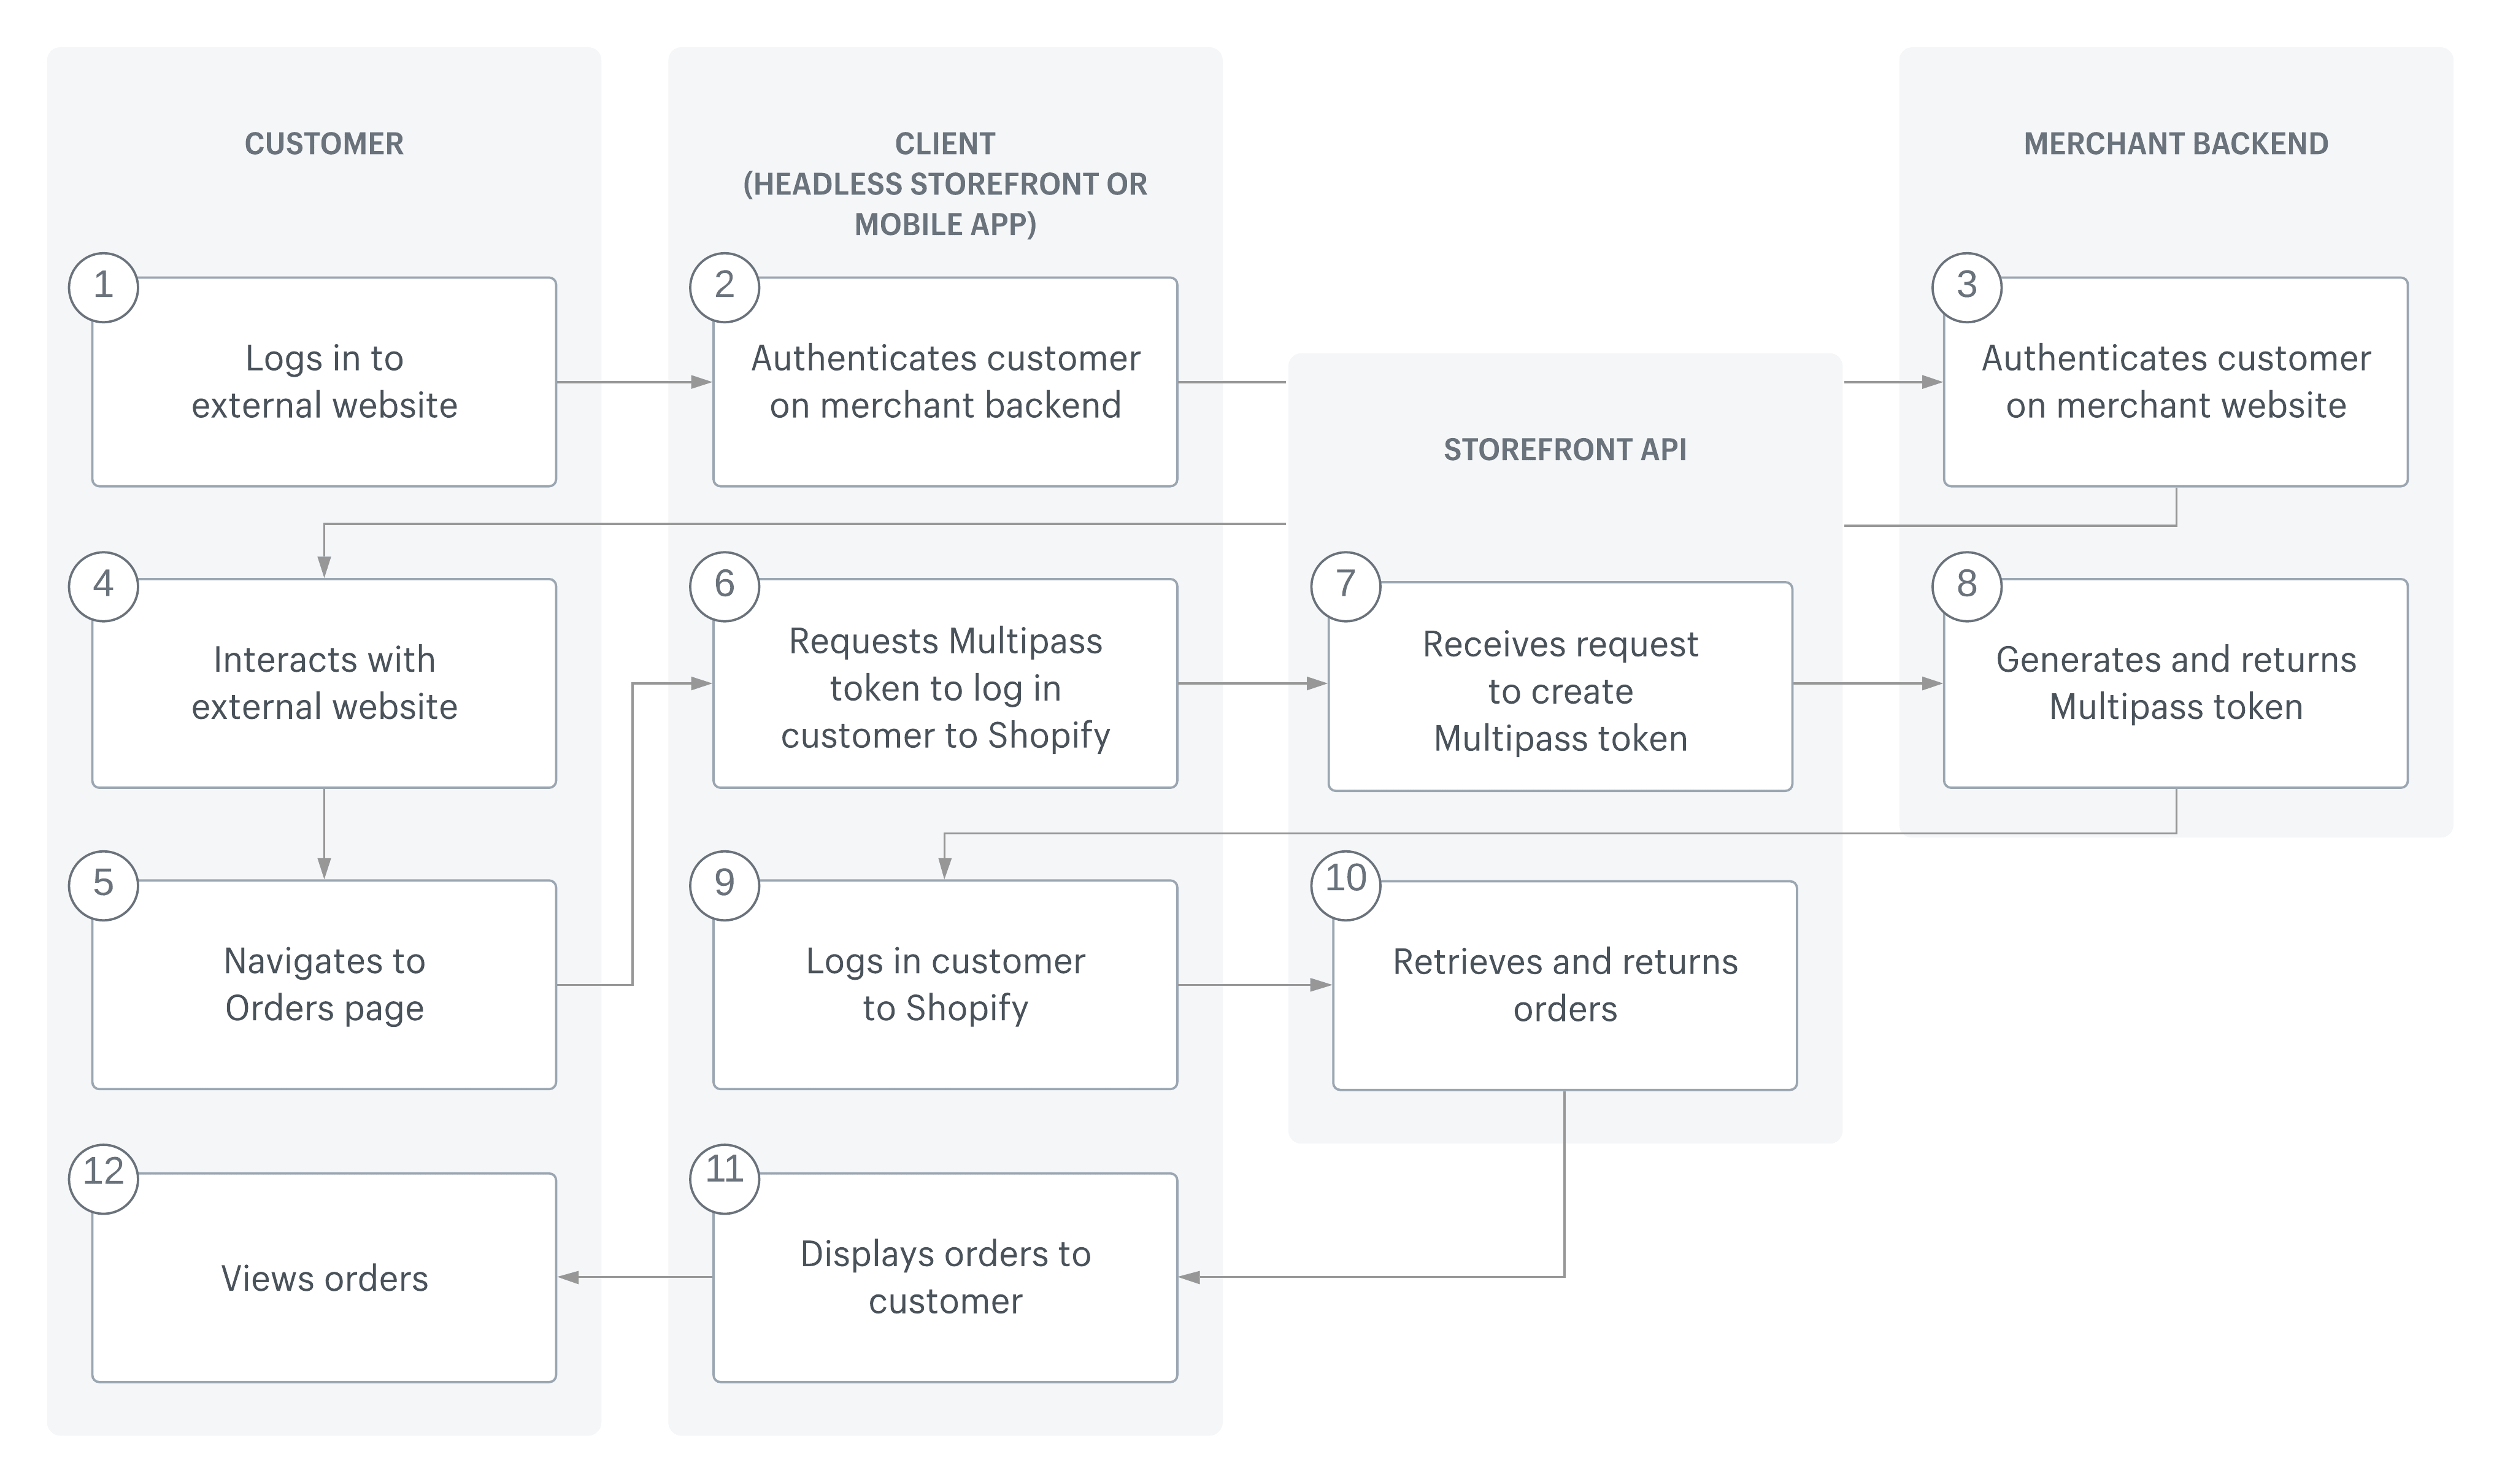
The following diagram shows the workflow for viewing orders using the customerAccessTokenCreateWithMultipass mutation:
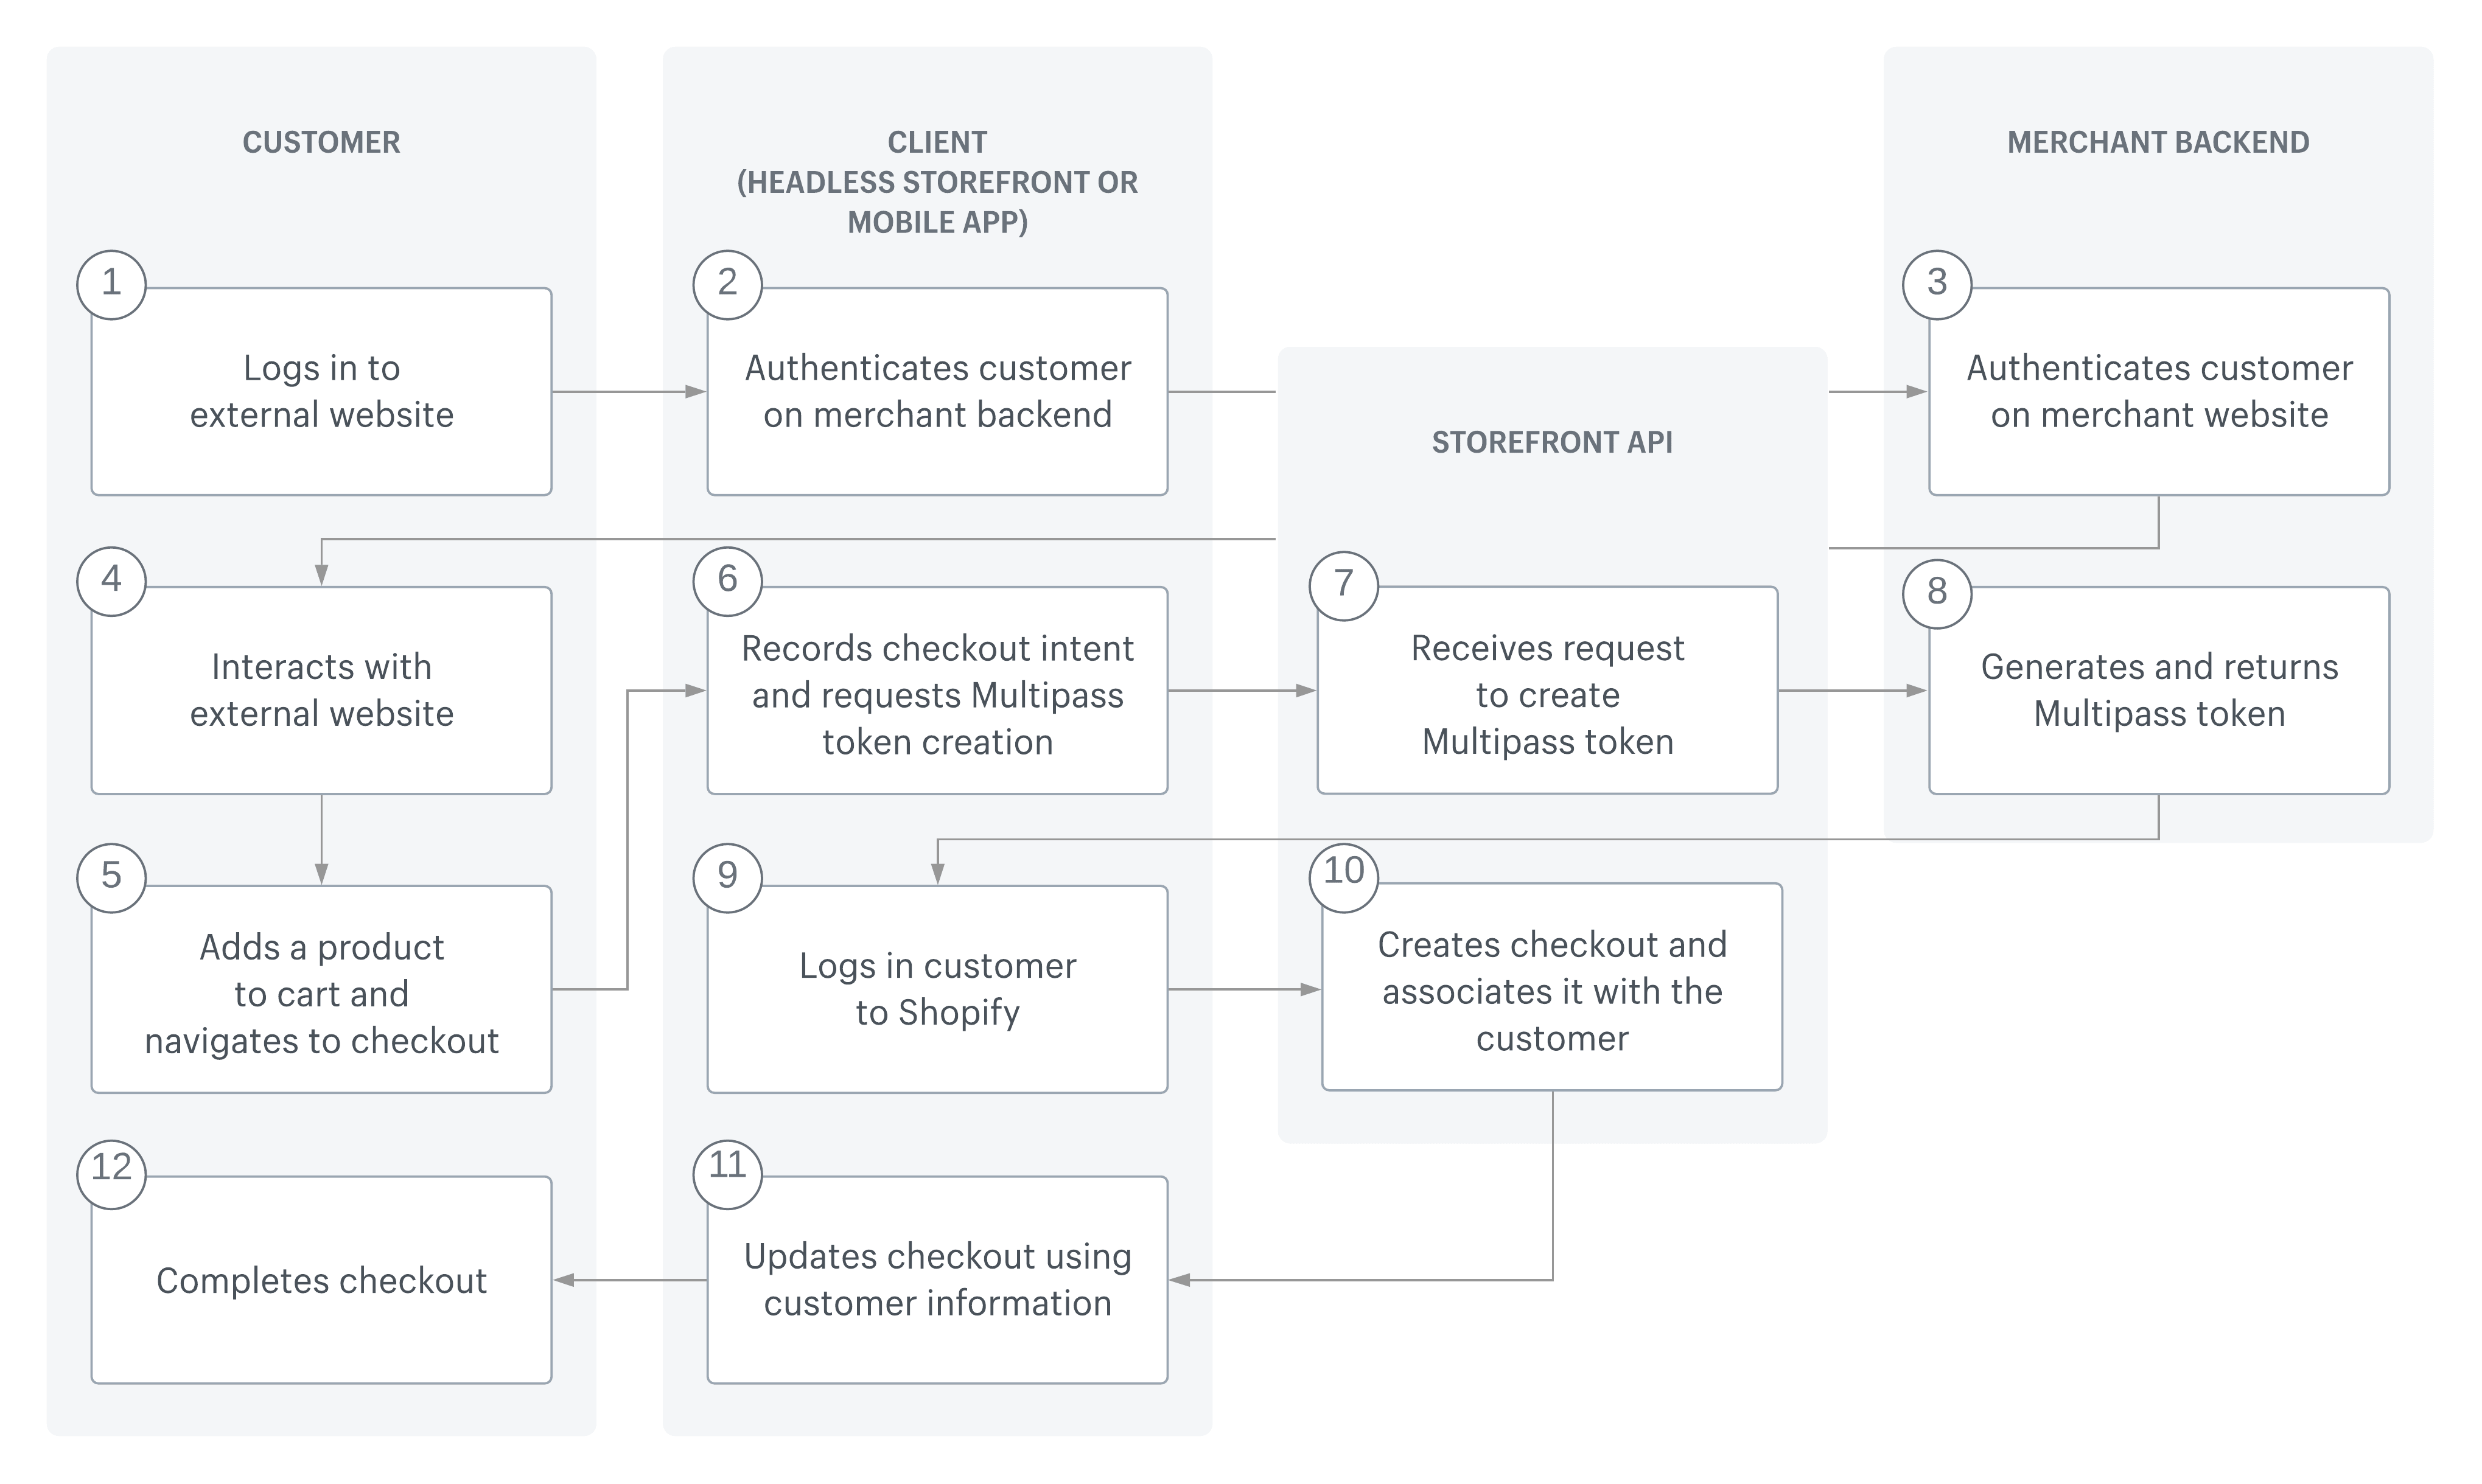
The following diagram shows the checkout workflow using the customerAccessTokenCreateWithMultipass mutation:
Anchor to Step 4: Update an addressStep 4: Update an address
When you have a customer access token, you can use it to associate or update an address for the customer.
The following example shows how to use the customerAddressCreate mutation to create a new address for a customer:
POST https://{shop}.myshopify.com/api/{api_version}/graphql.json
GraphQL mutation
Variables
JSON response
Anchor to Step 5: Recover and reset passwordsStep 5: Recover and reset passwords
You can use the customerRecover mutation to implement a password recovery flow on your custom storefront. The mutation requires the customer's email address and is used to send an email with a link to reset the password.
The following mutation recovers the customer's password. In response to a successful mutation, an email is sent with a reset password link. Clicking the link directs the customer to the Shopify account reset URL.
POST https://{shop}.myshopify.com/api/{api_version}/graphql.json
GraphQL mutation
Variables
Anchor to [object Object], mutationcustomerReset mutation
customerReset mutationIf you're using iOS Universal Links, then the redirect URL for the Shopify account reset redirects to your native app. In this case, you can use the customerReset mutation to send the customer's new password and reset token to Shopify. The reset token is included in the account reset redirect URL.
To update a customer's password without needing the customer's ID, use the customerResetByUrl mutation.
To update a customer's password without needing the customer's ID, use the customerResetByUrl mutation.
The following mutation takes the reset token from the Shopify account reset URL and sends it to Shopify along with the customer's new password:
POST https://{shop}.myshopify.com/api/{api_version}/graphql.json
GraphQL mutation
Variables
JSON response
Anchor to [object Object], mutationcustomerResetByUrl mutation
customerResetByUrl mutationThe customerResetByUrl mutation updates a customer's password by identifying the customer by their unique password-reset URL. This is the URL that's generated by the customer.reset_password_url Liquid variable.
The benefit of using customerResetByUrl over customerReset is that you don't need the customer's ID to identify the customer.
To pass the password-reset URL to your storefront, include customer.reset_password_url in the password reset email template.
Anchor to Update the password reset templateUpdate the password reset template
Update the Customer account password reset email template so that it links to wherever in your storefront the customer can enter a new password. Include {{ customer.reset_password_url }} as a URL parameter at the end of the link.
-
From the Shopify admin, go to Settings > Notifications.
-
In the Customers notifications section, click Customer account password reset email template.
-
In the template editor, update the Reset your password link to point to your storefront's password reset page.
Pass the password reset URL as a URL parameter by appending
?reset_url={{ customer.reset_password_url }}:<td className="button__cell"><a href="https://www.my-app-domain.com/reset/?reset_url={{ customer.reset_password_url }}" className="button__text">Reset your password</a></td>In the email notifications, the Reset your password link is rendered with the customer's unique password reset URL:
<a href="https://www.my-app-domain.com/reset/?reset_url=https://a-merchant-store.myshopify.com/account/reset/2198995959864/e692decd24f9e5c6afe6200cd76b0aa4-1580934624">Reset your password</a>
Anchor to Send a password recovery emailSend a password recovery email
To let a customer enter a new password, use the customerRecover mutation to send a password reset email to them:
Anchor to Use the reset URL to reset the passwordUse the reset URL to reset the password
When a customer clicks the password reset link and is directed to your storefront, get the password reset URL from the request parameters.
Use the customerResetByUrl mutation to reset the customer's password. Pass the password reset URL as the resetUrl argument, and the customer's new password as the password argument.
POST https://{shop}.myshopify.com/api/{api_version}/graphql.json
GraphQL mutation
Variables
JSON response
The Storefront API caches responses by default. Routes that return customer-specific data, such as names, emails, or order history, must explicitly disable caching to avoid serving one customer's personal data to another. Learn how to prevent caching customer-specific data.
The Storefront API caches responses by default. Routes that return customer-specific data, such as names, emails, or order history, must explicitly disable caching to avoid serving one customer's personal data to another. Learn how to prevent caching customer-specific data.
Anchor to Next stepsNext steps
- Retrieve metafields with the Storefront API to access additional information from different types of resources.
- Support multiple languages on a storefront with the Storefront API.
- Learn about the different tools that you can use to create unique buying experiences anywhere your customers are, including websites, apps, and video games.