Merchant onboarding overview
Onboarding is the process of merchants connecting to your channel app to publish products and sell on your marketplace. Merchants onboard, push products, and monitor their onboarding status through the channel app pages that you build in the Shopify admin.
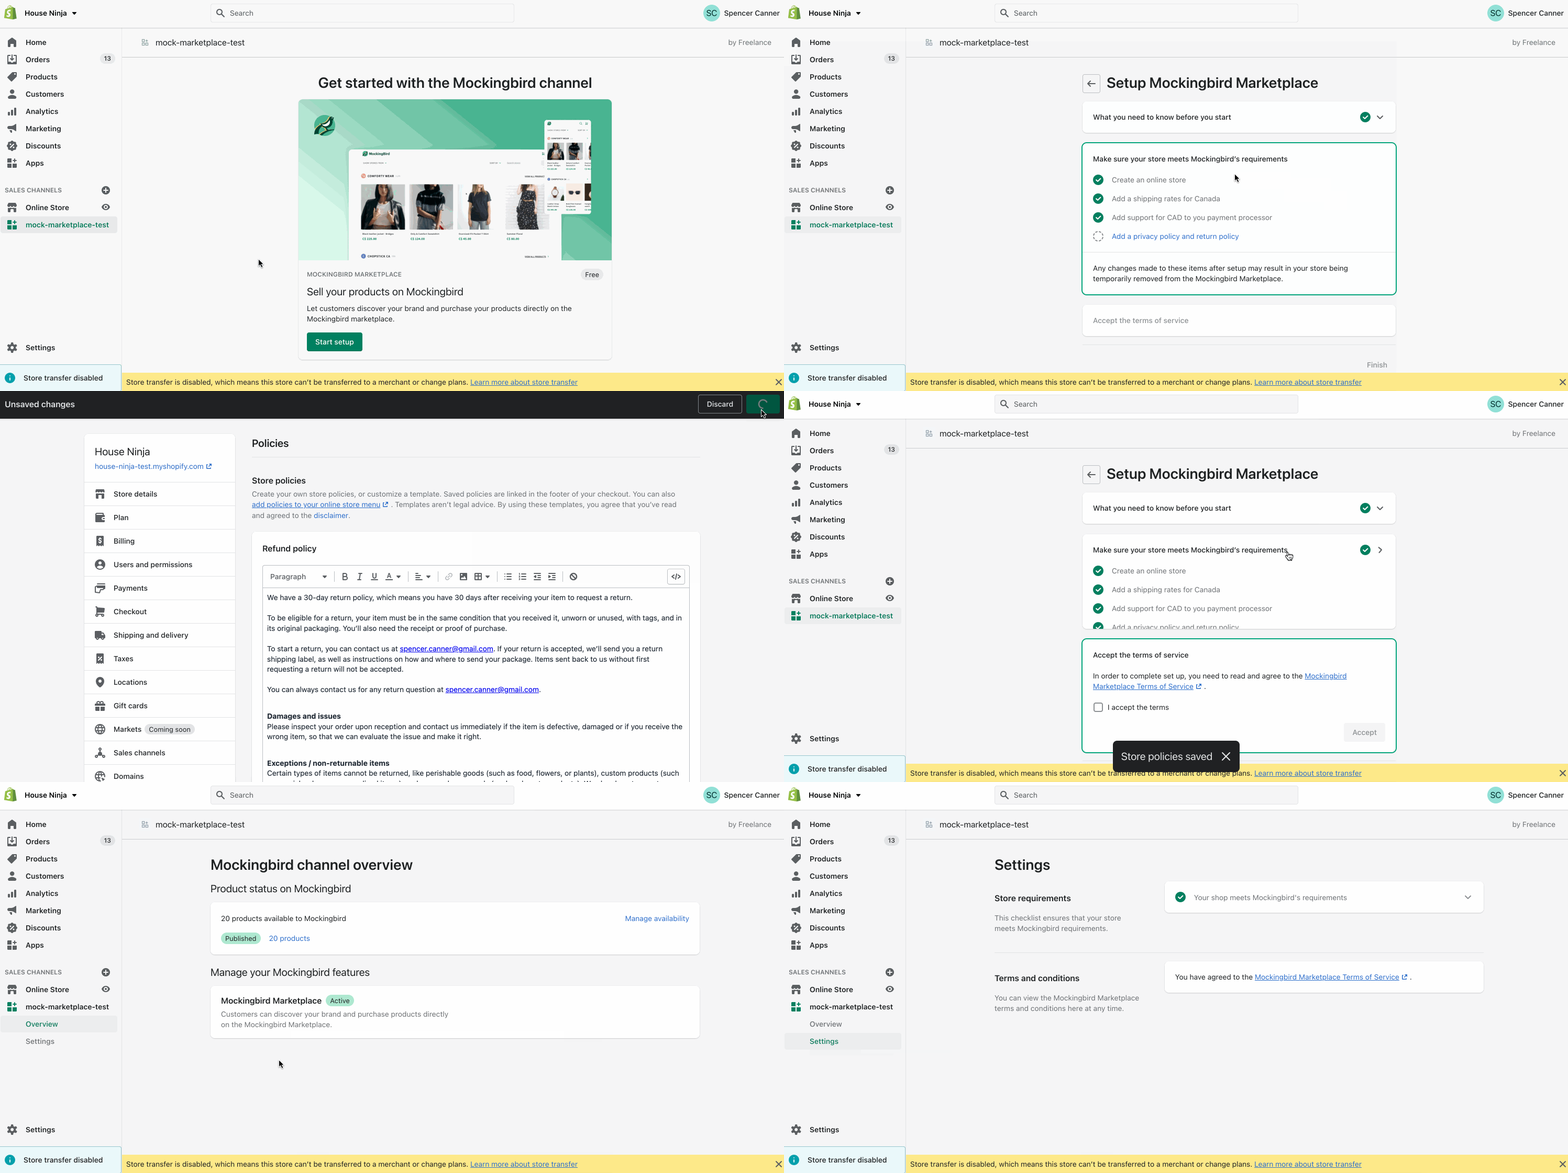
The following shows a merchant onboarding flow for the channel app in the Shopify admin:

This guide introduces you to the tutorials for onboarding merchants to a marketplace.
Each marketplace channel app should consist of the following pages:
Homepage: What merchants see when they open your channel app.
Onboarding page: Where merchants onboard to a marketplace by following a step-by-step process.
Settings page: Where merchants can view and edit the information that they supplied during the onboarding process.
The homepage is what a merchant sees when they open the channel app. Merchants who have newly-installed the channel app or haven't completed onboarding should see an introduction page that explains the marketplace’s features with a link to the onboarding page. If the merchant has already completed onboarding, then the homepage should instead provide merchants with an overview of their status on the marketplace and the products that they’re selling.
Onboarding page
Anchor link to section titled "Onboarding page"The onboarding page should surface the steps that a merchant must complete to sell on your marketplace. Requiring merchants to complete the onboarding process before selling products on your marketplace can help you deliver an improved buyer experience and reduce the risk of fraud.
The page should provide merchants with dynamic feedback on the state of their onboarding.
An onboarding flow should include the following elements, which are included with the channel app that you cloned.
Onboarding information: Surfaces important information about selling on your marketplace, along with a Call-to-action that prompts merchants to indicate that they understand the information.
Terms and conditions: Surfaces a link to the marketplace terms and conditions, along with a Call-to-action that prompts merchants to indicate that they agree to the terms.
The onboarding flow can also include the following elements, if relevant to the marketplace:
Requirements check: Surfaces a checklist of eligibility requirements for selling on your marketplace. Unmet requirements should link to the relevant section in the Shopify admin. This gives merchants a clear path to making the changes to meet eligibility.
Account connection: Enables merchants to connect their Shopify store to an account on your platform.
Settings page
Anchor link to section titled "Settings page"The settings page should resurface relevant information that the merchant encountered during the onboarding flow, since merchants shouldn't have access to the onboarding page after they have completed onboarding. For example, on the settings page you can display the marketplace's terms and conditions, and let merchants change which account they want to connect to their Shopify store.
Requirements
Anchor link to section titled "Requirements"Marketplace eligibility requirements are at your discretion.
Shop configuration provides helpful information for requirements. You can determine some basic elements for eligibility to sell on your marketplace by querying store properties using the REST Admin API. For example, you can require merchants to have a refund policy in place, which you can surface on the marketplace for buyers.
The following table lists some API resources and the questions that they can answer:
| Resource | Eligibility considerations |
|---|---|
Shop |
Is this merchant in an eligible country/market? How long has the merchant been on Shopify? Is the merchant's online store set up to accept orders? |
Policy |
Do merchants have return policies in place? |
Advanced: MerchantApprovalSignals
Anchor link to section titled "Advanced: MerchantApprovalSignals"The onboarding process is meant to be flexible to support your platform’s needs.
In the onboarding tutorials, you'll build a basic channel onboarding flow that enforces marketplace terms and conditions and merchant requirements.
If you manually review merchants' stores before approving them to sell on your marketplace, then the GraphQL Admin API's MerchantApprovalSignals object provides an accelerated onboarding process.
If a merchant is verified by Shopify, then you can feel confident allowing them to sell on your platform without needing to approve them manually. If a merchant is not verified by Shopify, then you can still allow them to sell on your marketplace if they pass your manual review.
Learn about how to add eligibility requirements to your channel app.
Share feedback on Marketplace Kit.