Chat
The chat component embeds a hosted chat application inside checkout so buyers can get real-time support while they complete their purchase. The component renders an iframe whose contents are served from your app, and it provides a secure messaging channel between checkout and the embedded page.
The chat component can only be rendered in the chat targets of the checkout (purchase.checkout.chat.render) and Thank you (purchase.thank-you.chat.render) pages.
The chat component can only be rendered in the chat targets of the checkout (purchase.checkout.chat.render) and Thank you (purchase.thank-you.chat.render) pages.
Supported targets
- purchase.
checkout. actions. render-before - purchase.
checkout. block. render - purchase.
checkout. cart-line-item. render-after - purchase.
checkout. cart-line-list. render-after - purchase.
checkout. chat. render - purchase.
checkout. contact. render-after - purchase.
checkout. delivery-address. render-after - purchase.
checkout. delivery-address. render-before - purchase.
checkout. footer. render-after - purchase.
checkout. header. render-after - purchase.
checkout. payment-method-list. render-after - purchase.
checkout. payment-method-list. render-before - purchase.
checkout. pickup-location-list. render-after - purchase.
checkout. pickup-location-list. render-before - purchase.
checkout. pickup-location-option-item. render-after - purchase.
checkout. pickup-point-list. render-after - purchase.
checkout. pickup-point-list. render-before - purchase.
checkout. reductions. render-after - purchase.
checkout. reductions. render-before - purchase.
checkout. shipping-option-item. details. render - purchase.
checkout. shipping-option-item. render-after - purchase.
checkout. shipping-option-list. render-after - purchase.
checkout. shipping-option-list. render-before - purchase.
thank-you. announcement. render - purchase.
thank-you. block. render - purchase.
thank-you. cart-line-item. render-after - purchase.
thank-you. cart-line-list. render-after - purchase.
thank-you. chat. render - purchase.
thank-you. customer-information. render-after - purchase.
thank-you. footer. render-after - purchase.
thank-you. header. render-after
Supported targets
- purchase.
checkout. actions. render-before - purchase.
checkout. block. render - purchase.
checkout. cart-line-item. render-after - purchase.
checkout. cart-line-list. render-after - purchase.
checkout. chat. render - purchase.
checkout. contact. render-after - purchase.
checkout. delivery-address. render-after - purchase.
checkout. delivery-address. render-before - purchase.
checkout. footer. render-after - purchase.
checkout. header. render-after - purchase.
checkout. payment-method-list. render-after - purchase.
checkout. payment-method-list. render-before - purchase.
checkout. pickup-location-list. render-after - purchase.
checkout. pickup-location-list. render-before - purchase.
checkout. pickup-location-option-item. render-after - purchase.
checkout. pickup-point-list. render-after - purchase.
checkout. pickup-point-list. render-before - purchase.
checkout. reductions. render-after - purchase.
checkout. reductions. render-before - purchase.
checkout. shipping-option-item. details. render - purchase.
checkout. shipping-option-item. render-after - purchase.
checkout. shipping-option-list. render-after - purchase.
checkout. shipping-option-list. render-before - purchase.
thank-you. announcement. render - purchase.
thank-you. block. render - purchase.
thank-you. cart-line-item. render-after - purchase.
thank-you. cart-line-list. render-after - purchase.
thank-you. chat. render - purchase.
thank-you. customer-information. render-after - purchase.
thank-you. footer. render-after - purchase.
thank-you. header. render-after
Anchor to Use casesUse cases
- Live support: Connect buyers with a support agent or chatbot to answer questions before they complete checkout.
- Order assistance: Help buyers resolve issues with shipping, payment, or discounts without leaving the page.
- Post-purchase follow-up: Offer order updates or upsell opportunities on the Thank you page.
Anchor to PropertiesProperties
Configure the following properties on the chat component.
- Anchor to accessibilityLabelaccessibility
Labelaccessibility Label ChatProps$1ChatProps$1 A label that describes the purpose of the chat, announced by assistive technologies like screen readers.
- Anchor to blockSizeblock
Sizeblock Size Adjust the block size.
Checkout imposes sizing restrictions for the component, therefore the size set may not be the actual size rendered.
Learn more about block size on MDN.
- Anchor to inlineSizeinline
Sizeinline Size Adjust the inline size.
Checkout imposes sizing restrictions for the component, therefore the size set may not be the actual size rendered.
Learn more about inline size on MDN.
ChatProps
- accessibilityLabel
A label that describes the purpose of the chat, announced by assistive technologies like screen readers.
ChatProps$1 - blockSize
Adjust the block size. Checkout imposes [sizing restrictions](/docs/apps/build/checkout/chat#component-states) for the component, therefore the size set may not be the actual size rendered. Learn more about [block size on MDN](https://developer.mozilla.org/en-US/docs/Web/CSS/block-size).
- inlineSize
Adjust the inline size. Checkout imposes [sizing restrictions](/docs/apps/build/checkout/chat#component-states) for the component, therefore the size set may not be the actual size rendered. Learn more about [inline size on MDN](https://developer.mozilla.org/en-US/docs/Web/CSS/inline-size).
Anchor to EventsEvents
The chat component provides event callbacks for handling the embedded page lifecycle. Learn more about handling events.
- Anchor to readyreadyreadyCallbackEventListener<typeof tagName>CallbackEventListener<typeof tagName>
A callback that fires when the embedded page is ready and a message port has been created to communicate with the host page.
CallbackEventListener
A typed event listener for custom element events. The listener receives a `CallbackEvent` with the correct `currentTarget` type for the associated custom element tag.
(EventListener & {
    (event: CallbackEvent<TTagName, Event> & TData): void;
}) | null
CallbackEvent
An event type that narrows the `currentTarget` to the specific HTML element associated with the custom element tag. This provides type-safe event handling in callback listeners.
TEvent & {
    currentTarget: HTMLElementTagNameMap[TTagName];
}
Anchor to MethodsMethods
The chat component exposes methods for communicating with the embedded page. Learn more about using methods.
- Anchor to contentWindowcontent
Windowcontent Window { postMessage(message: any): void; }{ postMessage(message: any): void; }requiredrequired Returns an object exposing a
method used to send messages to the embedded page rendered inside the chat iframe. Pair this with thereadyevent (orcallback) to know when the message channel is available.
Anchor to ExamplesExamples
Anchor to Basic chatBasic chat
Render a chat experience in checkout. This example renders an s-chat element sized for a support widget. The iframe source is provided by the chat key under preloads in the extension configuration file.
Basic chat

Preact
Anchor to Resize the chat iframe from the hosted applicationResize the chat iframe from the hosted application
A common action in your application is to request a resize of the iframe. The visible region of the chat iframe is controlled from the hosted application with window.resizeTo(). This example resizes the iframe when an activator button is clicked to reveal a dialog, and resizes it back when the dialog is closed.
Resize the chat iframe from the hosted application
Preact
// @extension-target: purchase.checkout.chat.render
import '@shopify/ui-extensions/preact';
import {render} from 'preact';

export default function extension() {
  render(<Extension />, document.body);
}

// The resize logic lives in the hosted application, which calls
// `window.resizeTo()` through App Bridge. The extension just renders the chat.
function Extension() {
  return (
    <s-chat
      accessibilityLabel="Chat with our support team"
      inlineSize="150px"
      blockSize="50px"
    />
  );
}
Hosted chat application
<!doctype html>
<html lang="en">
  <head>
    <script src="https://cdn.shopify.com/shopifycloud/checkout-web/assets/app-bridge-checkout.js"></script>
  </head>
  <body>
    <dialog class="dialog" aria-label="Chat with our support team">
      How can we help you today?
      <button class="btn-close">Close</button>
    </dialog>
    <button class="btn-activator">Chat with us</button>

    <script type="text/javascript">
      const btnActivator = document.querySelector('.btn-activator');
      const btnClose = document.querySelector('.btn-close');
      const dialog = document.querySelector('.dialog');

      btnActivator.addEventListener('click', openDialog);
      btnClose.addEventListener('click', () => dialog.close());

      // The native `close` event fires for both the Close button and the
      // Escape key, so resizing the iframe back down lives here.
      dialog.addEventListener('close', () => {
        shopify !== undefined && window.resizeTo(150, 50);
      });

      function openDialog() {
        // Resize the iframe to fit the dialog, then open it with the native
        // dialog API. `showModal()` moves focus into the dialog, traps focus,
        // closes on Escape, and exposes it to assistive technologies as modal.
        shopify !== undefined && window.resizeTo(415, 700);
        dialog.showModal();
      }
    </script>
  </body>
</html>
Anchor to Communicate information between the hosted application and the UI extensionCommunicate information between the hosted application and the UI extension
Information can be passed between the UI extension and the hosted application. From the extension, send a message into the iframe with the component's contentWindow.postMessage method once the ready event (or onReady callback) has fired. Inside the iframe, the hosted application listens and replies through shopify.extension.port. Back in the extension, listen for the reply with a message listener added once the ready event has fired.
Communicate information between the hosted application and the UI extension
Preact
// @extension-target: purchase.checkout.chat.render
import '@shopify/ui-extensions/preact';
import {render} from 'preact';
import {useEffect, useRef} from 'preact/hooks';

export default function extension() {
  render(<Extension />, document.body);
}

function Extension() {
  const chatRef = useRef(null);

  useEffect(() => {
    const chat = chatRef.current;
    if (chat == null) return;

    // Listen for messages coming back from the hosted application. The sandbox
    // relays the raw message payload (not a `MessageEvent`), so its fields are
    // read directly off the argument rather than from `event.data`.
    function handleMessage(message) {
      if (message?.action === 'pong') {
        console.log('Messaging channel successful');
      }
    }

    // `ready` fires once the message channel is available.
    function handleReady() {
      window.addEventListener('message', handleMessage);

      // Read the buyer's first name to personalize the chat experience, then
      // send it into the iframe with the element's `contentWindow.postMessage`.
      const firstName = shopify.shippingAddress?.value?.firstName;
      chat.contentWindow.postMessage({
        action: 'ping',
        buyer: {firstName},
      });
    }

    chat.addEventListener('ready', handleReady);

    // Tear down the listeners when the extension unmounts.
    return () => {
      chat.removeEventListener('ready', handleReady);
      window.removeEventListener('message', handleMessage);
    };
  }, []);

  return (
    <s-chat
      ref={chatRef}
      accessibilityLabel="Chat with our support team"
      inlineSize="150px"
      blockSize="50px"
    />
  );
}
Hosted chat application
// Create a variable to store the buyer's first name.
// We'll be able to use this to personalize the chat experience.
let buyerFirstName;

// In the hosted application Javascript, listen for messages from the UI extension.
shopify.extension.port.onmessage = async (event) => {
  // if the message's data has a ping action, respond with a pong
  if (event.data.action === 'ping') {
    buyerFirstName = event.data.buyer.firstName;

    await shopify.extension.port.postMessage({
      action: 'pong',
    });
  }
};

// Ensure the messagePort is ready to start sending and receiving messages.
shopify.extension.port.start();
Anchor to Chat dimensionsChat dimensions
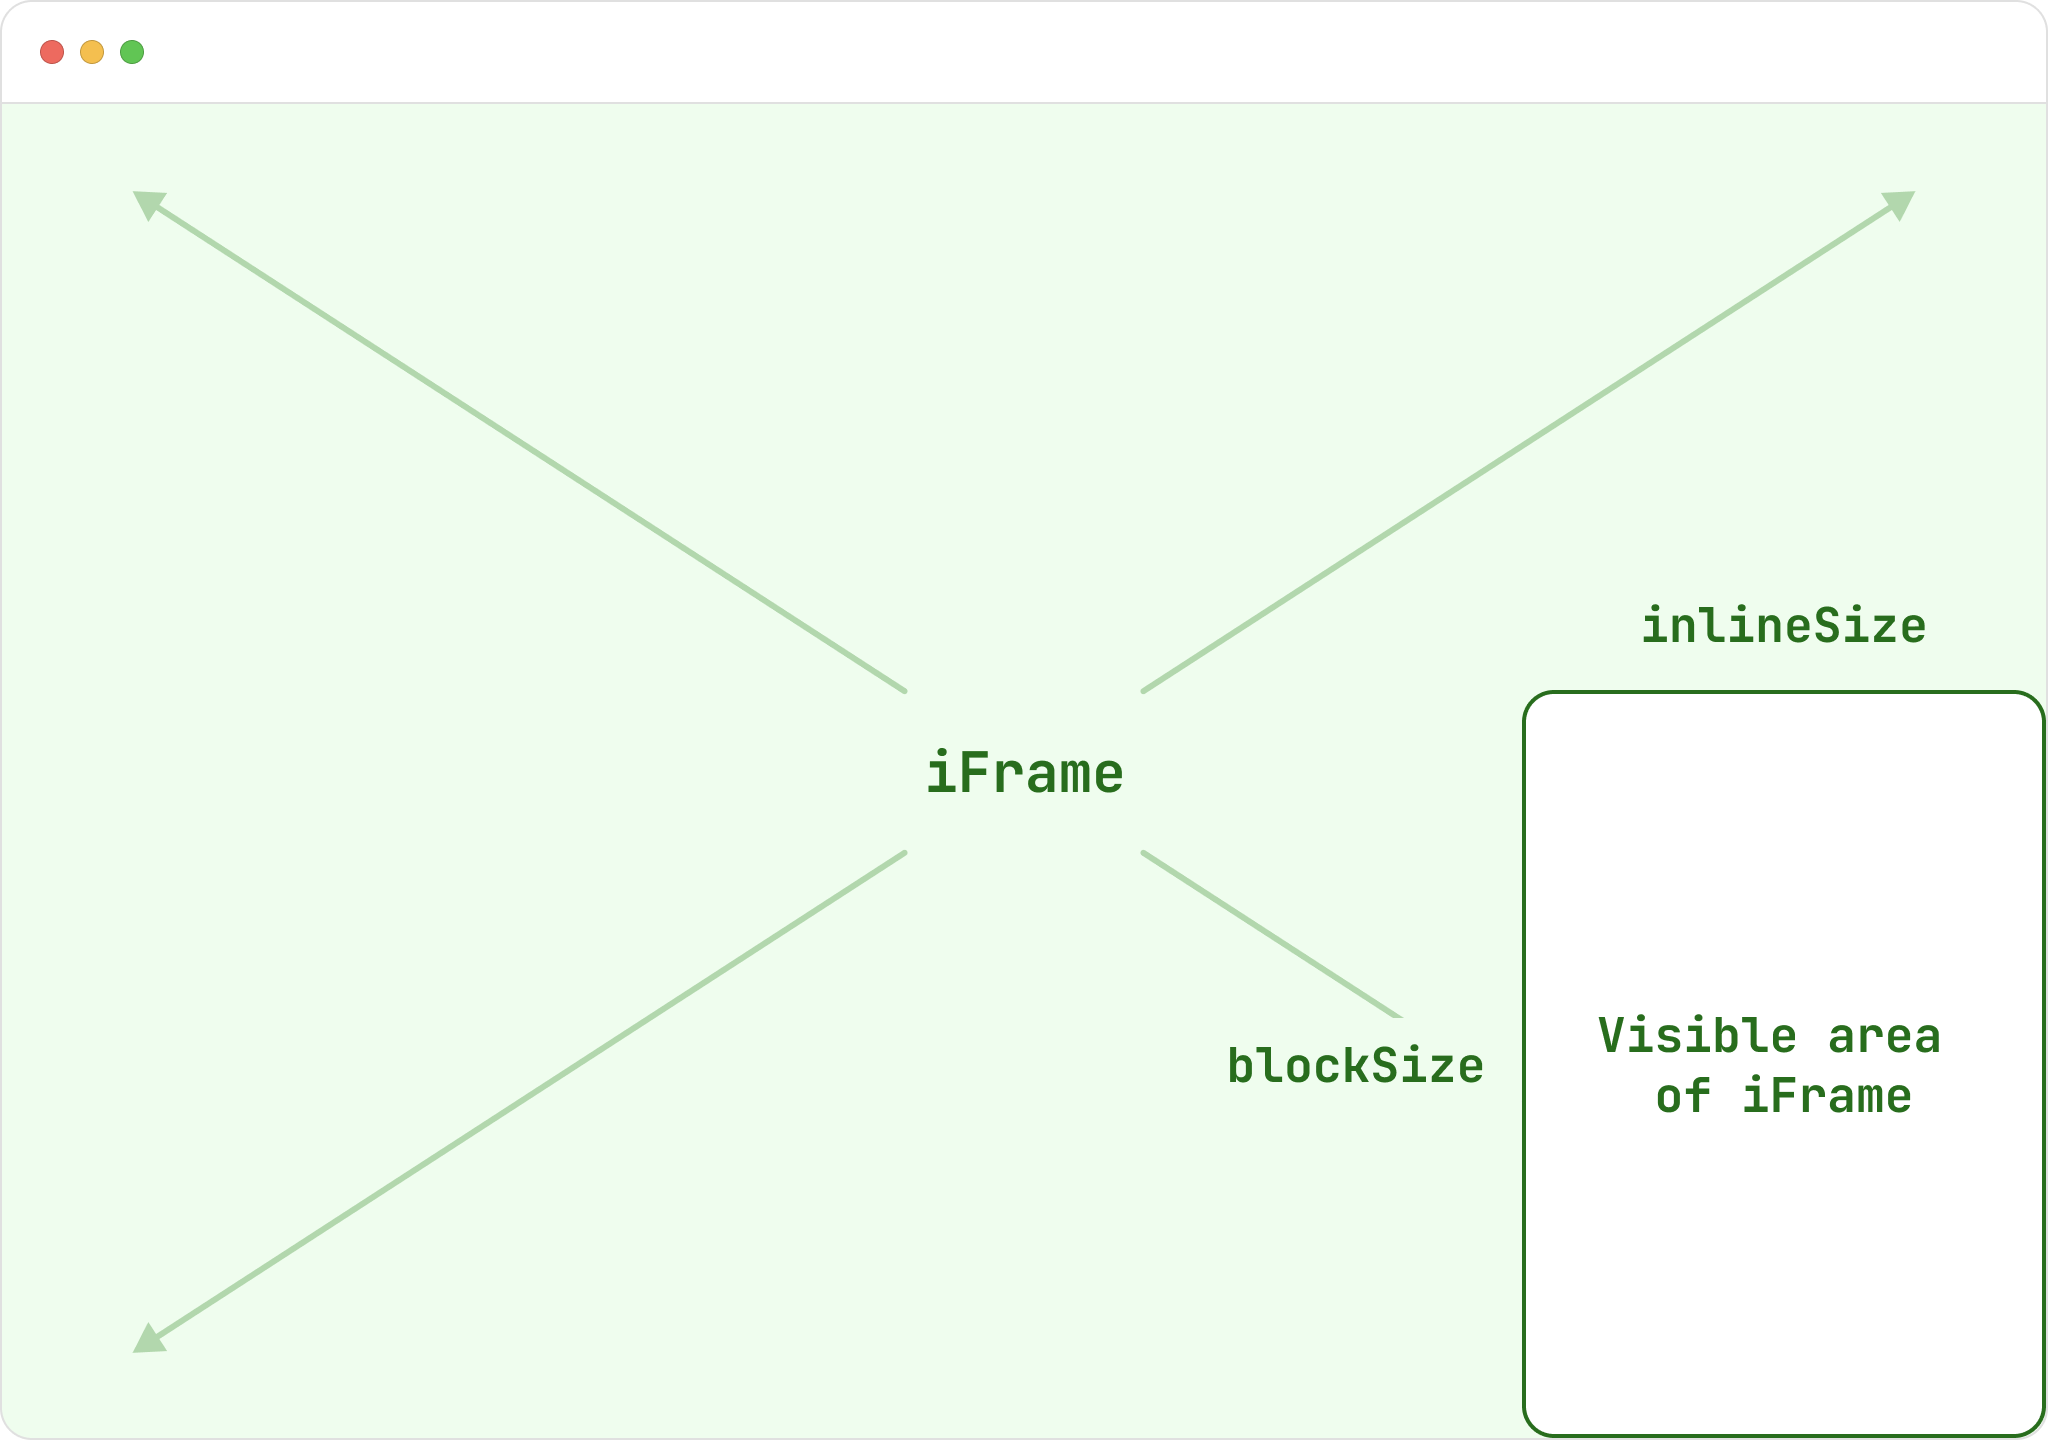
To give you the most flexibility for responsive layouts, the iframe rendered by chat takes the full width and height of the browser window, and only a clipped region is visible. The inlineSize and blockSize values you set on the component (or change at runtime through App Bridge) define the bounding box of that visible region, fixed to the bottom-right corner.
Because the iframe fills the window, your application can rely on the window's dimensions to apply responsive styles. For example, CSS media queries work inside the iframe as if your application were rendered outside of one. Checkout imposes maximum dimensions on large and small screens.
Anchor to App Bridge for checkoutApp Bridge for checkout
App Bridge for checkout provides a secure communication channel between checkout and the application embedded in the chat iframe, along with helpers for common actions such as resizing the iframe. After App Bridge is set up, your application has access to the shopify global variable, which exposes functionality and configuration for the embedded page.
Anchor to Getting started with App Bridge for checkoutGetting started with App Bridge for checkout
Add App Bridge to your hosted chat application by including the app-bridge-checkout.js script as the first script in the <head> of your page. The script loads directly from Shopify and keeps itself up to date.
html
Inbound messages from checkout are received inside the iframe through App Bridge. To send messages from the extension into the iframe, use the component's contentWindow.postMessage method, and pair it with the ready event (or onReady callback) to know when the message channel is available.
Anchor to App Bridge's global variableApp Bridge's global variable
After App Bridge is set up in your app, you have access to the shopify global variable. This variable exposes various App Bridge functionalities, such as resizing the iframe or retrieving details of the shop.
To explore everything available on the shopify global variable:
- Open the Chrome developer console while in checkout.
- Switch the frame context to your app's iframe.
- Enter
shopifyin the console.
Anchor to App Bridge CSS APIApp Bridge CSS API
Because the chat iframe is clipped and fills the whole window, percentage-based sizes resolve against the window rather than the visible region, which can clip your content. App Bridge exposes a set of CSS custom properties matching the maximum dimensions defined in the UX guidelines. Use them — in CSS or JavaScript — to guard against overflowing content while still using percentage-based sizes, and to stay resilient if Shopify changes the maximum dimensions.
css
css
Anchor to Chat source and query parametersChat source and query parameters
The iframe src is provided by the chat key under preloads in the extension configuration file. Shopify automatically appends query parameters that let you verify the authenticity of the request and the identity of the merchant:
id_token: A signed JSON Web Token (JWT) with a 5-minute TTL, used to retrieve merchant information on your backend and to ensure that requests came from a Shopify-authenticated source. See the ID token documentation.locale: The locale of the shop embedding the app, for exampleen-CA. Also available on theshopifyglobal variable underconfig.handle: The unique handle of the UI extension as defined by the developer. Also available on theshopifyglobal variable underextension.