Version 2025-07 is the last API version to support React-based UI components. Later versions use web components, native UI elements with built-in accessibility, better performance, and consistent styling with Shopify's design system. Check out the upgrade guide to upgrade your extension.
Stack
The Stack component organizes elements horizontally or vertically along the block or inline axis. Use it to structure layouts, group related components, or control spacing between elements with flexible alignment options.
The component simplifies layout creation by automatically managing spacing between child elements through gap properties, eliminating the need for manual margin management. It supports both horizontal and vertical arrangements, flexible alignment options, and wrapping behavior, making it the foundation for building consistent, responsive layouts throughout POS extensions.
Stack components support responsive gap values that automatically adjust spacing based on screen size, ensuring layouts remain visually balanced and maintain proper element separation across different devices.
Supported targets
- pos.
cart. line-item-details. action. render - pos.
customer-details. action. render - pos.
customer-details. block. render - pos.
draft-order-details. action. render - pos.
draft-order-details. block. render - pos.
home. modal. render - pos.
order-details. action. render - pos.
order-details. block. render - pos.
product-details. action. render - pos.
product-details. block. render - pos.
purchase. post. action. render - pos.
purchase. post. block. render
Supported targets
- pos.
cart. line-item-details. action. render - pos.
customer-details. action. render - pos.
customer-details. block. render - pos.
draft-order-details. action. render - pos.
draft-order-details. block. render - pos.
home. modal. render - pos.
order-details. action. render - pos.
order-details. block. render - pos.
product-details. action. render - pos.
product-details. block. render - pos.
purchase. post. action. render - pos.
purchase. post. block. render
Anchor to Use casesUse cases
- Organized layouts: Arrange form elements, buttons, or content in organized layouts.
- Responsive design: Create responsive layouts that adapt to different screen sizes.
- Consistent spacing: Control spacing between elements for visual hierarchy.
- Precise alignment: Align content precisely using justify and align properties.
Anchor to PropertiesProperties
Configure the following properties on the Stack component.
- Anchor to alignContentalign
Contentalign Content 'stretch' | ContentPosition | ContentDistribution'stretch' | ContentPosition | ContentDistributionDefault: 'start'Default: 'start' The alignment of the Stack component along the cross axis, controlling how content is distributed when there's extra space. Learn more about align-content on MDN.
- Anchor to alignItemsalign
Itemsalign Items 'stretch' | 'baseline' | ContentPosition'stretch' | 'baseline' | ContentPositionDefault: 'stretch'Default: 'stretch' The alignment of the Stack component's children along the cross axis, controlling how individual items are positioned. Learn more about align-items on MDN.
- Anchor to blockSizeblock
Sizeblock Size SizeUnitsOrAutoSizeUnitsOrAutoDefault: 'auto'Default: 'auto' Adjusts the block size (height in horizontal writing modes). Use
'auto'to take the block size of the box's children. Learn more about block-size on MDN.- Anchor to columnGapcolumn
Gapcolumn Gap SpacingKeyword | ''SpacingKeyword | ''Default: '' - meaning no overrideDefault: '' - meaning no override The spacing between elements in the inline axis. Overrides the column value of gap.
- Anchor to directiondirectiondirection'inline' | 'block' | DeprecatedStackDirection'inline' | 'block' | DeprecatedStackDirectionDefault: 'inline'Default: 'inline'
The direction in which children are placed within the Stack component. Use
'block'for vertical arrangement along the block axis without wrapping, or'inline'for horizontal arrangement along the inline axis with automatic wrapping.- Anchor to flexflexflexnumbernumber
The flex value for the Stack component. A value of 1 will stretch the component to fill the parent container.
- Anchor to flexChildrenflex
Childrenflex Children booleanboolean A boolean that determines whether the children should be stretched to fill the cross axis.
- Anchor to gapgapgapSpacingKeywordSpacingKeywordDefault: '0'Default: '0'
The size of the gap between each child in the Stack component.
- Anchor to inlineSizeinline
Sizeinline Size SizeUnitsOrAutoSizeUnitsOrAutoDefault: 'auto'Default: 'auto' Adjusts the inline size (width in horizontal writing modes). Use
'auto'to take the inline size of the box's children. Learn more about inline-size on MDN.- Anchor to justifyContentjustify
Contentjustify Content ContentPosition | ContentDistributionContentPosition | ContentDistributionDefault: 'start'Default: 'start' The alignment of the Stack component along the main axis, controlling how space is distributed between and around content items. Learn more about justify-content on MDN.
- Anchor to maxBlockSizemax
Block Sizemax Block Size SizeUnitsOrNoneSizeUnitsOrNoneDefault: 'none'Default: 'none' Adjusts the maximum block size (max-height in horizontal writing modes). Learn more about max-block-size on MDN.
- Anchor to maxInlineSizemax
Inline Sizemax Inline Size SizeUnitsOrNoneSizeUnitsOrNoneDefault: 'none'Default: 'none' Adjusts the maximum inline size (max-width in horizontal writing modes). Learn more about max-inline-size on MDN.
- Anchor to minBlockSizemin
Block Sizemin Block Size SizeUnitsSizeUnitsDefault: '0'Default: '0' Adjusts the minimum block size (min-height in horizontal writing modes). Learn more about min-block-size on MDN.
- Anchor to minInlineSizemin
Inline Sizemin Inline Size SizeUnitsSizeUnitsDefault: '0'Default: '0' Adjusts the minimum inline size (min-width in horizontal writing modes). Learn more about min-inline-size on MDN.
- Anchor to paddingpaddingpaddingPaddingKeysPaddingKeysDefault: '0'Default: '0'
Adjusts the padding on all edges of the box using predefined spacing values.
- Anchor to paddingBlockpadding
Blockpadding Block PaddingKeysPaddingKeysDefault: '0'Default: '0' Adjusts the padding on the block axis (vertical in horizontal writing modes). Overrides the block value from
padding.- Anchor to paddingBlockEndpadding
Block Endpadding Block End PaddingKeysPaddingKeysDefault: '0'Default: '0' Adjusts the padding at the block-end edge (bottom in horizontal writing modes). Overrides the end value from
.- Anchor to paddingBlockStartpadding
Block Startpadding Block Start PaddingKeysPaddingKeysDefault: '0'Default: '0' Adjusts the padding at the block-start edge (top in horizontal writing modes). Overrides the start value from
.- Anchor to paddingInlinepadding
Inlinepadding Inline PaddingKeysPaddingKeysDefault: '0'Default: '0' Adjusts the padding on the inline axis (horizontal in horizontal writing modes). Overrides the inline value from
padding.- Anchor to paddingInlineEndpadding
Inline Endpadding Inline End PaddingKeysPaddingKeysDefault: '0'Default: '0' Adjusts the padding at the inline-end edge (right in left-to-right languages). Overrides the end value from
.- Anchor to paddingInlineStartpadding
Inline Startpadding Inline Start PaddingKeysPaddingKeysDefault: '0'Default: '0' Adjusts the padding at the inline-start edge (left in left-to-right languages). Overrides the start value from
.- Anchor to rowGaprow
Gaprow Gap SpacingKeyword | ''SpacingKeyword | ''Default: '' - meaning no overrideDefault: '' - meaning no override The spacing between elements in the block axis. Overrides the row value of gap.
- Anchor to alignmentalignmentalignmentContentPosition | ContentDistributionContentPosition | ContentDistributionDefault: 'flex-start'Default: 'flex-start'deprecateddeprecated
The alignment of the children along the main axis.
DeprecatedUse the
prop instead.Deprecated:Use the
prop instead.- Anchor to flexWrapflex
Wrapflex Wrap 'wrap' | 'nowrap' | 'wrap-reverse''wrap' | 'nowrap' | 'wrap-reverse'deprecateddeprecated The wrap behavior for the children of the Stack component.
DeprecatedThis property has no effect as content will always wrap.
Deprecated:This property has no effect as content will always wrap.
- Anchor to paddingHorizontalpadding
Horizontalpadding Horizontal HorizontalSpacingHorizontalSpacingdeprecateddeprecated The horizontal padding around the Stack component.
DeprecatedUse the
prop instead.Deprecated:Use the
prop instead.- Anchor to paddingVerticalpadding
Verticalpadding Vertical VerticalSpacingVerticalSpacingdeprecateddeprecated The vertical padding around the Stack component.
DeprecatedUse the
prop instead.Deprecated:Use the
prop instead.- Anchor to spacingspacingspacingSpacingSpacingDefault: 1Default: 1deprecateddeprecated
The spacing between each child in the Stack component.
DeprecatedUse the
gapprop instead.Deprecated:Use the
gapprop instead.
ContentPosition
Defines positioning values for aligning content within a container.
'center' | 'start' | 'end'ContentDistribution
Defines distribution strategies for spacing content within a container.
'space-around' | 'space-between' | 'space-evenly'SizeUnitsOrAuto
Extends SizeUnits to include `'auto'` for properties that can automatically size based on content.
SizeUnits | 'auto'SizeUnits
Defines CSS size units for dimensions, supporting pixel values, percentages, or zero.
`${number}px` | `${number}%` | `0`SpacingKeyword
Spacing values that can be used for gaps between elements, including all size keywords and `'none'` for no spacing.
SizeKeyword | 'none'SizeKeyword
Defines the standardized spacing scale used throughout the POS design system. Each keyword maps to a predetermined spacing value that ensures visual consistency across components. Values range from `'0'` (no spacing) through `'2000'` (maximum spacing), with increments designed to create harmonious visual rhythm and hierarchy.
'0' | '025' | '050' | '100' | '200' | '250' | '300' | '350' | '400' | '450' | '500' | '600' | '700' | '800' | '900' | '1000' | '1100' | '1200' | '1400' | '1800' | '2000'DeprecatedStackDirection
'vertical' | 'horizontal'SizeUnitsOrNone
Extends SizeUnits to include `'none'` for properties that can be explicitly disabled.
SizeUnits | 'none'PaddingKeys
Defines the allowed padding values, including all standardized size keywords and `'none'` for no padding.
SizeKeyword | 'none'HorizontalSpacing
The spacing values for controlling horizontal space between elements.
'HalfPoint' | 'ExtraSmall' | 'Small' | 'Medium' | 'Large' | 'ExtraLarge' | 'ExtraExtraLarge'VerticalSpacing
The spacing values for controlling vertical space between elements.
'HalfPoint' | 'ExtraSmall' | 'Small' | 'Medium' | 'Large' | 'ExtraLarge'Spacing
Deprecated spacing values represented as numeric multipliers.
0.5 | 1 | 2 | 3 | 4 | 5 | 6 | 7 | 8 | 9 | 10 | 11 | 13 | 16Anchor to ExamplesExamples
Anchor to Layout elements horizontally or verticallyLayout elements horizontally or vertically
Organize UI elements horizontally or vertically with automatic spacing management. This example shows a Stack with default values, demonstrating how to structure layouts and control element spacing through gap properties without manual margin management.Layout elements horizontally or vertically
Layout elements horizontally or vertically
React
import {
  reactExtension,
  Button,
  Stack,
  Screen,
} from '@shopify/ui-extensions-react/point-of-sale';
import React from 'react';

export default reactExtension('pos.home.modal.render', () => (
  <Screen name="Stack" title="Stack">
    <Stack direction="inline" gap="200">
      <Button title="Hello" />
      <Button title="Hello" />
    </Stack>
  </Screen>
));
TS
import {
  extension,
  Button,
  Screen,
  Stack,
} from '@shopify/ui-extensions/point-of-sale';

export default extension('pos.home.modal.render', (root) => {
  const button1 = root.createComponent(Button, {
    title: 'Hello',
  });

  const button2 = root.createComponent(Button, {
    title: 'Hello',
  });

  const stack = root.createComponent(Stack, {
    direction: 'inline',
    gap: '200',
  });
  stack.append(button1, button2);

  const screen = root.createComponent(Screen, {
    name: 'Stack',
    title: 'Stack',
  });
  screen.append(stack);
  root.append(screen);

  root.mount();
});
Anchor to Arrange elements verticallyArrange elements vertically
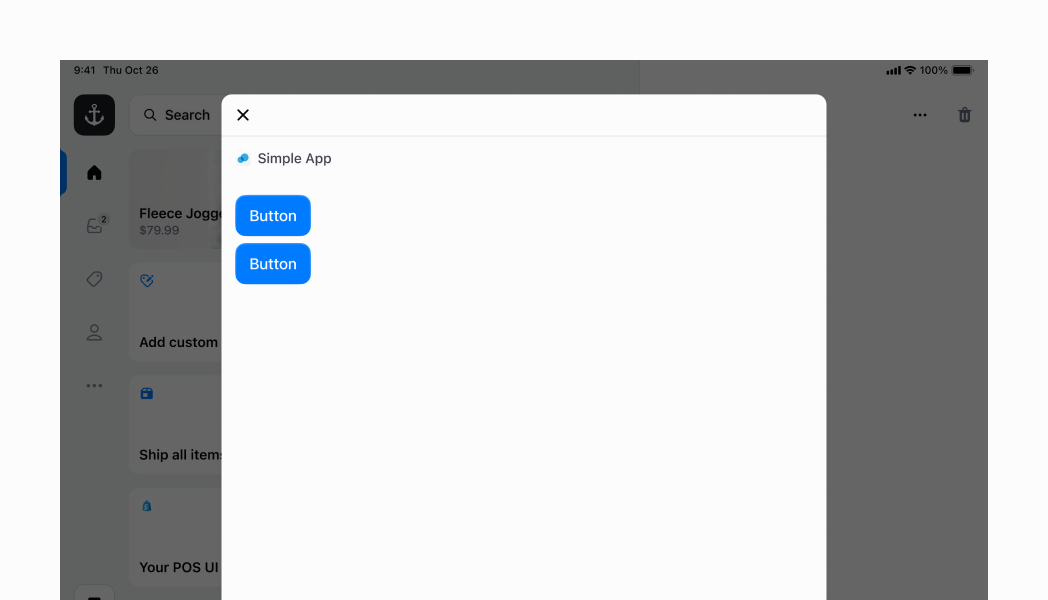
Stack elements vertically by setting direction="block". This creates a vertical layout with automatic gap spacing between elements, ideal for forms, lists, or any vertically-stacked content.Arrange elements vertically
Arrange elements vertically
React
import {
  reactExtension,
  Button,
  Stack,
  Screen,
} from '@shopify/ui-extensions-react/point-of-sale';
import React from 'react';

export default reactExtension('pos.home.modal.render', () => (
  <Screen name="Stack" title="Stack">
    <Stack direction="block" gap="200" paddingInline="450">
      <Button title="Hello" />
      <Button title="Hello" />
      <Button title="Hello" />
    </Stack>
  </Screen>
));
TS
import {
  extension,
  Button,
  Screen,
  Stack,
} from '@shopify/ui-extensions/point-of-sale';

export default extension('pos.home.modal.render', (root) => {
  const button1 = root.createComponent(Button, {
    title: 'Hello',
  });

  const button2 = root.createComponent(Button, {
    title: 'Hello',
  });

  const button3 = root.createComponent(Button, {
    title: 'Hello',
  });

  const stack = root.createComponent(Stack, {
    direction: 'block',
    gap: '200',
    paddingInline: '450',
  });
  stack.append(button1, button2, button3);

  const screen = root.createComponent(Screen, {
    name: 'Stack',
    title: 'Stack',
  });
  screen.append(stack);
  root.append(screen);

  root.mount();
});
Anchor to Center content on both axesCenter content on both axes
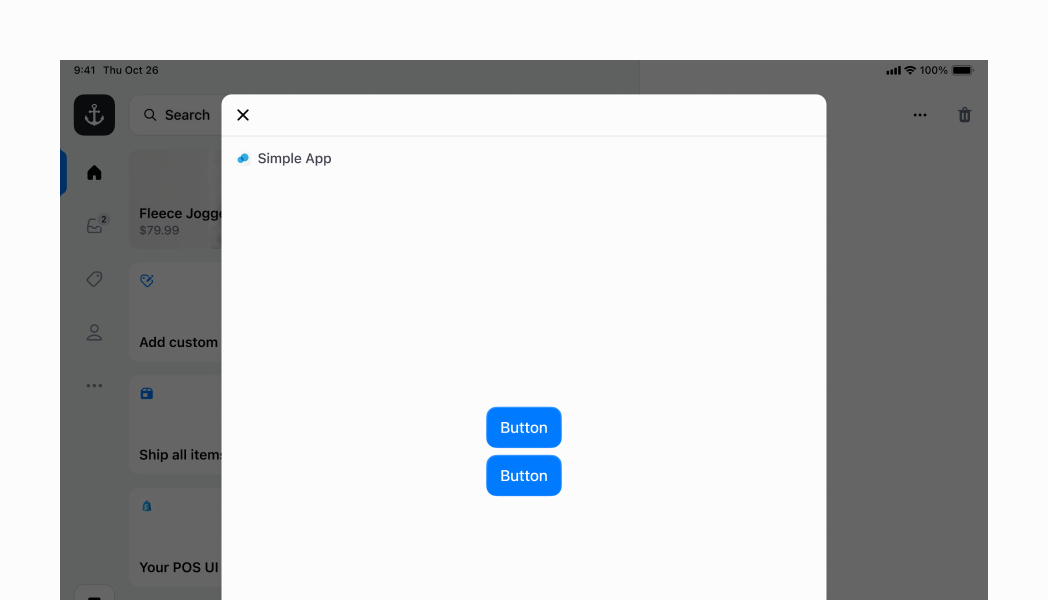
Center elements both horizontally and vertically using justifyContent="center", alignContent="center", and alignItems="center" with custom blockSize="50%" and inlineSize="100%". All three alignment properties work together to create perfectly centered content on both axes.Center content on both axes
Center content on both axes
React
import {
  reactExtension,
  Button,
  Stack,
  Screen,
} from '@shopify/ui-extensions-react/point-of-sale';
import React from 'react';

export default reactExtension('pos.home.modal.render', () => (
  <Screen name="Stack" title="Stack">
    <Stack
      direction="block"
      gap="200"
      justifyContent="center"
      alignContent="center"
      alignItems="center"
      inlineSize="100%"
      paddingInline="450"
      blockSize="50%"
    >
      <Button title="Hello" />
      <Button title="Hello" />
    </Stack>
  </Screen>
));
TS
import {
  extension,
  Button,
  Screen,
  Stack,
} from '@shopify/ui-extensions/point-of-sale';

export default extension('pos.home.modal.render', (root) => {
  const button1 = root.createComponent(Button, {
    title: 'Hello',
  });

  const button2 = root.createComponent(Button, {
    title: 'Hello',
  });

  const stack = root.createComponent(Stack, {
    direction: 'block',
    justifyContent: 'center',
    alignContent: 'center',
    alignItems: 'center',
    inlineSize: '100%',
    paddingInline: '450',
    blockSize: '50%',
    gap: '200',
  });
  stack.append(button1, button2);

  const screen = root.createComponent(Screen, {
    name: 'Stack',
    title: 'Stack',
  });
  screen.append(stack);
  root.append(screen);

  root.mount();
});
Anchor to Center elements horizontallyCenter elements horizontally
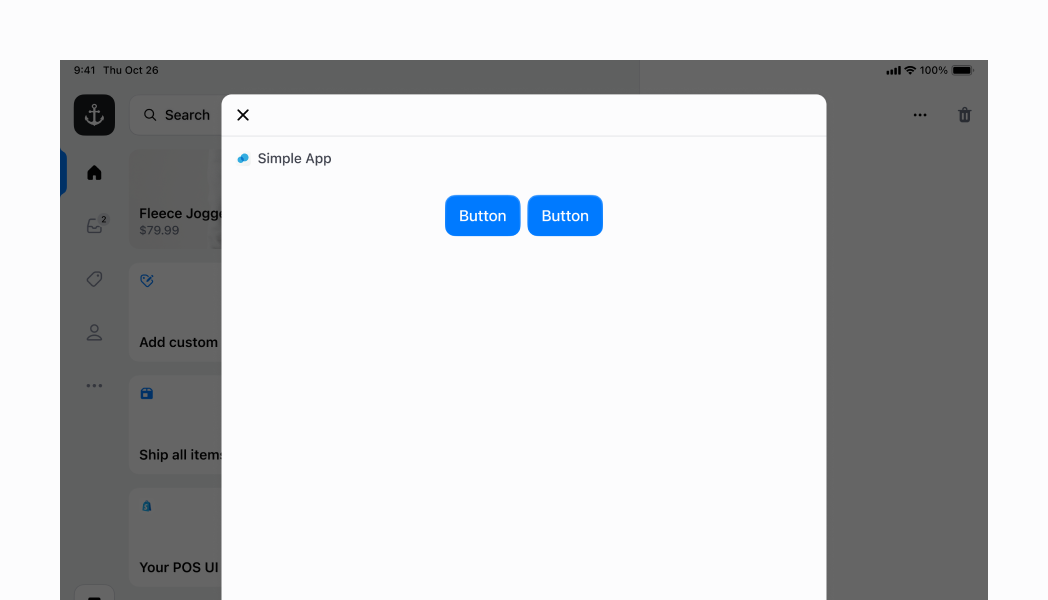
Center elements horizontally using justifyContent="center" with flexChildren={false} (default). This positions children in the center while keeping them at their minimum required size, ideal for centered button groups without stretching.Center elements horizontally
Center elements horizontally
React
import {
  reactExtension,
  Button,
  Stack,
  Screen,
} from '@shopify/ui-extensions-react/point-of-sale';
import React from 'react';

export default reactExtension('pos.home.modal.render', () => (
  <Screen name="Stack" title="Stack">
    <Stack direction="inline" gap="200" justifyContent="center">
      <Button title="Hello" />
      <Button title="Hello" />
    </Stack>
  </Screen>
));
TS
import {
  extension,
  Button,
  Screen,
  Stack,
} from '@shopify/ui-extensions/point-of-sale';

export default extension('pos.home.modal.render', (root) => {
  const button1 = root.createComponent(Button, {
    title: 'Hello',
  });

  const button2 = root.createComponent(Button, {
    title: 'Hello',
  });

  const stack = root.createComponent(Stack, {
    direction: 'inline',
    gap: '200',
    justifyContent: 'center',
  });
  stack.append(button1, button2);

  const screen = root.createComponent(Screen, {
    name: 'Stack',
    title: 'Stack',
  });
  screen.append(stack);
  root.append(screen);

  root.mount();
});
Anchor to Center elements verticallyCenter elements vertically
Center children along the vertical axis using alignItems="center". This example shows an inline stack with two children of different heights (a nested block stack and a button)—since the block stack has greater intrinsic height, alignItems="center" centers both children along the cross-axis.Center elements vertically
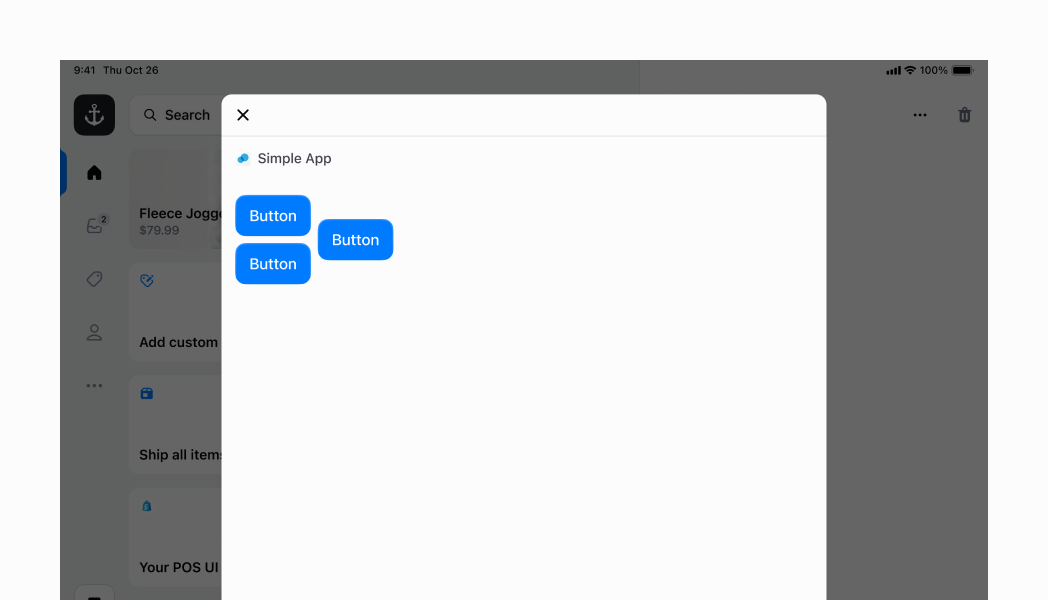
Center elements vertically
React
import {
  reactExtension,
  Button,
  Stack,
  Screen,
  ScrollView,
} from '@shopify/ui-extensions-react/point-of-sale';
import React from 'react';

export default reactExtension('pos.home.modal.render', () => (
  <Screen name="Stack" title="Stack">
    <ScrollView>
      <Stack
        direction="inline"
        gap="200"
        alignItems="center"
        alignContent="center"
      >
        <Stack direction="block" gap="200">
          <Button title="Hello" />
          <Button title="Hello" />
        </Stack>
        <Button title="Hello" />
      </Stack>
    </ScrollView>
  </Screen>
));
TS
import {
  extension,
  Button,
  Screen,
  Stack,
  ScrollView,
} from '@shopify/ui-extensions/point-of-sale';

export default extension('pos.home.modal.render', (root) => {
  const button1 = root.createComponent(Button, {
    title: 'Hello',
  });

  const button2 = root.createComponent(Button, {
    title: 'Hello',
  });

  const button3 = root.createComponent(Button, {
    title: 'Hello',
  });

  const innerStack = root.createComponent(Stack, {
    direction: 'block',
    gap: '200',
  });
  innerStack.append(button1, button2);

  const mainStack = root.createComponent(Stack, {
    direction: 'inline',
    gap: '200',
    alignItems: 'center',
    alignContent: 'center',
  });
  mainStack.append(innerStack, button3);

  const scrollView = root.createComponent(ScrollView);
  scrollView.append(mainStack);

  const screen = root.createComponent(Screen, {
    name: 'Stack',
    title: 'Stack',
  });
  screen.append(scrollView);
  root.append(screen);

  root.mount();
});
Anchor to Create complex layouts with nested stacksCreate complex layouts with nested stacks
Nest multiple stacks to build sophisticated layouts. This example creates a tappable row using an inline parent stack with justifyContent="space-between" and inlineSize="100%" containing two child stacks: a block stack (left) with gap 100 for labels, and an inline stack (right) with gap 600 for text and icon. The entire structure is wrapped in a Selectable component for tap interaction with visual highlight.Create complex layouts with nested stacks
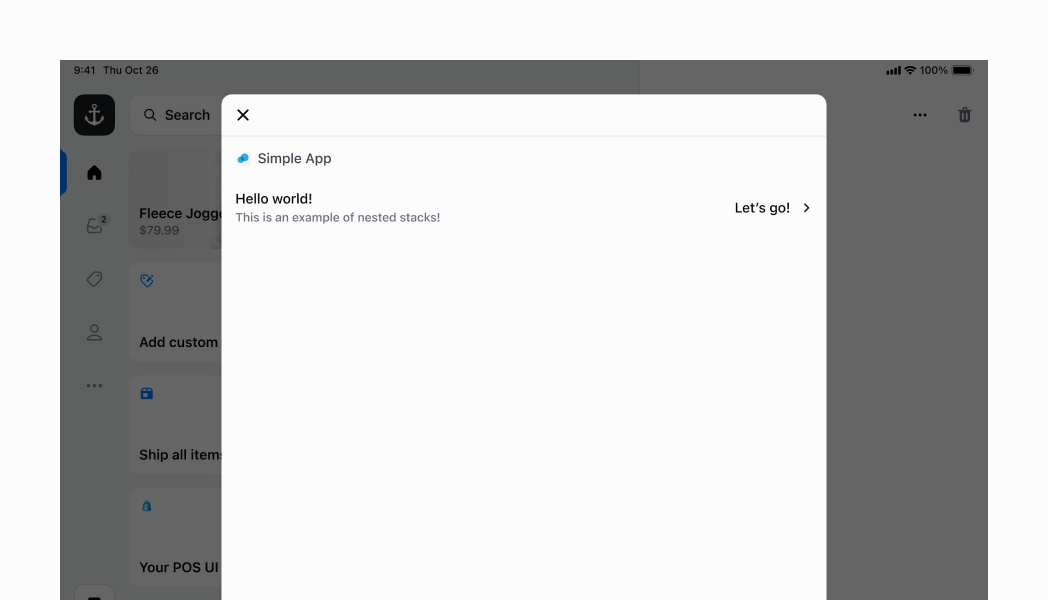
Create complex layouts with nested stacks
React
import {
  reactExtension,
  Text,
  Icon,
  Stack,
  Screen,
  Selectable,
} from '@shopify/ui-extensions-react/point-of-sale';
import React from 'react';

export default reactExtension('pos.home.modal.render', () => (
  <Screen name="Stack" title="Stack">
    <Selectable onPress={() => console.log('Pressed')}>
      <Stack
        direction="inline"
        gap="400"
        justifyContent="space-between"
        alignItems="center"
        alignContent="center"
        paddingInline="450"
        paddingBlock="600"
        inlineSize="100%"
      >
        <Stack direction="block" gap="100">
          <Text>Hello world!</Text>
          <Text variant="captionRegular">
            This is an example of a nested stack!
          </Text>
        </Stack>
        <Stack
          direction="inline"
          gap="600"
          alignItems="center"
          alignContent="center"
        >
          <Text>Let's go!</Text>
          <Icon name="chevron-right" />
        </Stack>
      </Stack>
    </Selectable>
  </Screen>
));
TS
import {
  extension,
  Text,
  Icon,
  Screen,
  Stack,
  Selectable,
} from '@shopify/ui-extensions/point-of-sale';

export default extension('pos.home.modal.render', (root) => {
  const label1 = root.createComponent(Text);
  label1.append('Hello world!');

  const label2 = root.createComponent(Text, {variant: 'captionRegular'});
  label2.append('This is an example of a nested stack!');

  const price = root.createComponent(Text);
  price.append("Let's go!");

  const icon = root.createComponent(Icon, {
    name: 'chevron-right',
  });

  const leftStack = root.createComponent(Stack, {
    direction: 'block',
    gap: '100',
  });
  leftStack.append(label1, label2);

  const rightStack = root.createComponent(Stack, {
    direction: 'inline',
    gap: '600',
    alignItems: 'center',
    alignContent: 'center',
  });
  rightStack.append(price, icon);

  const mainStack = root.createComponent(Stack, {
    direction: 'inline',
    gap: '400',
    justifyContent: 'space-between',
    alignItems: 'center',
    alignContent: 'center',
    paddingInline: '450',
    paddingBlock: '600',
    inlineSize: '100%',
  });
  mainStack.append(leftStack, rightStack);

  const selectable = root.createComponent(Selectable, {
    onPress: () => console.log('Pressed'),
  });
  selectable.append(mainStack);

  const screen = root.createComponent(Screen, {
    name: 'Stack',
    title: 'Stack',
  });
  screen.append(selectable);
  root.append(screen);

  root.mount();
});
Anchor to Expand children to fill available spaceExpand children to fill available space
Make child components expand to fill available space in an inline stack using flexChildren={true}. This stretches the two buttons to occupy maximum space within the inline container, distributing space evenly across children for full-width layouts.Expand children to fill available space
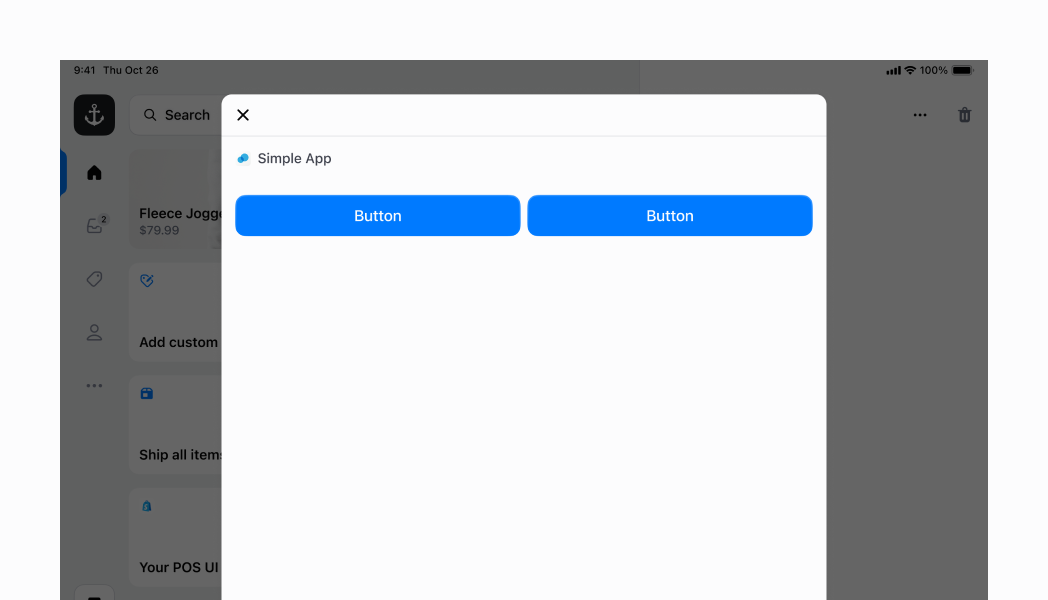
Expand children to fill available space
React
import {
  reactExtension,
  Button,
  Stack,
  Screen,
} from '@shopify/ui-extensions-react/point-of-sale';
import React from 'react';

export default reactExtension('pos.home.modal.render', () => (
  <Screen name="Stack" title="Stack">
    <Stack direction="inline" gap="200" flexChildren>
      <Button title="Hello" />
      <Button title="Hello" />
    </Stack>
  </Screen>
));
TS
import {
  extension,
  Button,
  Screen,
  Stack,
} from '@shopify/ui-extensions/point-of-sale';

export default extension('pos.home.modal.render', (root) => {
  const button1 = root.createComponent(Button, {
    title: 'Hello',
  });

  const button2 = root.createComponent(Button, {
    title: 'Hello',
  });

  const stack = root.createComponent(Stack, {
    direction: 'inline',
    gap: '200',
    flexChildren: true,
  });
  stack.append(button1, button2);

  const screen = root.createComponent(Screen, {
    name: 'Stack',
    title: 'Stack',
  });
  screen.append(stack);
  root.append(screen);

  root.mount();
});
Anchor to Space elements apart verticallySpace elements apart vertically
Distribute children vertically using justifyContent="space-between" with blockSize="50%" for custom height. This example removes the ScrollView wrapper and adds inlinePadding="450" to mimic screen header padding, spreading children across the available height with maximum spacing.Space elements apart vertically
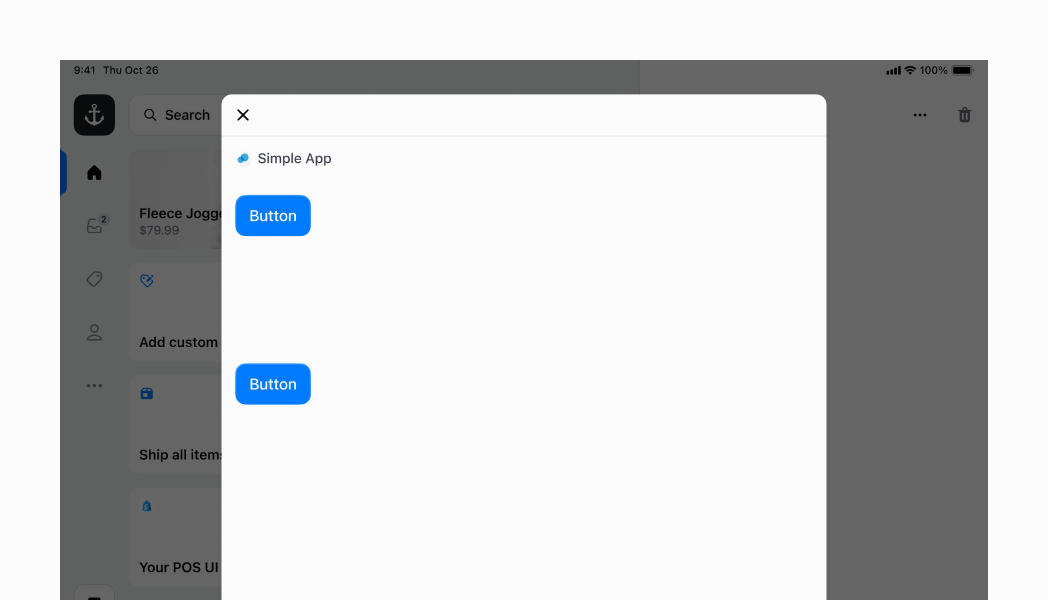
Space elements apart vertically
React
import {
  reactExtension,
  Button,
  Stack,
  Screen,
} from '@shopify/ui-extensions-react/point-of-sale';
import React from 'react';

export default reactExtension('pos.home.modal.render', () => (
  <Screen name="Stack" title="Stack">
    <Stack
      direction="block"
      gap="200"
      justifyContent="space-between"
      blockSize="50%"
      paddingInline="450"
    >
      <Button title="Hello" />
      <Button title="Hello" />
      <Button title="Hello" />
    </Stack>
  </Screen>
));
TS
import {
  extension,
  Button,
  Screen,
  Stack,
} from '@shopify/ui-extensions/point-of-sale';

export default extension('pos.home.modal.render', (root) => {
  const button1 = root.createComponent(Button, {
    title: 'Hello',
  });

  const button2 = root.createComponent(Button, {
    title: 'Hello',
  });

  const button3 = root.createComponent(Button, {
    title: 'Hello',
  });

  const stack = root.createComponent(Stack, {
    direction: 'block',
    gap: '200',
    justifyContent: 'space-between',
    blockSize: '50%',
    paddingInline: '450',
  });
  stack.append(button1, button2, button3);

  const screen = root.createComponent(Screen, {
    name: 'Stack',
    title: 'Stack',
  });
  screen.append(stack);
  root.append(screen);

  root.mount();
});
Anchor to Stretch elements to fill widthStretch elements to fill width
Stretch child elements to fill container width using alignContent="stretch". This makes all children expand horizontally to fill available space regardless of content, ensuring consistent full-width elements in vertical layouts.Stretch elements to fill width
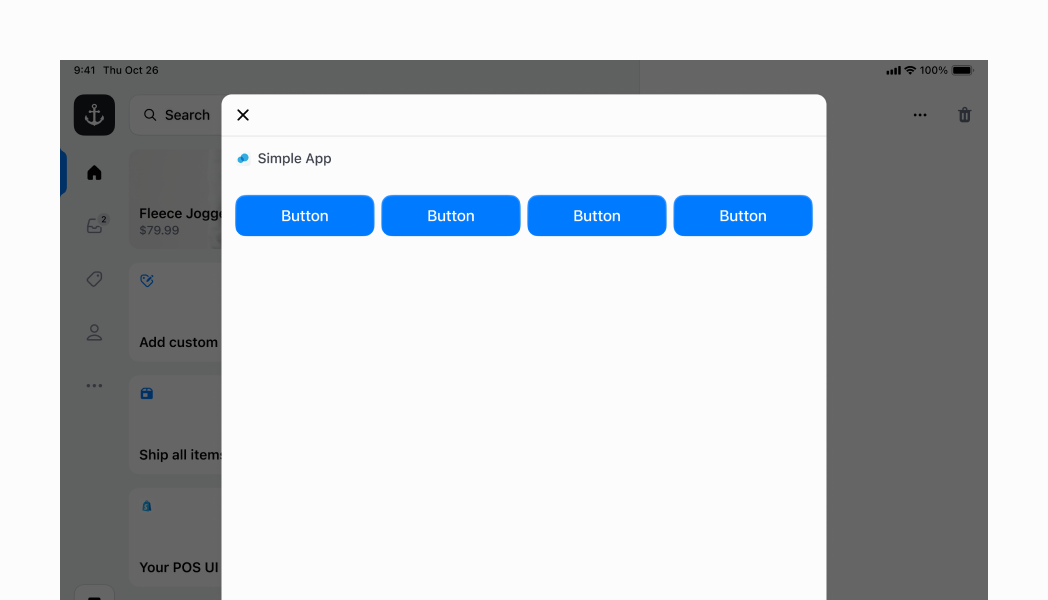
Stretch elements to fill width
React
import {
  reactExtension,
  SegmentedControl,
  Stack,
  Screen,
} from '@shopify/ui-extensions-react/point-of-sale';
import React from 'react';

export default reactExtension('pos.home.modal.render', () => (
  <Screen name="Stack" title="Stack">
    <Stack direction="block" gap="400" alignContent="stretch" padding="400">
      <SegmentedControl
        selected="1"
        segments={[
          {id: '1', label: 'Segment 1', disabled: false},
          {id: '2', label: 'Segment 2', disabled: false},
          {id: '3', label: 'Segment 3', disabled: false},
          {id: '4', label: 'Segment 4', disabled: false},
          {id: '5', label: 'Segment 5', disabled: false},
          {id: '6', label: 'Segment 6', disabled: false},
          {id: '7', label: 'Segment 7', disabled: false},
        ]}
        onSelect={(id) => console.log(`Selected segment with id: ${id}`)}
      />
    </Stack>
  </Screen>
));
TS
import {
  extension,
  SegmentedControl,
  Screen,
  Stack,
} from '@shopify/ui-extensions/point-of-sale';

export default extension('pos.home.modal.render', (root) => {
  const segmentedControl = root.createComponent(SegmentedControl, {
    segments: [
      {id: '1', label: 'Segment 1', disabled: false},
      {id: '2', label: 'Segment 2', disabled: false},
      {id: '3', label: 'Segment 3', disabled: false},
      {id: '4', label: 'Segment 4', disabled: false},
      {id: '5', label: 'Segment 5', disabled: false},
      {id: '6', label: 'Segment 6', disabled: false},
      {id: '7', label: 'Segment 7', disabled: false},
    ],
    selected: '1',
    onSelect: (id: string) => {
      console.log(`Selected segment with id: ${id}`);
    },
  });
  const stack = root.createComponent(Stack);
  stack.append(segmentedControl);
  const screen = root.createComponent(Screen, {
    name: 'Stack',
    title: 'Stack',
  });
  screen.append(stack);
  root.append(screen);

  root.mount();
});
Anchor to Best practicesBest practices
- Apply consistent spacing using the numeric scale: Use the predefined numeric spacing values (for example,
'100','300','500') to maintain consistency across your interface. Start with'300'for standard spacing and adjust up or down based on your content hierarchy needs. - Use alignment properties for professional layouts: Use the
justifyContentproperty to control main axis distribution. UsealignItemsfor cross axis positioning of individual items, andalignContentfor cross axis distribution when there's extra space. - Use gap properties for precise spacing control: Take advantage of the flexible gap system - use
gapfor uniform spacing,rowGapfor block axis control, andcolumnGapfor inline axis control. - Combine with other layout components strategically: Use the Stack component in combination with Box and Section components. Stack handles element arrangement and spacing, while other components provide additional layout capabilities.
Anchor to LimitationsLimitations
Wrapping behavior is determined by direction—inline stacks wrap content while block stacks don't, which may not suit all layout requirements.